Tableset is your AI-powered cooking companion. Whether you need recipe inspiration for tonight, want to master a new cuisine, or organize your family's meals for the week — Tableset helps you discover, cook, plan, and shop with confidence. This guide walks you through everything the app can do.
Meet the Smith Family
Throughout this guide, we'll follow the Smith family as they use Tableset in the kitchen.
In This Guide
1. Getting Started
Signing In
When you first open Tableset, you can Sign in with Apple to create an account, or tap Continue without an account to start using local features (manual recipes, meal planning, grocery list, cooking mode) right away. Subscriptions can be purchased without signing in — signing in becomes useful when you want AI features, household sharing, or to access your subscription on additional devices. Your first name is used as your display name within the app; no email or last name is collected.
Your Free Trial
New users get a 14-day free trial with full access to every feature. After the trial, choose a subscription plan to continue:
- Basic ($12.99/month) — AI meal suggestions, Fill Week, recipe scanning & importing, nutrition analysis, AI-generated meal images, and 2 included shared user slots for household sharing.
- Pro ($17.99/month) — Everything in Basic, plus Recipe Q&A chat, Cooking Mode Q&A, higher daily limits, and 4 included shared user slots.
- Premium ($19.99/month) — Everything in Pro, plus a higher AI suggestion budget, more AI image generations, priority Sue chat, and 4 included shared user slots. Best for heavy use and frequent hosting.
Navigating the App
Tableset has five main areas, accessible from the tab bar at the bottom of the screen:
- Suggest — A fresh personalized pick each morning, plus a wizard to build your own
- Recipes — Your personal recipe collection — add, scan, import, and organize
- Sue (center button) — Your AI cooking assistant, always ready to help
- Plan — Organize your week with a visual meal calendar
- Grocery — Auto-generated shopping list from your planned meals

2. Discovering New Recipes
The Suggest tab has two ways to find your next meal: a personalized daily pick that's ready when you open the app, and a customization wizard for when you want full control.
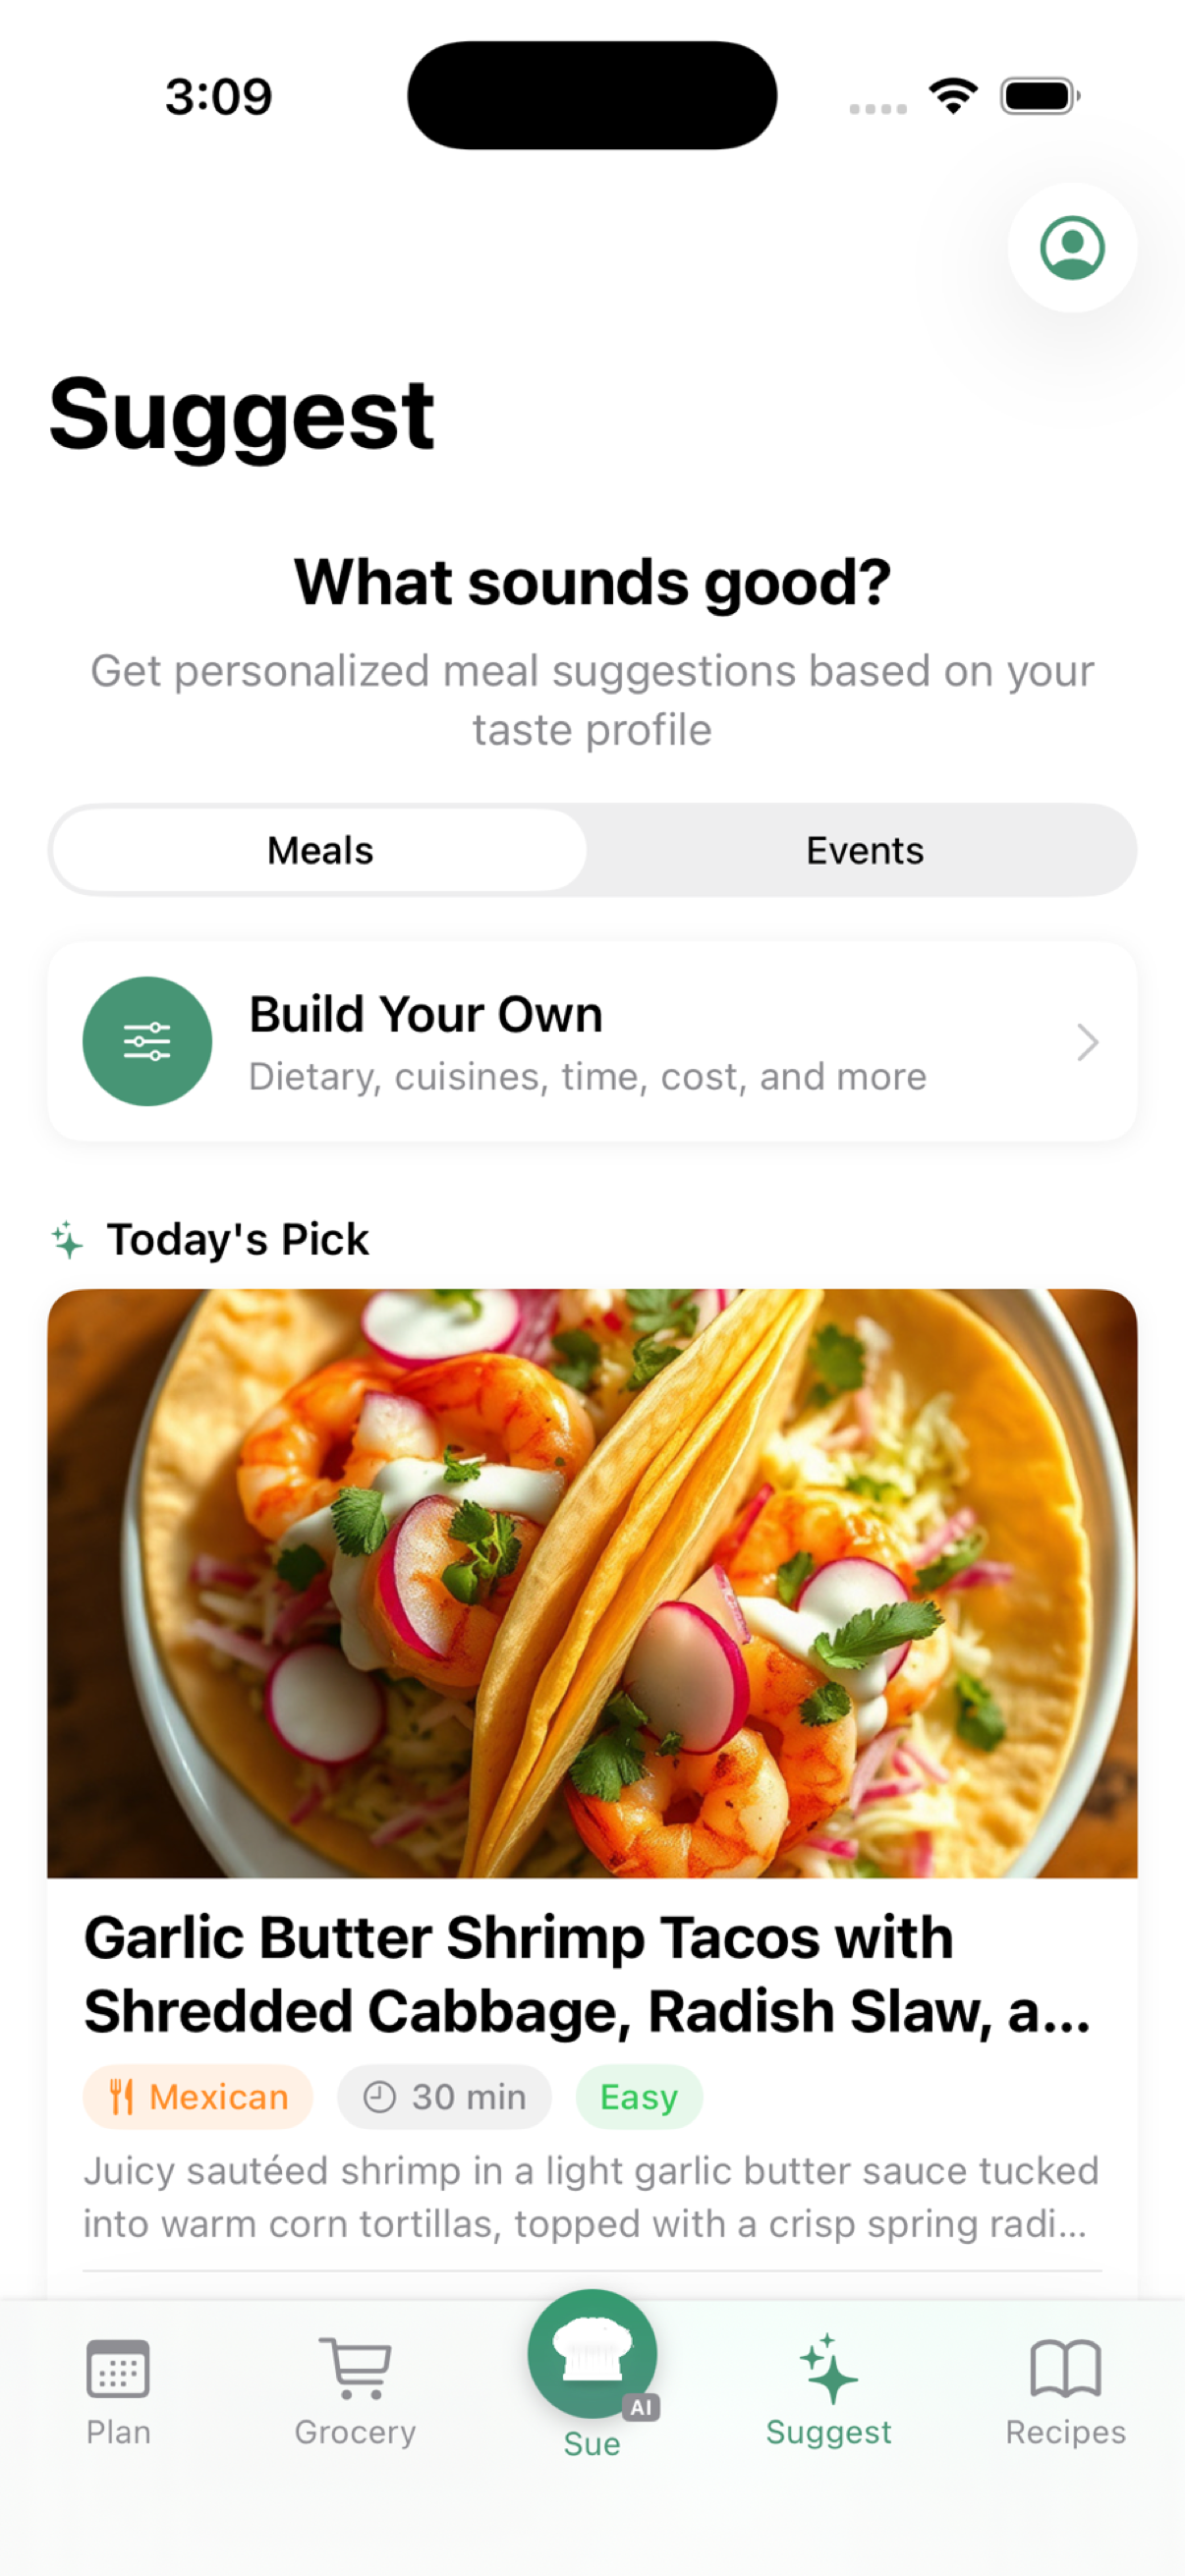
Today's Pick
Every morning Tableset generates one personalized recipe based on your taste profile, dietary needs, household, and recent cooking history. The image, ingredients, and steps are all ready to go — no input needed from you.
- Save — Adds it to your recipe library
- Skip — Opens an optional feedback sheet ("why pass on this one?") that trains Sue for tomorrow's pick
- Changed your mind? If you skipped and later want it after all, tap Save Instead any time before midnight
Build Your Own
Tap the Build Your Own card to open the customization wizard. Walk through a few quick steps:
- Who's eating — Pick household members so dietary needs auto-apply
- Event — Describe the occasion or pick a preset (Dinner Party, Brunch, Game Day, Date Night, Holiday, BBQ, Kids Party, Potluck, …)
- Restrictions — Dietary, allergies, ingredients to avoid (all support free-text additions on top of the presets)
- Style & preferences — Cuisines, ingredients on hand, custom preferences like "comfort food" or "kid-friendly"
- Time & budget — How long you have, cost target, difficulty
- Review & generate — Confirm the picture and tap Generate
The wizard returns three meal suggestions tailored to everything you picked.
Working with Suggestions
Each suggestion card shows the meal name, cuisine, cooking time, and difficulty. You can:
- Save — Add it to your recipe library
- Skip — Tell Sue you're not interested (helps future suggestions)
- Start Cooking — Jump straight into Cooking Mode
- Get More — Load three additional ideas with the same filters
3. Your Recipe Library
The Recipes tab is your personal cookbook. All recipes you create, scan, import, or accept from suggestions live here.

Adding Recipes
Tap the + button to add recipes in several ways:
Type It In
Create a recipe from scratch. Enter the name, ingredients, steps, cuisine type, difficulty, and cooking time.
Scan a Recipe
Have a recipe in a cookbook or on a card? Take a photo (or multiple photos) and AI will read the text and extract the ingredients and steps automatically. You can review and edit before saving.
Import from a Link
Found a recipe online? Copy the URL and paste it into Tableset. AI extracts the recipe from the webpage — no more scrolling past life stories to find the ingredients.
Import from Social Media
Saw a recipe on Instagram, TikTok, YouTube, Pinterest, or X (Twitter)? Paste the link — or share directly from any of these apps using the Share menu — and Tableset will pull the recipe from the post's caption or description. Works with reels, video posts, and pinned blog posts.
- Supported platforms: Instagram, TikTok, YouTube, Pinterest, X (Twitter)
Paste Recipe Text
Have a recipe as plain text from a chat, email, or notes app? Tap Paste Recipe Text and Tableset will parse the text into a structured recipe with ingredients and steps.
Import from Video
Screen-recorded a cooking reel or short video tutorial? Tableset extracts frames from the video and reads the recipe from the on-screen text and visuals.
Recipe Details
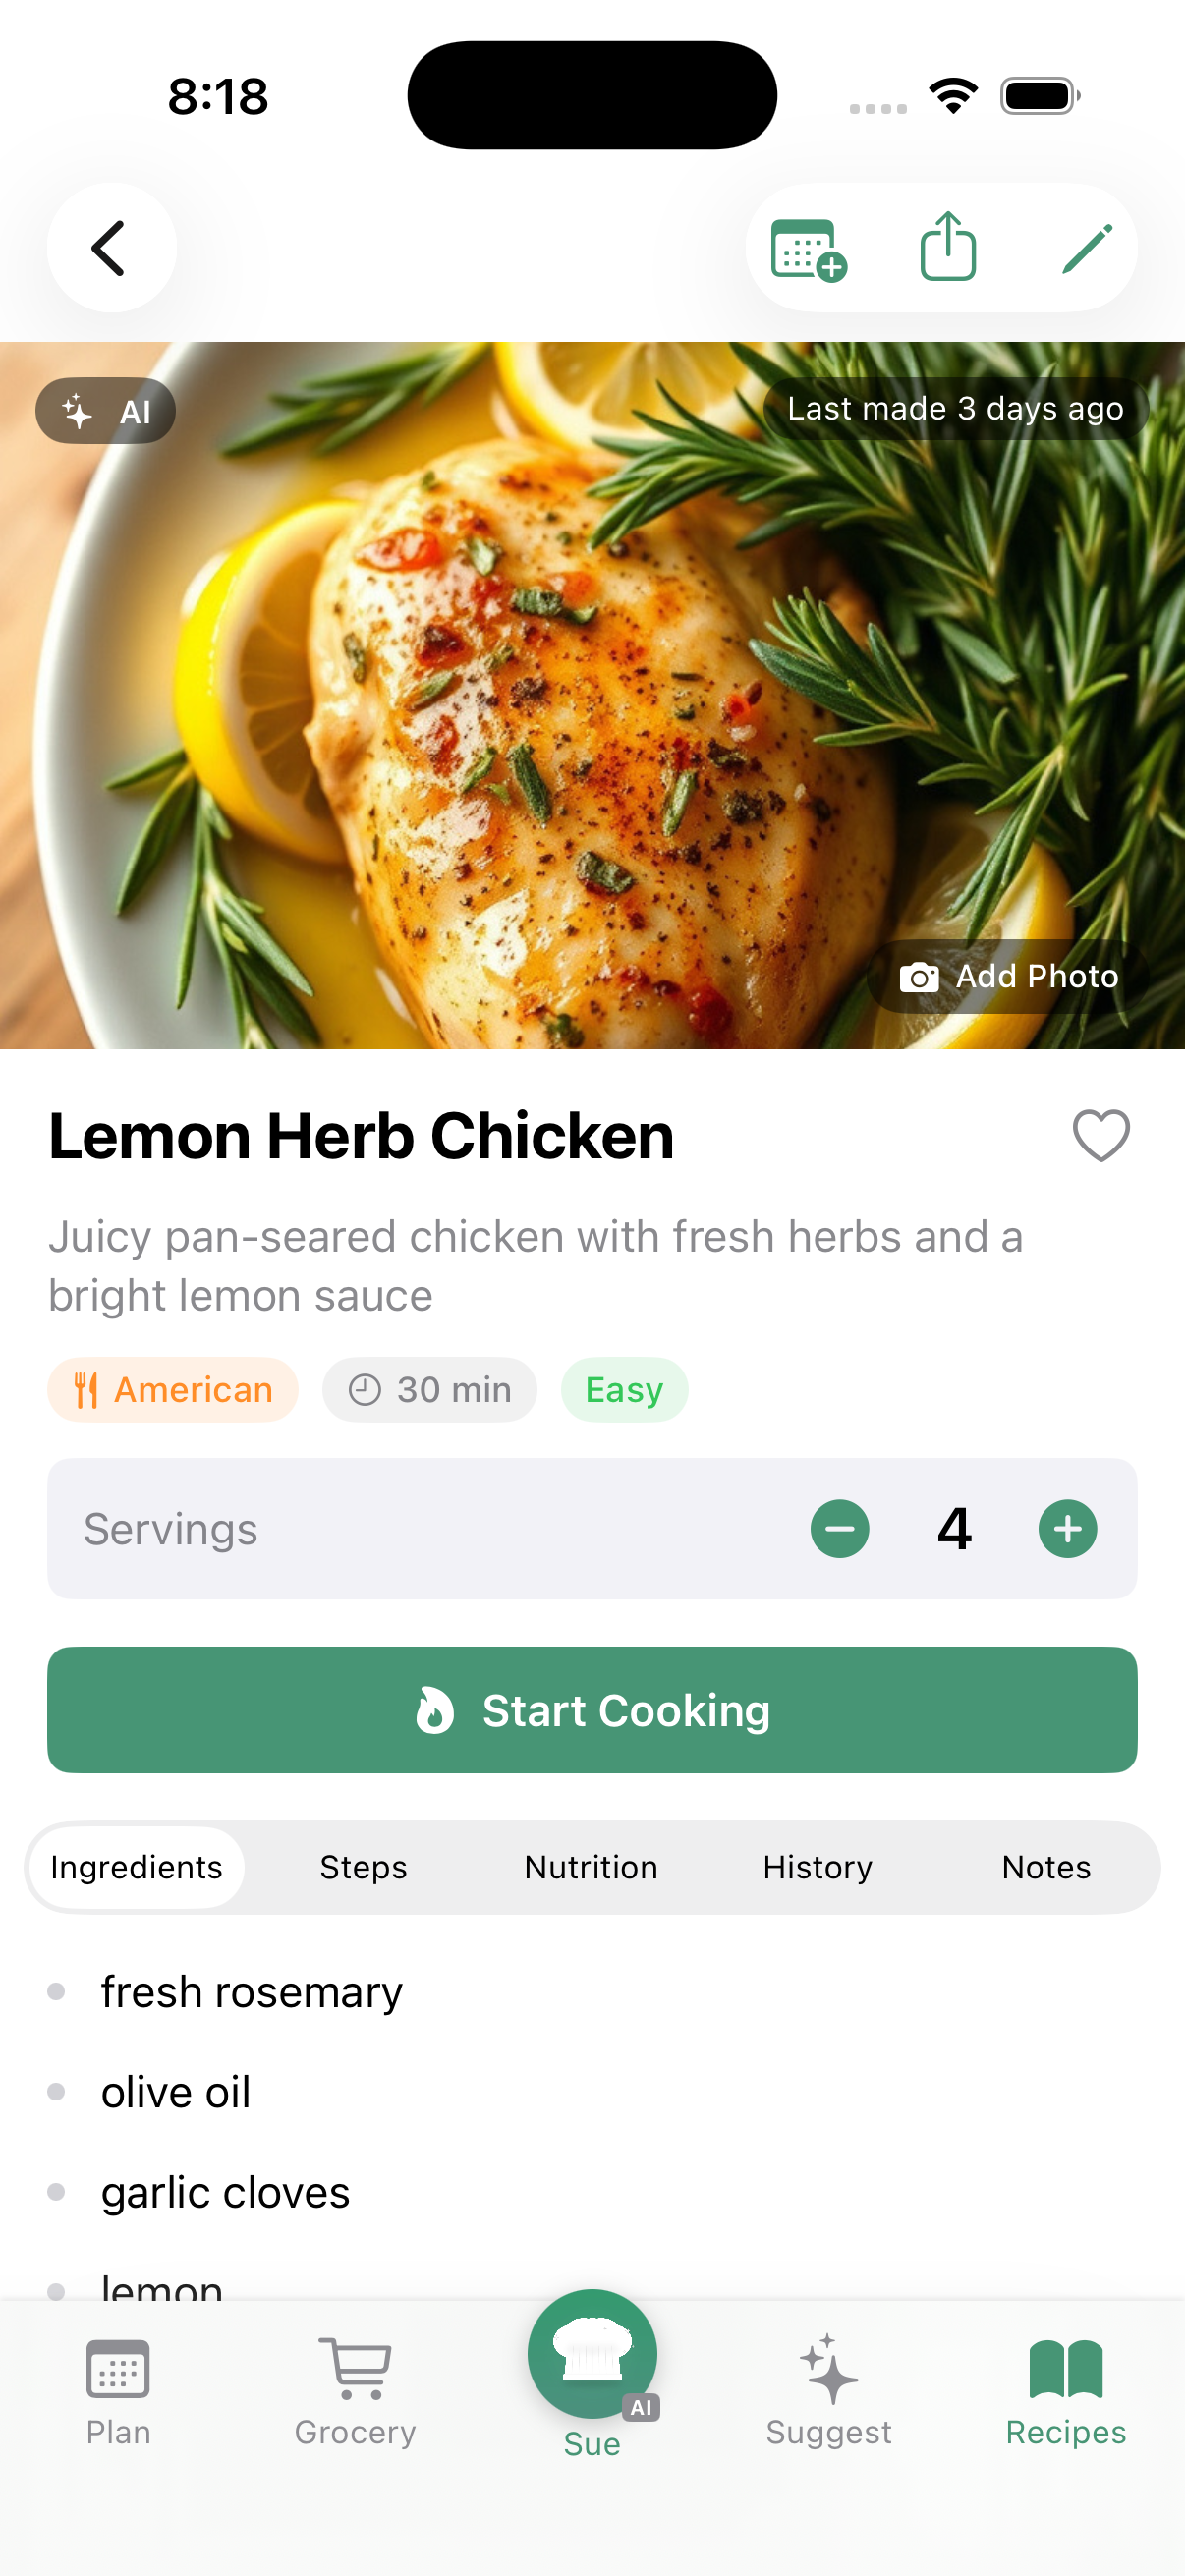
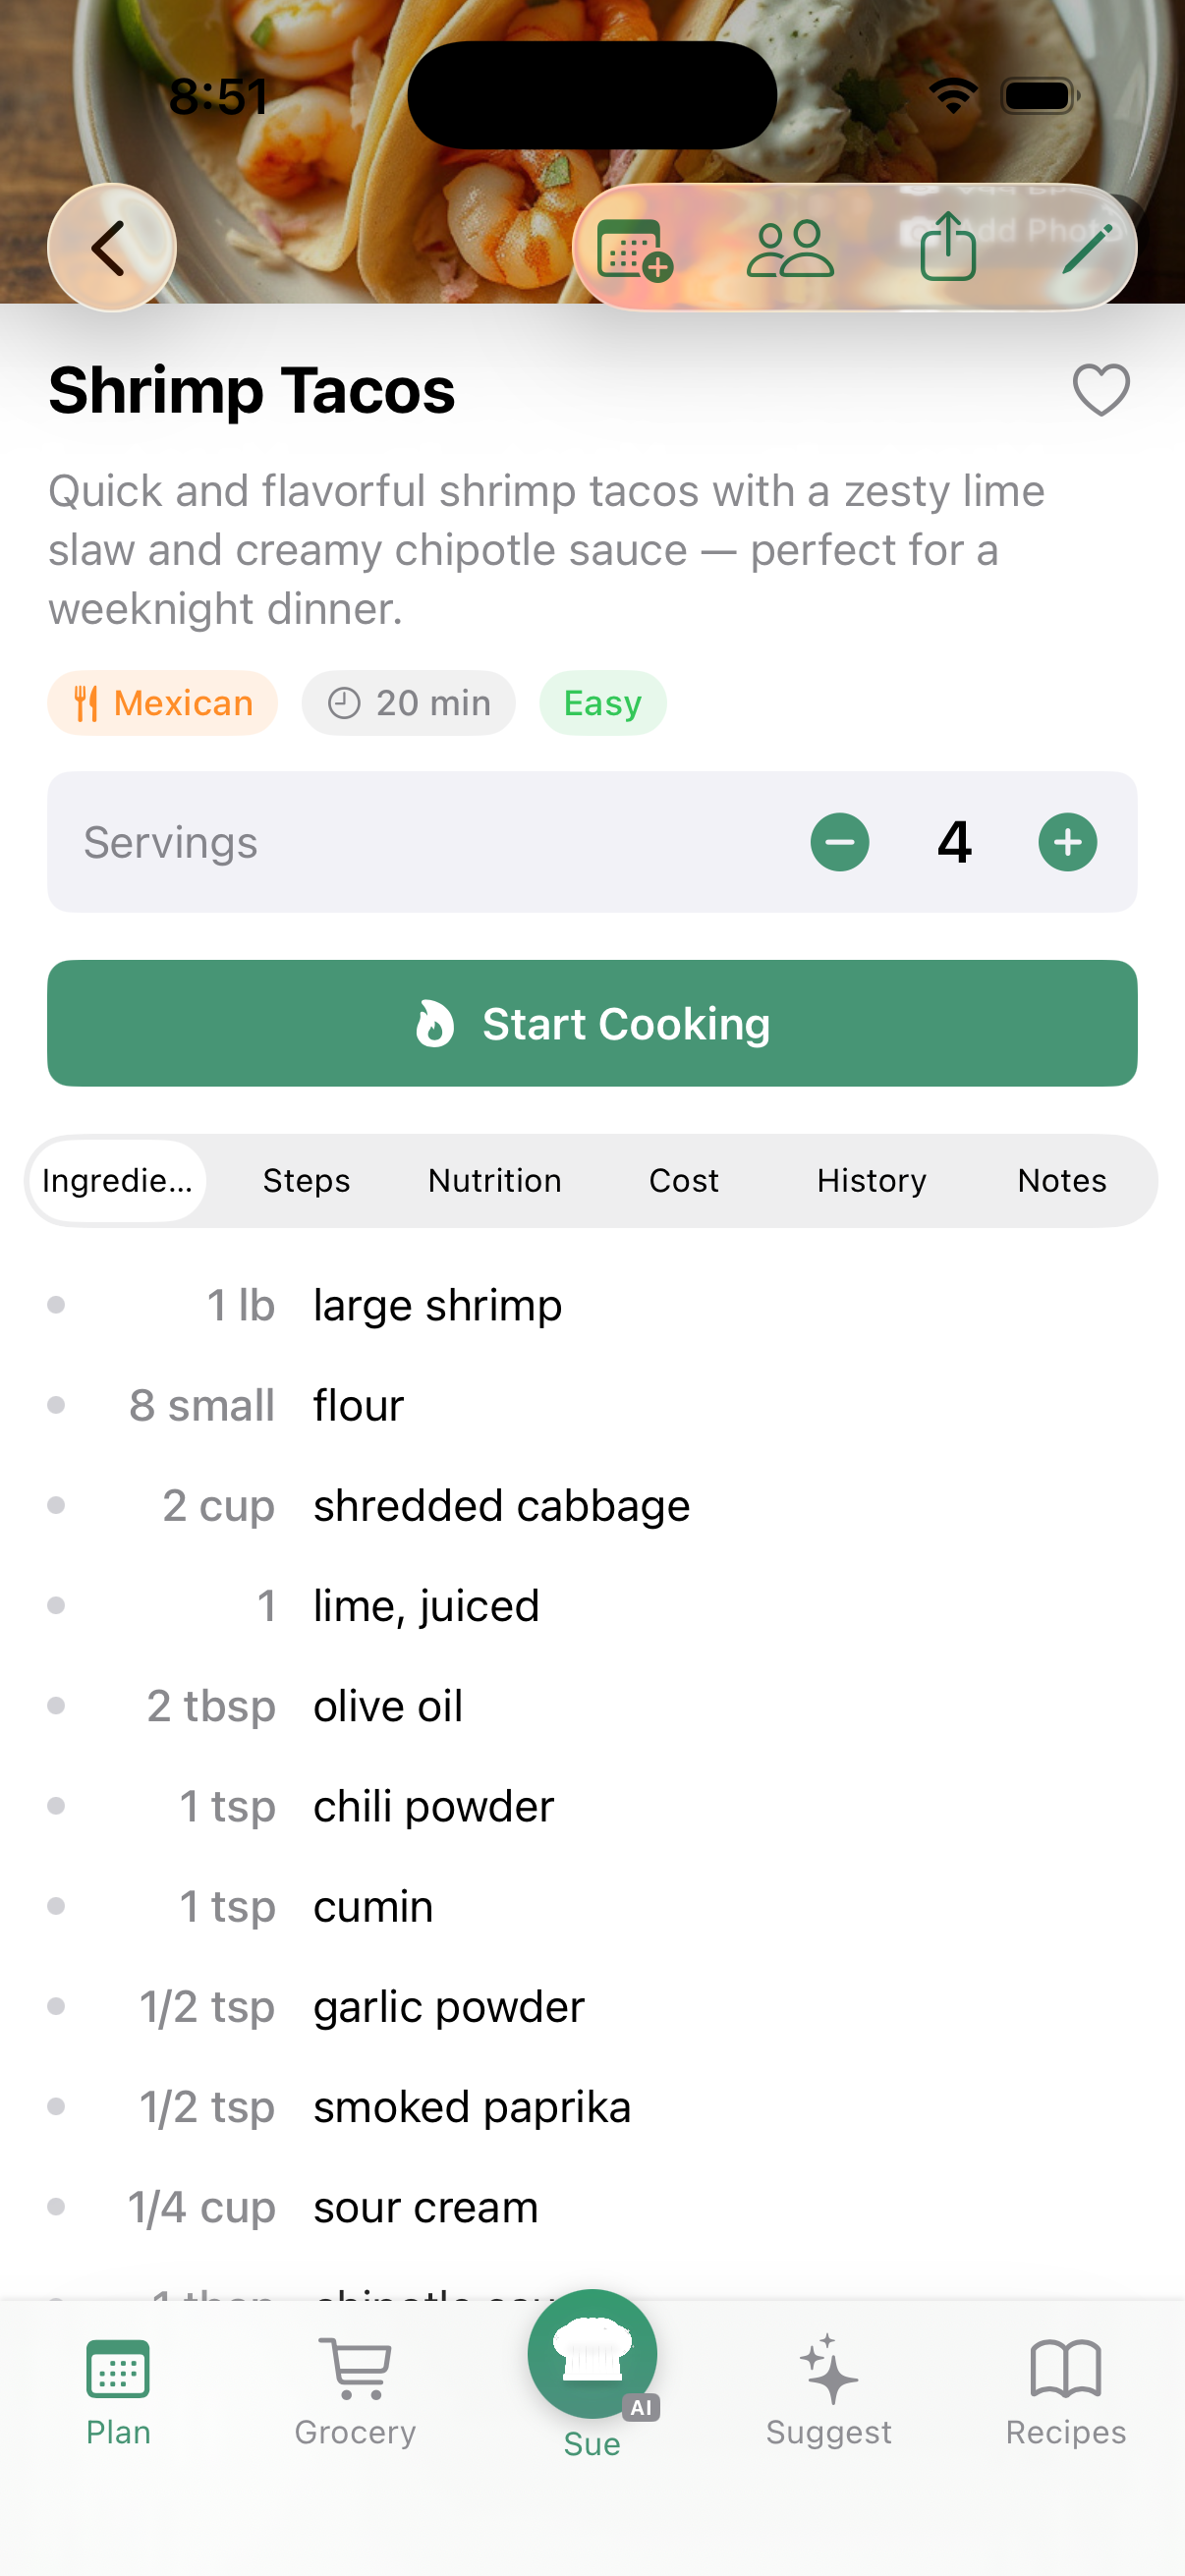
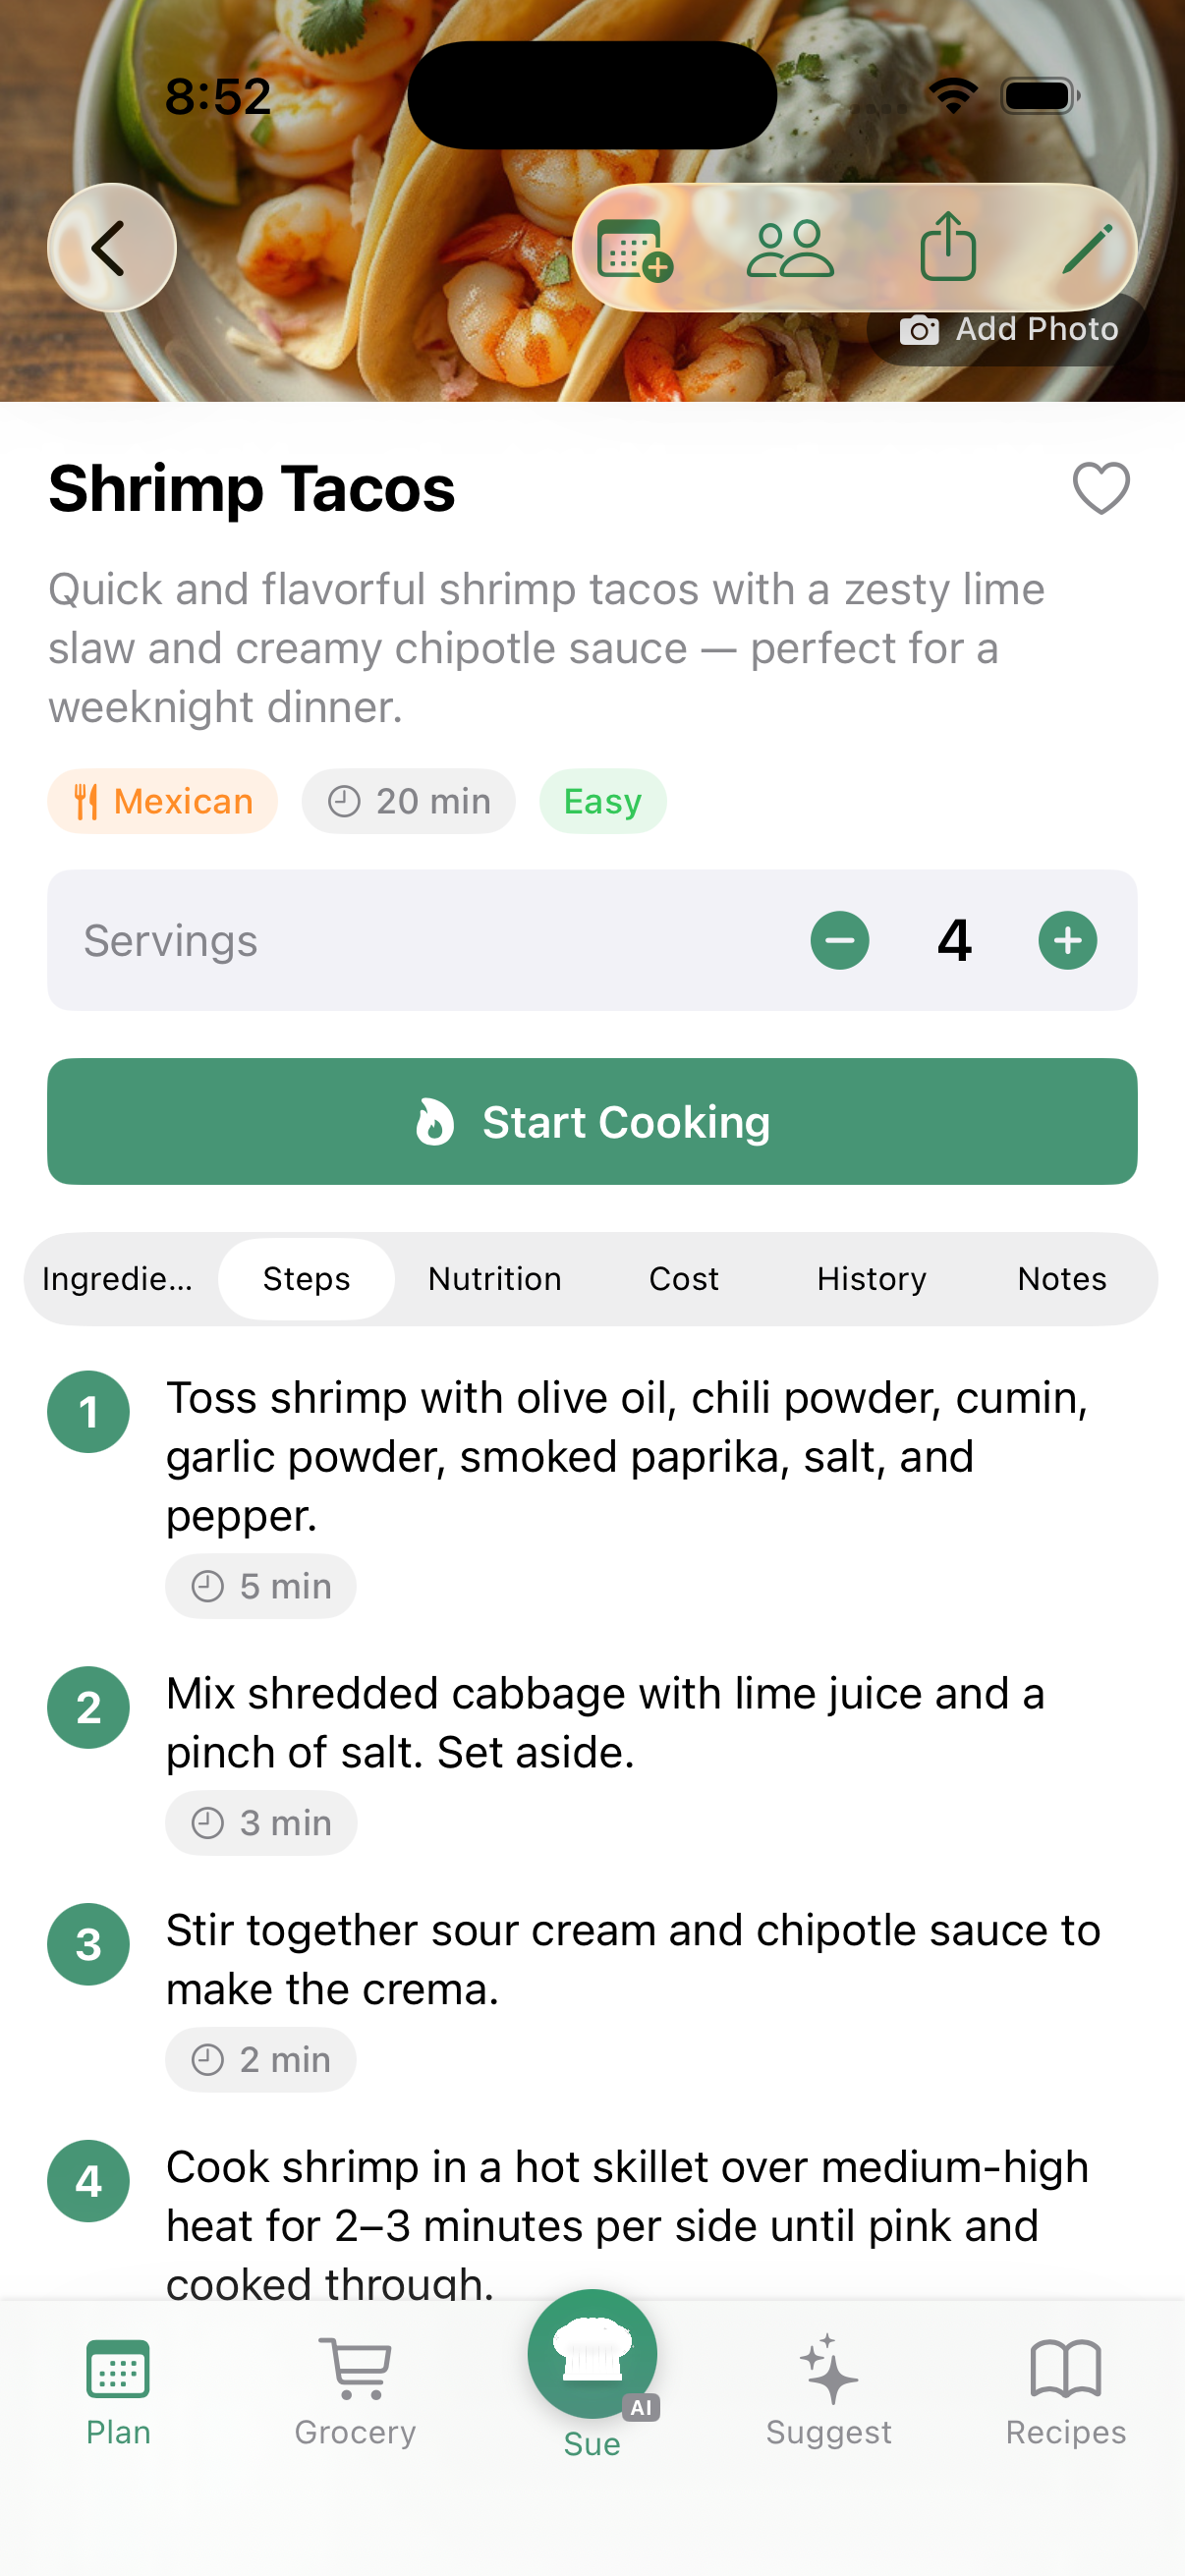
Tap any recipe to see the full details:
- Overview — Ingredients (with serving adjustments), step-by-step instructions, quick-add to plan
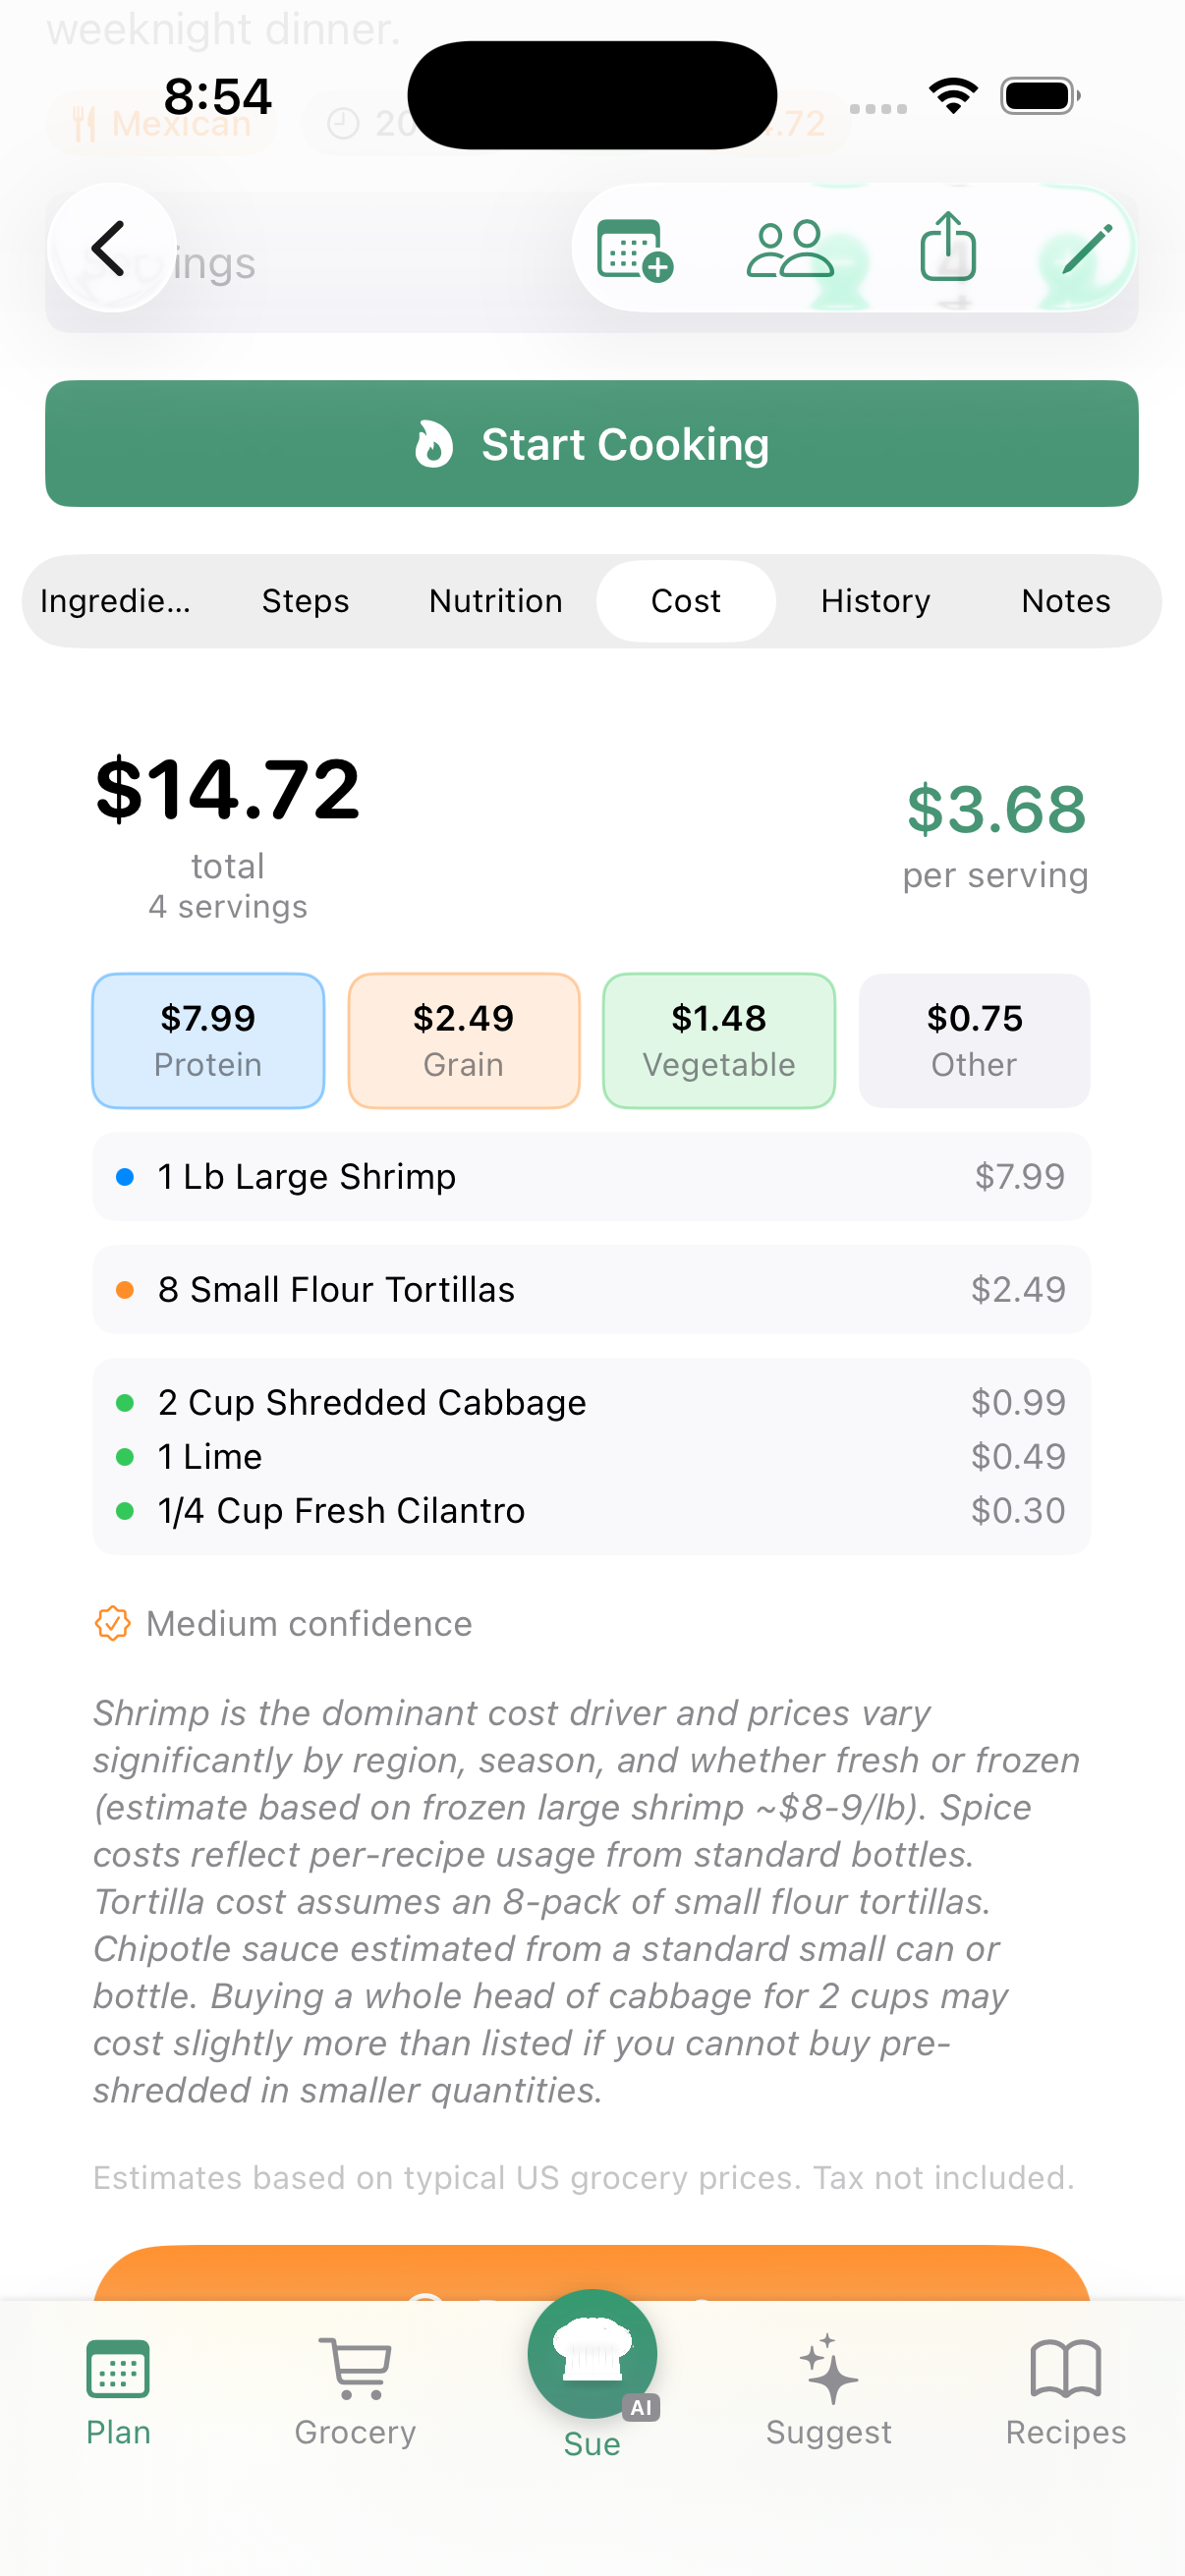
- Nutrition — AI-estimated calories, macros, and cost per serving
- History — Past ratings, who cooked it, and feedback
Each recipe has multiple tabs to explore:
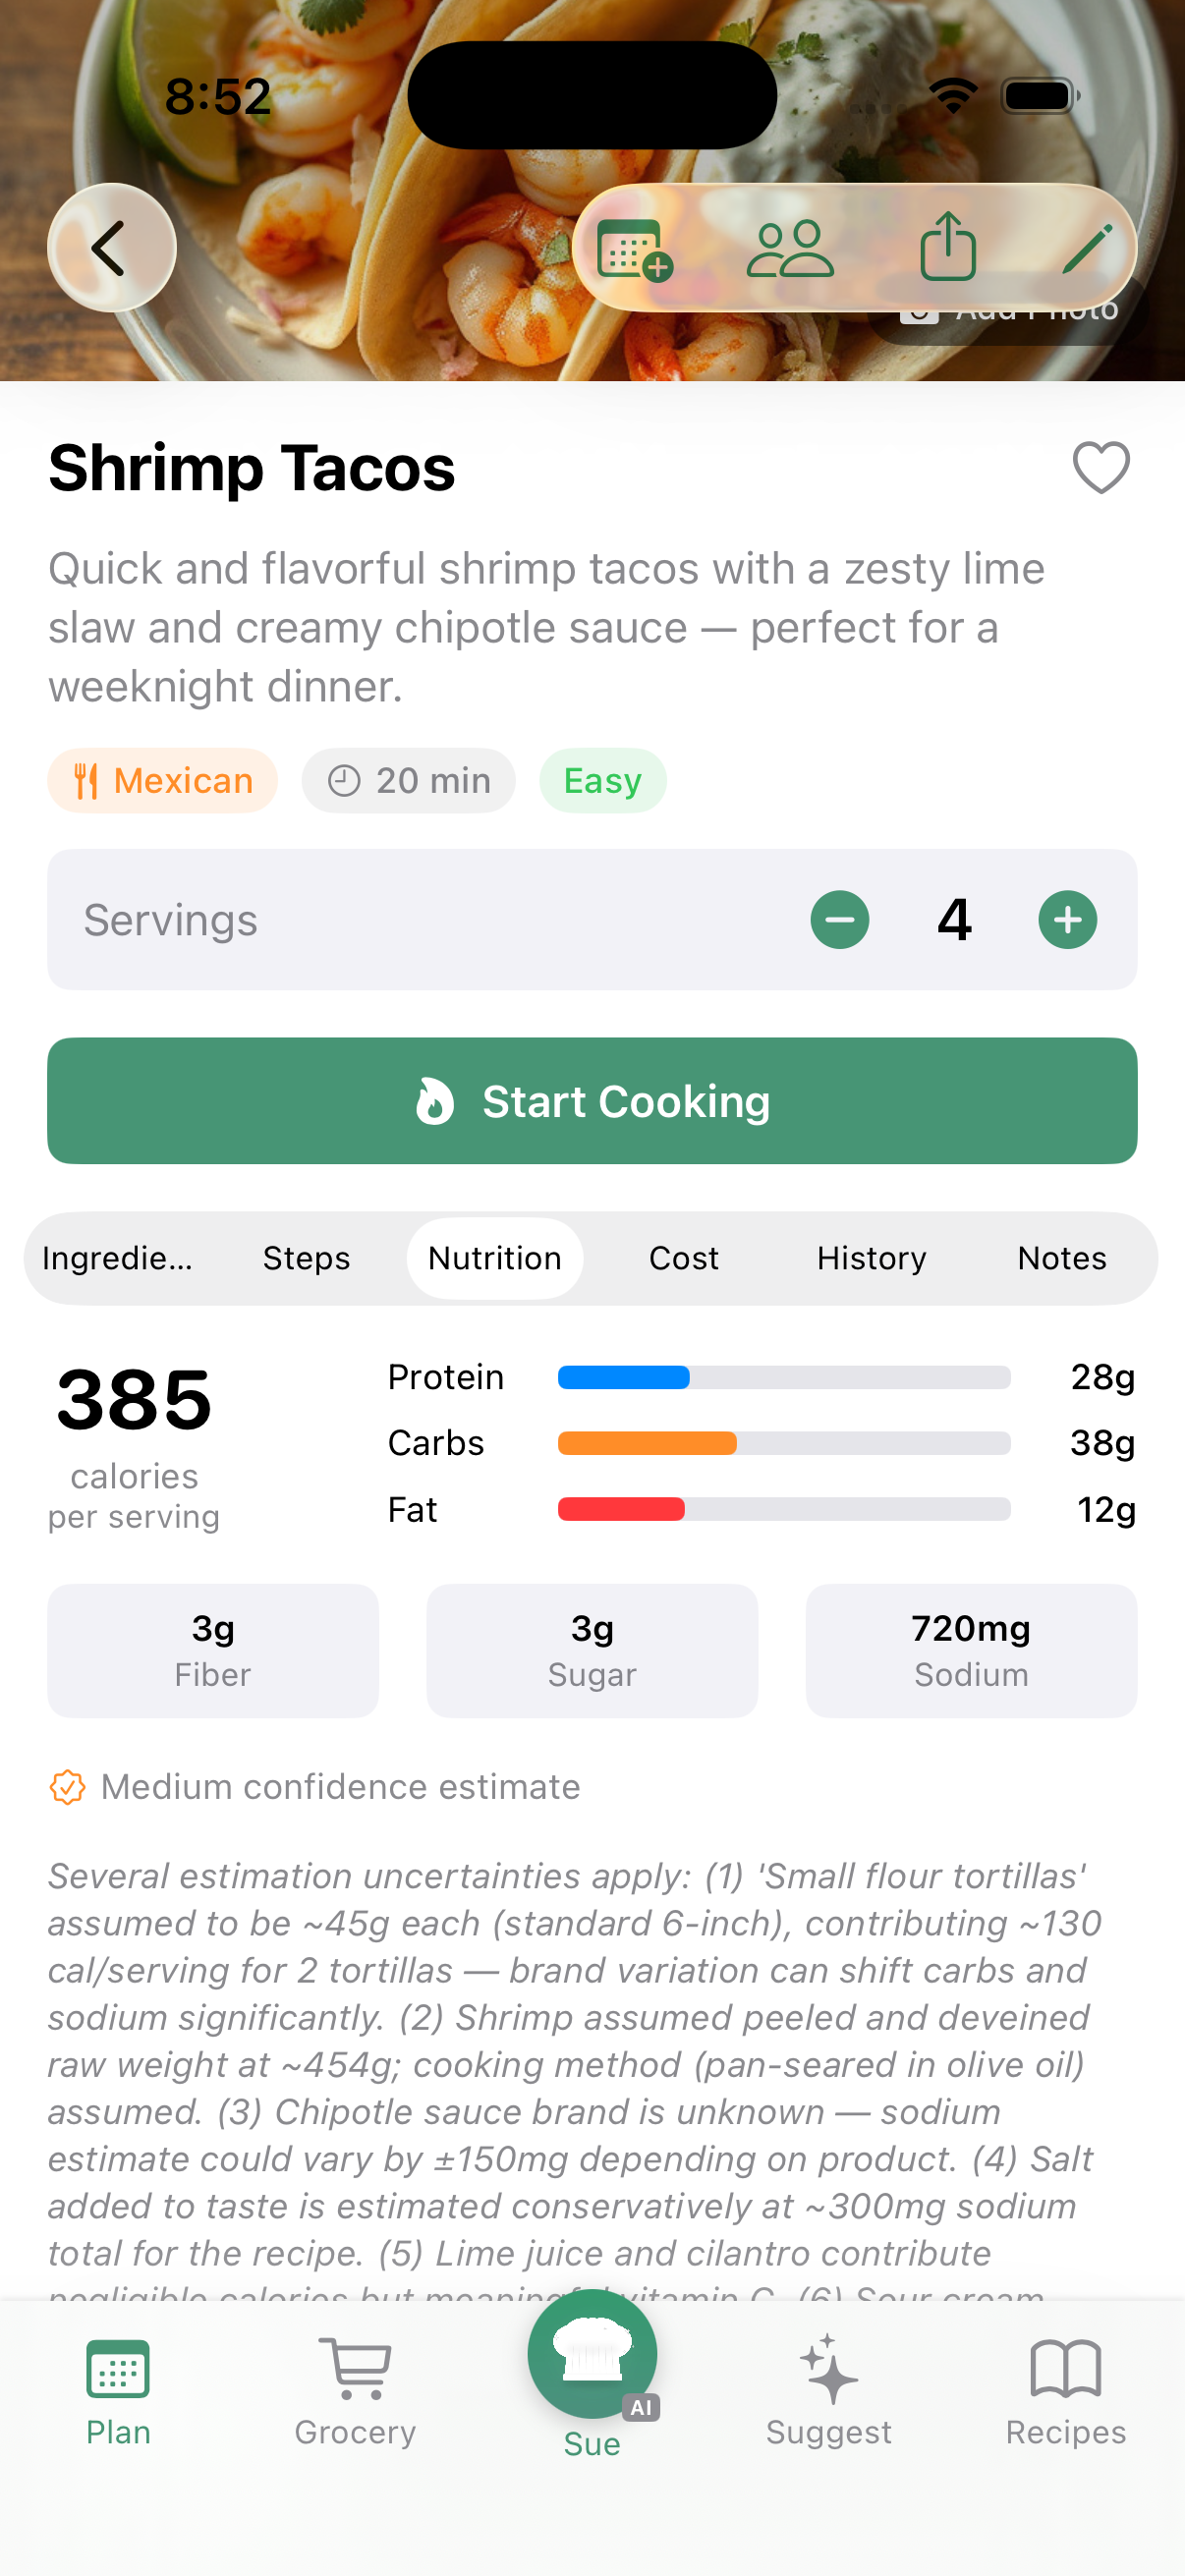
The History tab shows past ratings grouped by date — who cooked it, average stars, and feedback. The Notes tab is your personal space for tips, tweaks, and reminders about the recipe.
Adjusting Servings
Need to cook for more (or fewer) people? Use the serving adjuster to scale the recipe up or down. Ingredient quantities update automatically with smart fraction formatting.
4. Cooking with Tableset
When you're ready to cook, tap Start Cooking on any recipe. This opens Cooking Mode — a distraction-free, step-by-step view designed for the kitchen.
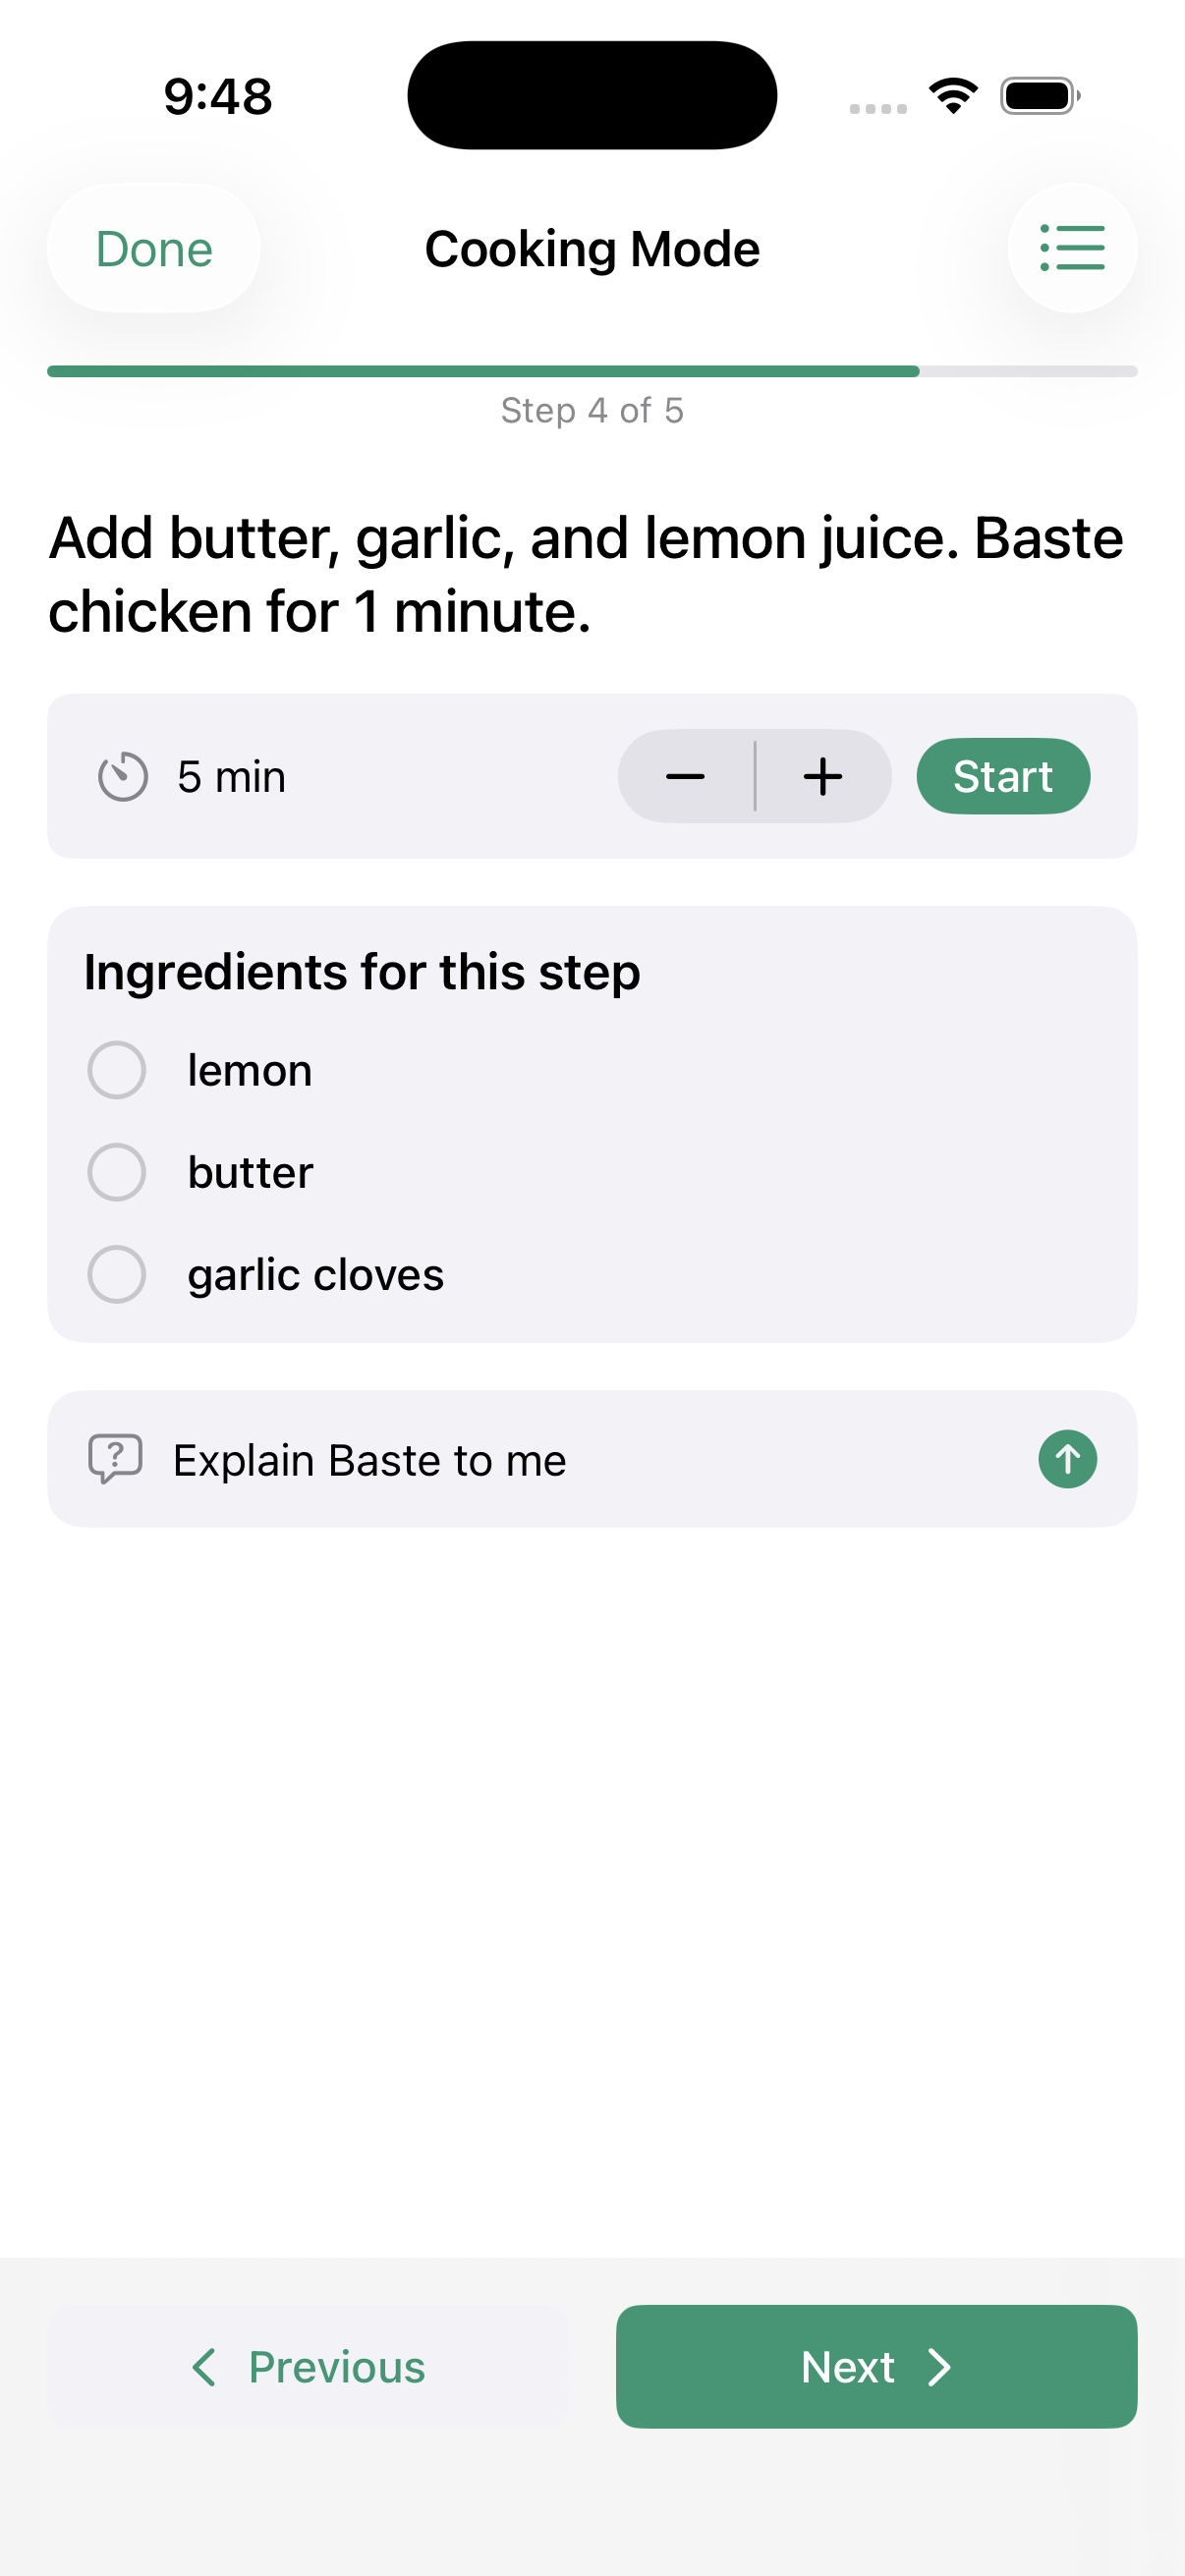
Step-by-Step Guidance
Each step is displayed in large, easy-to-read text. Swipe or tap the arrows to move between steps. A progress bar at the top shows how far along you are.
Timers
When a step involves timing (simmering, baking, resting), tap the timer button to start a countdown. You'll get a haptic buzz when time's up. Multiple timers can run simultaneously for different steps.
Ingredient Checklist
Toggle the ingredient view to see what you need for the current step. Tap ingredients as you prep them to check them off.
Tools & Equipment
Each step also shows what tools you'll need — mixing bowl, baking sheet, whisk, saucepan, etc. — so you can gather everything before you start. Tools are generated automatically when the recipe is created by AI.
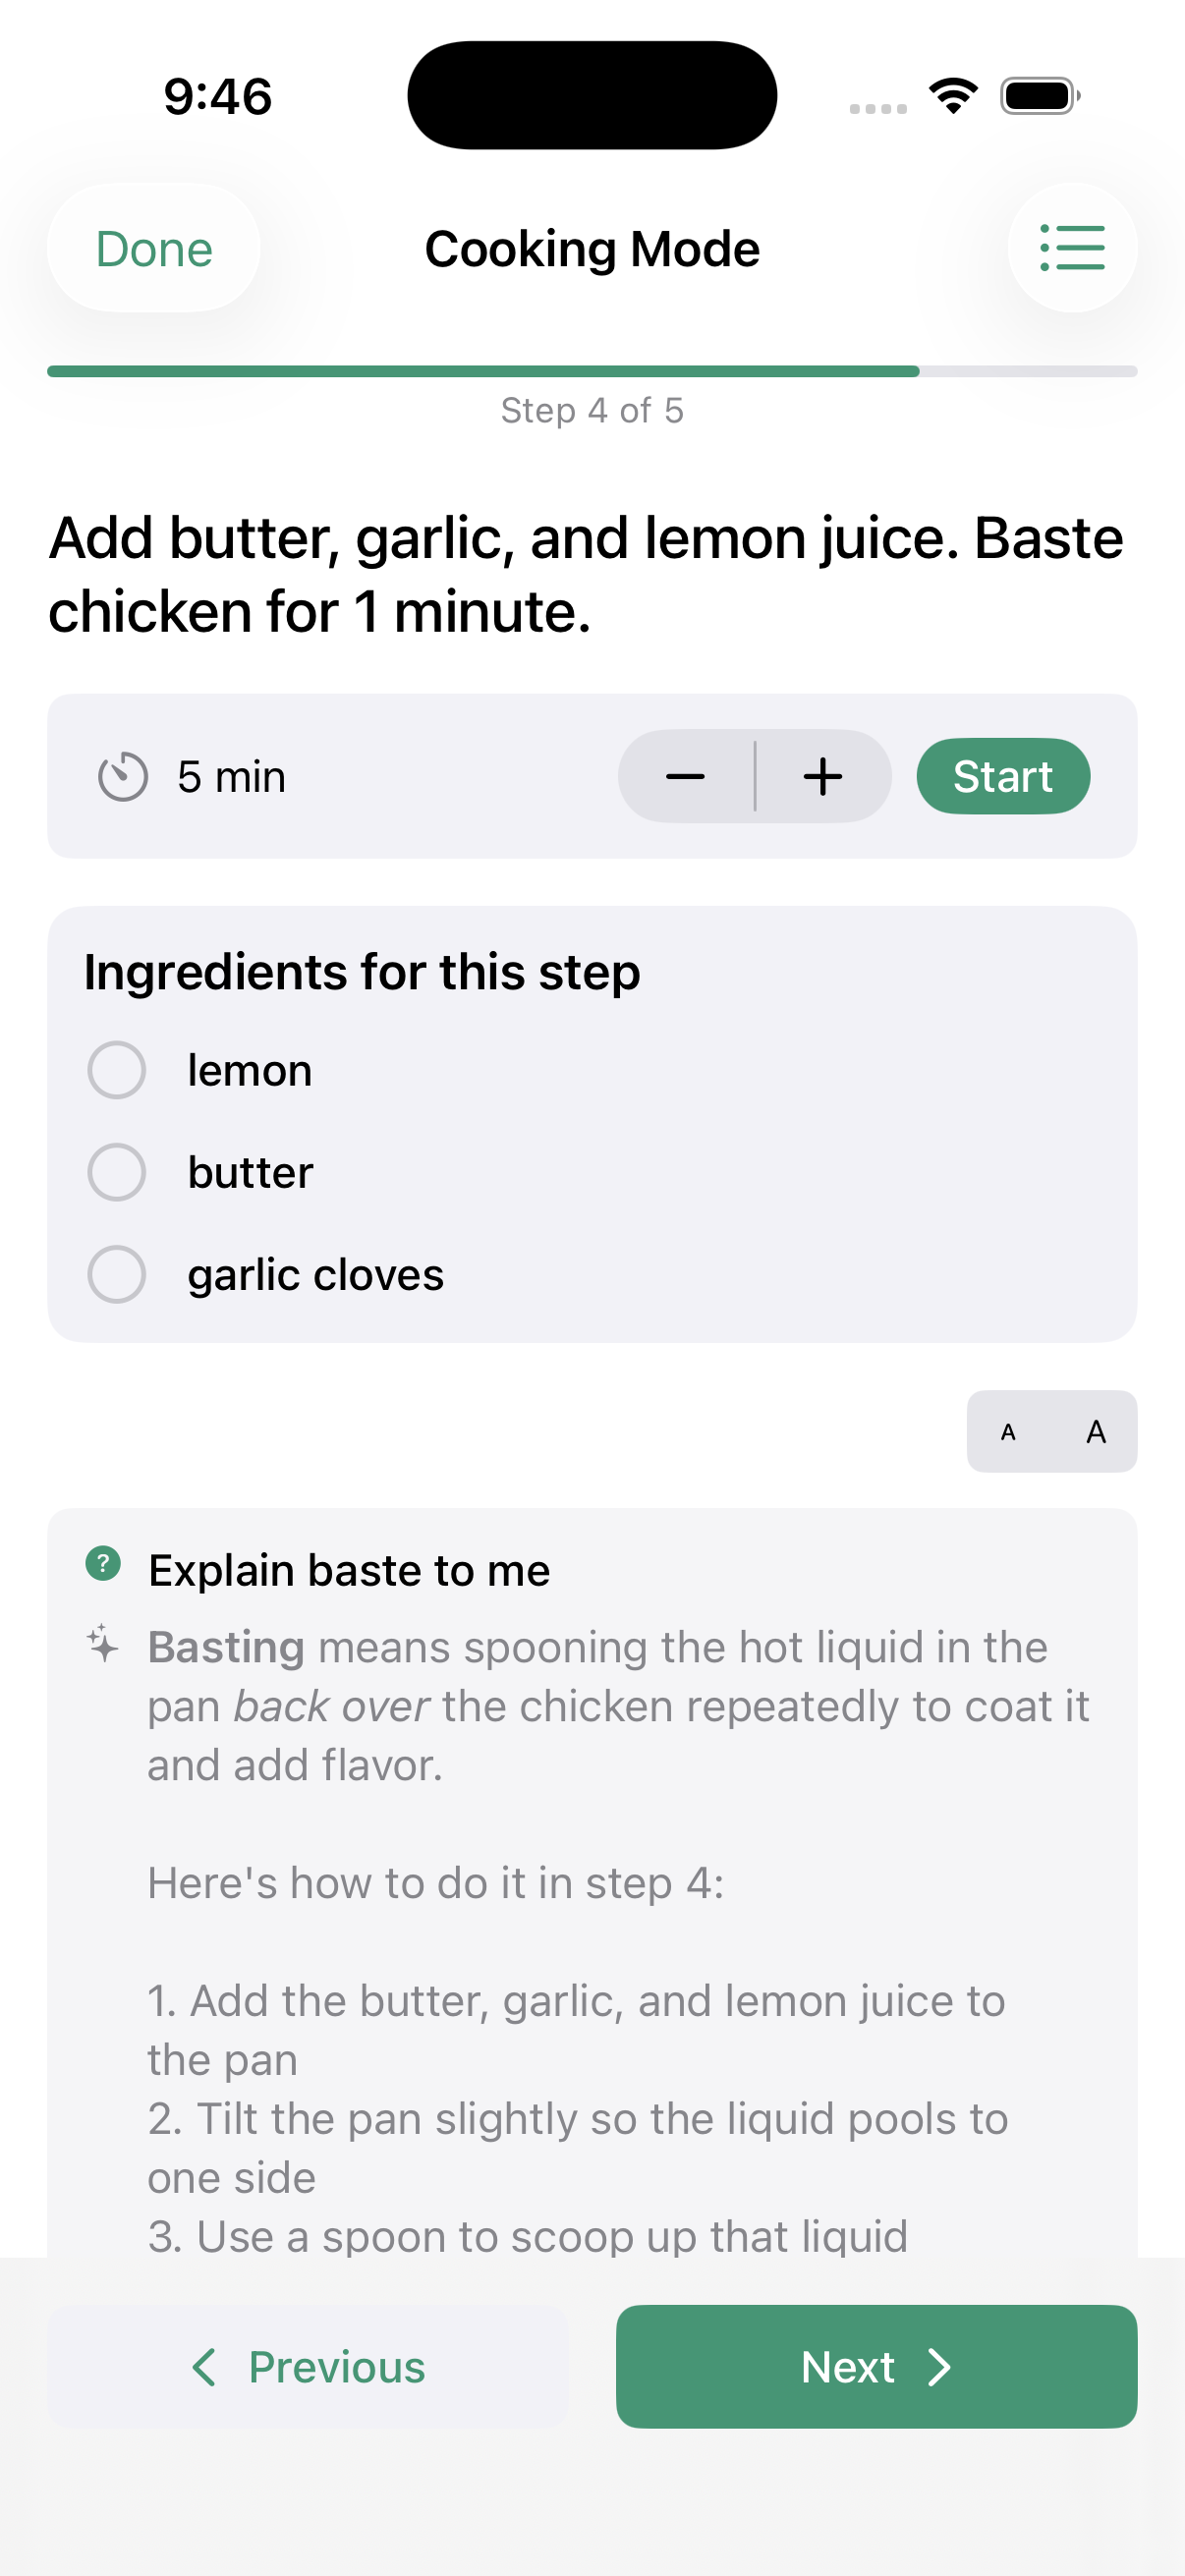
Ask Questions While Cooking (Pro)
With a Pro subscription, you can ask questions during cooking: "What does 'deglaze' mean?", "How do I know when the onions are caramelized?", "Can I substitute butter for oil?" The AI answers in the context of your specific recipe.
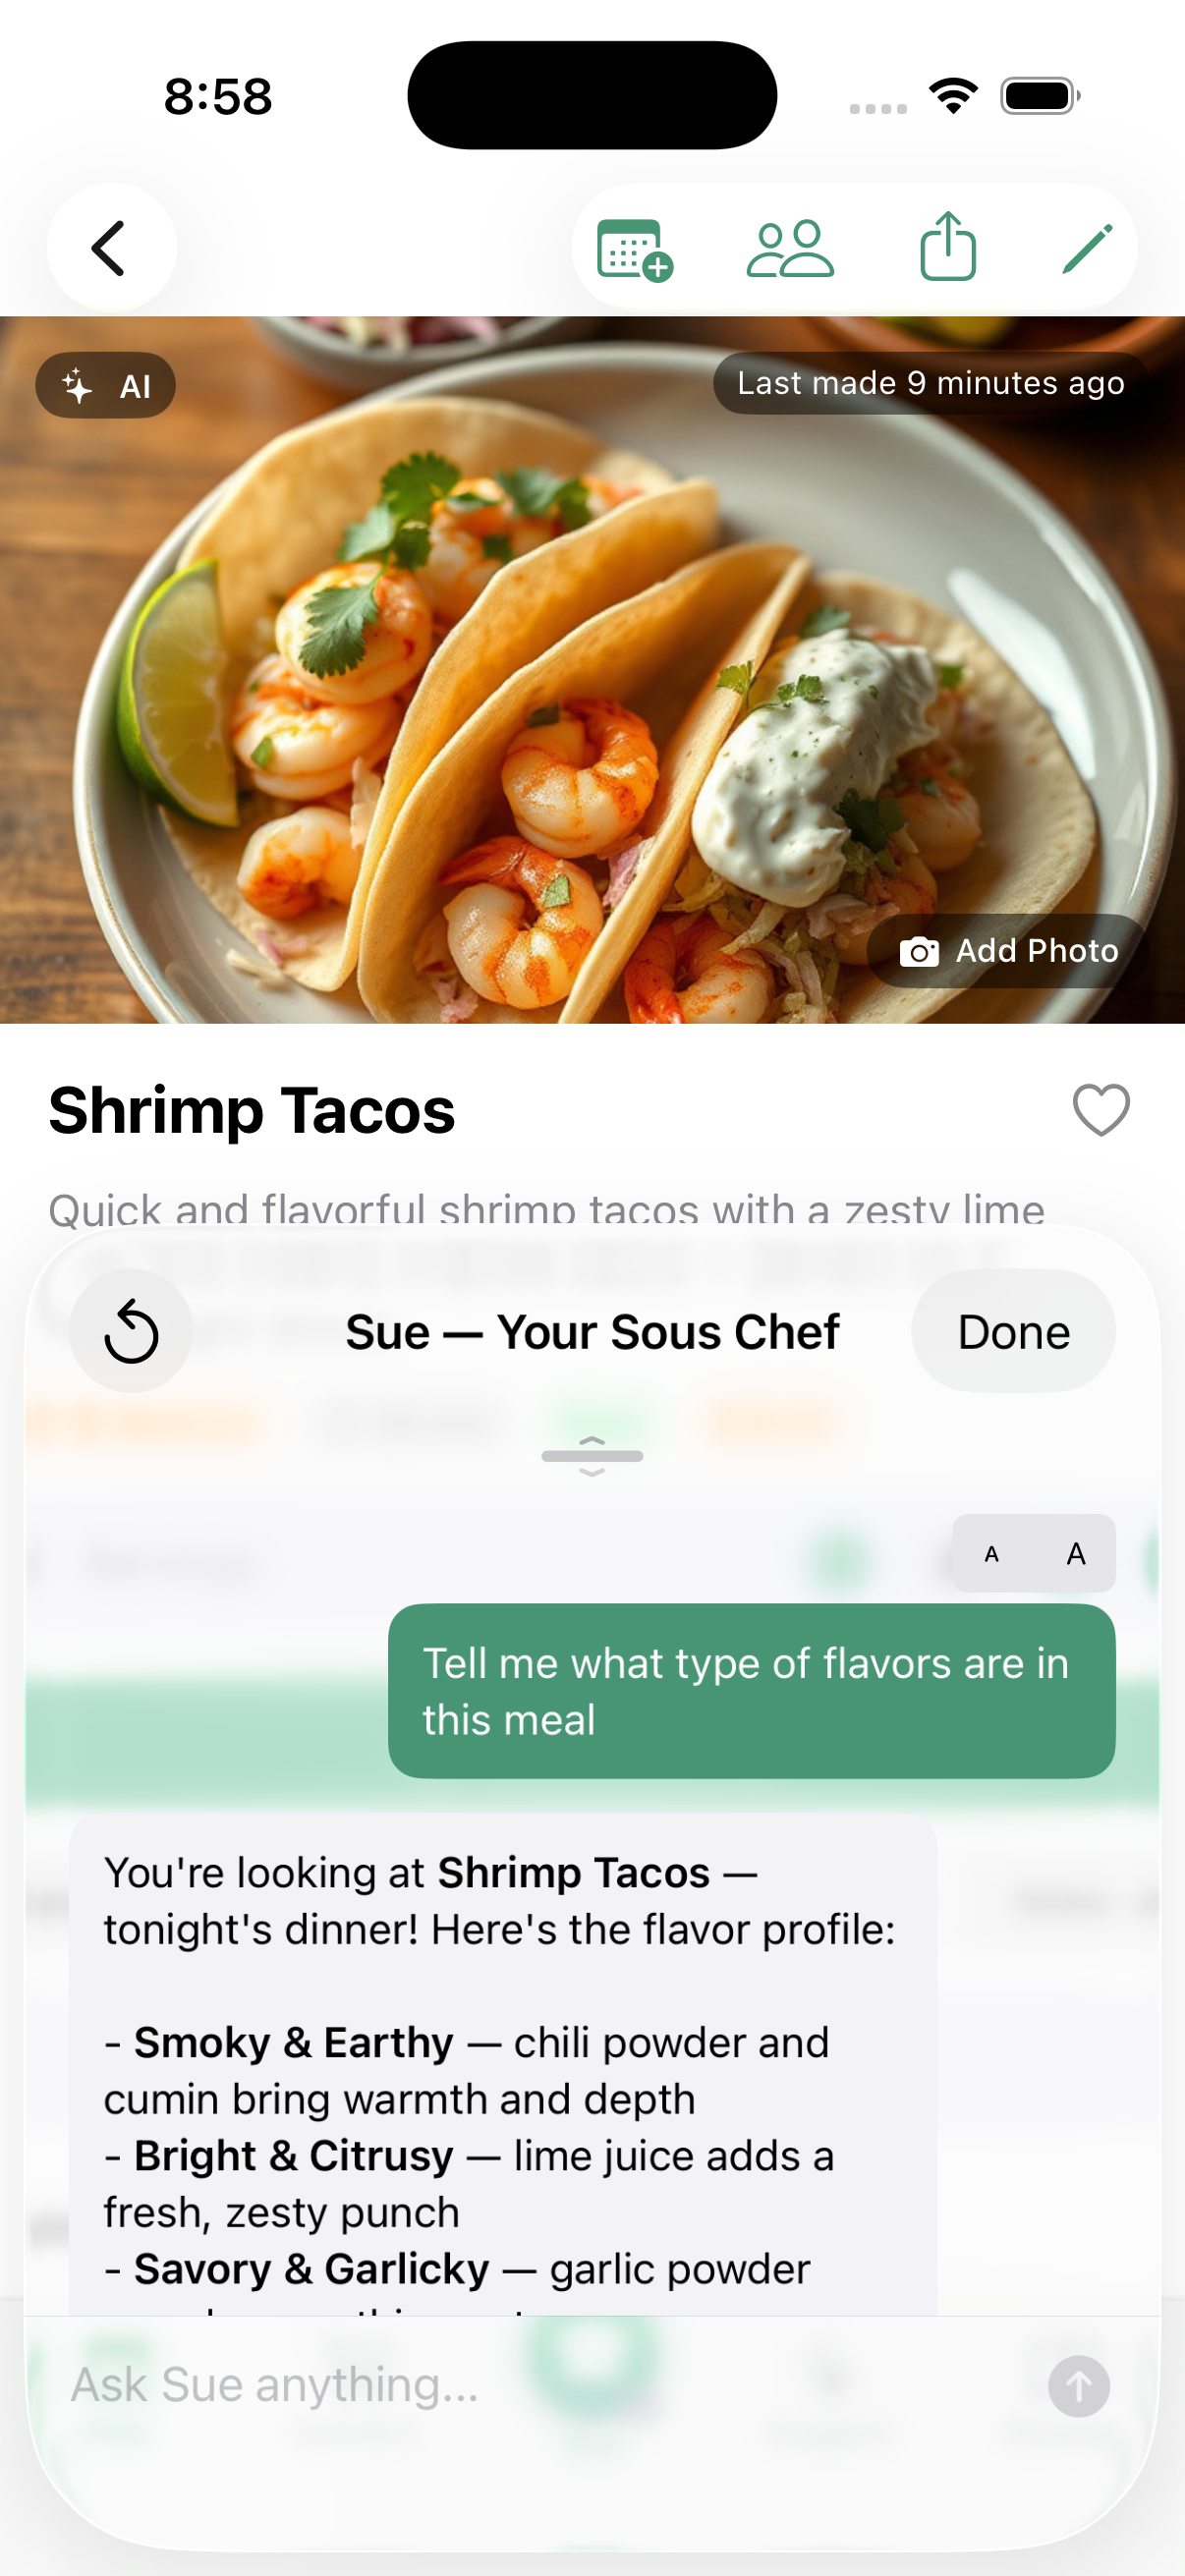
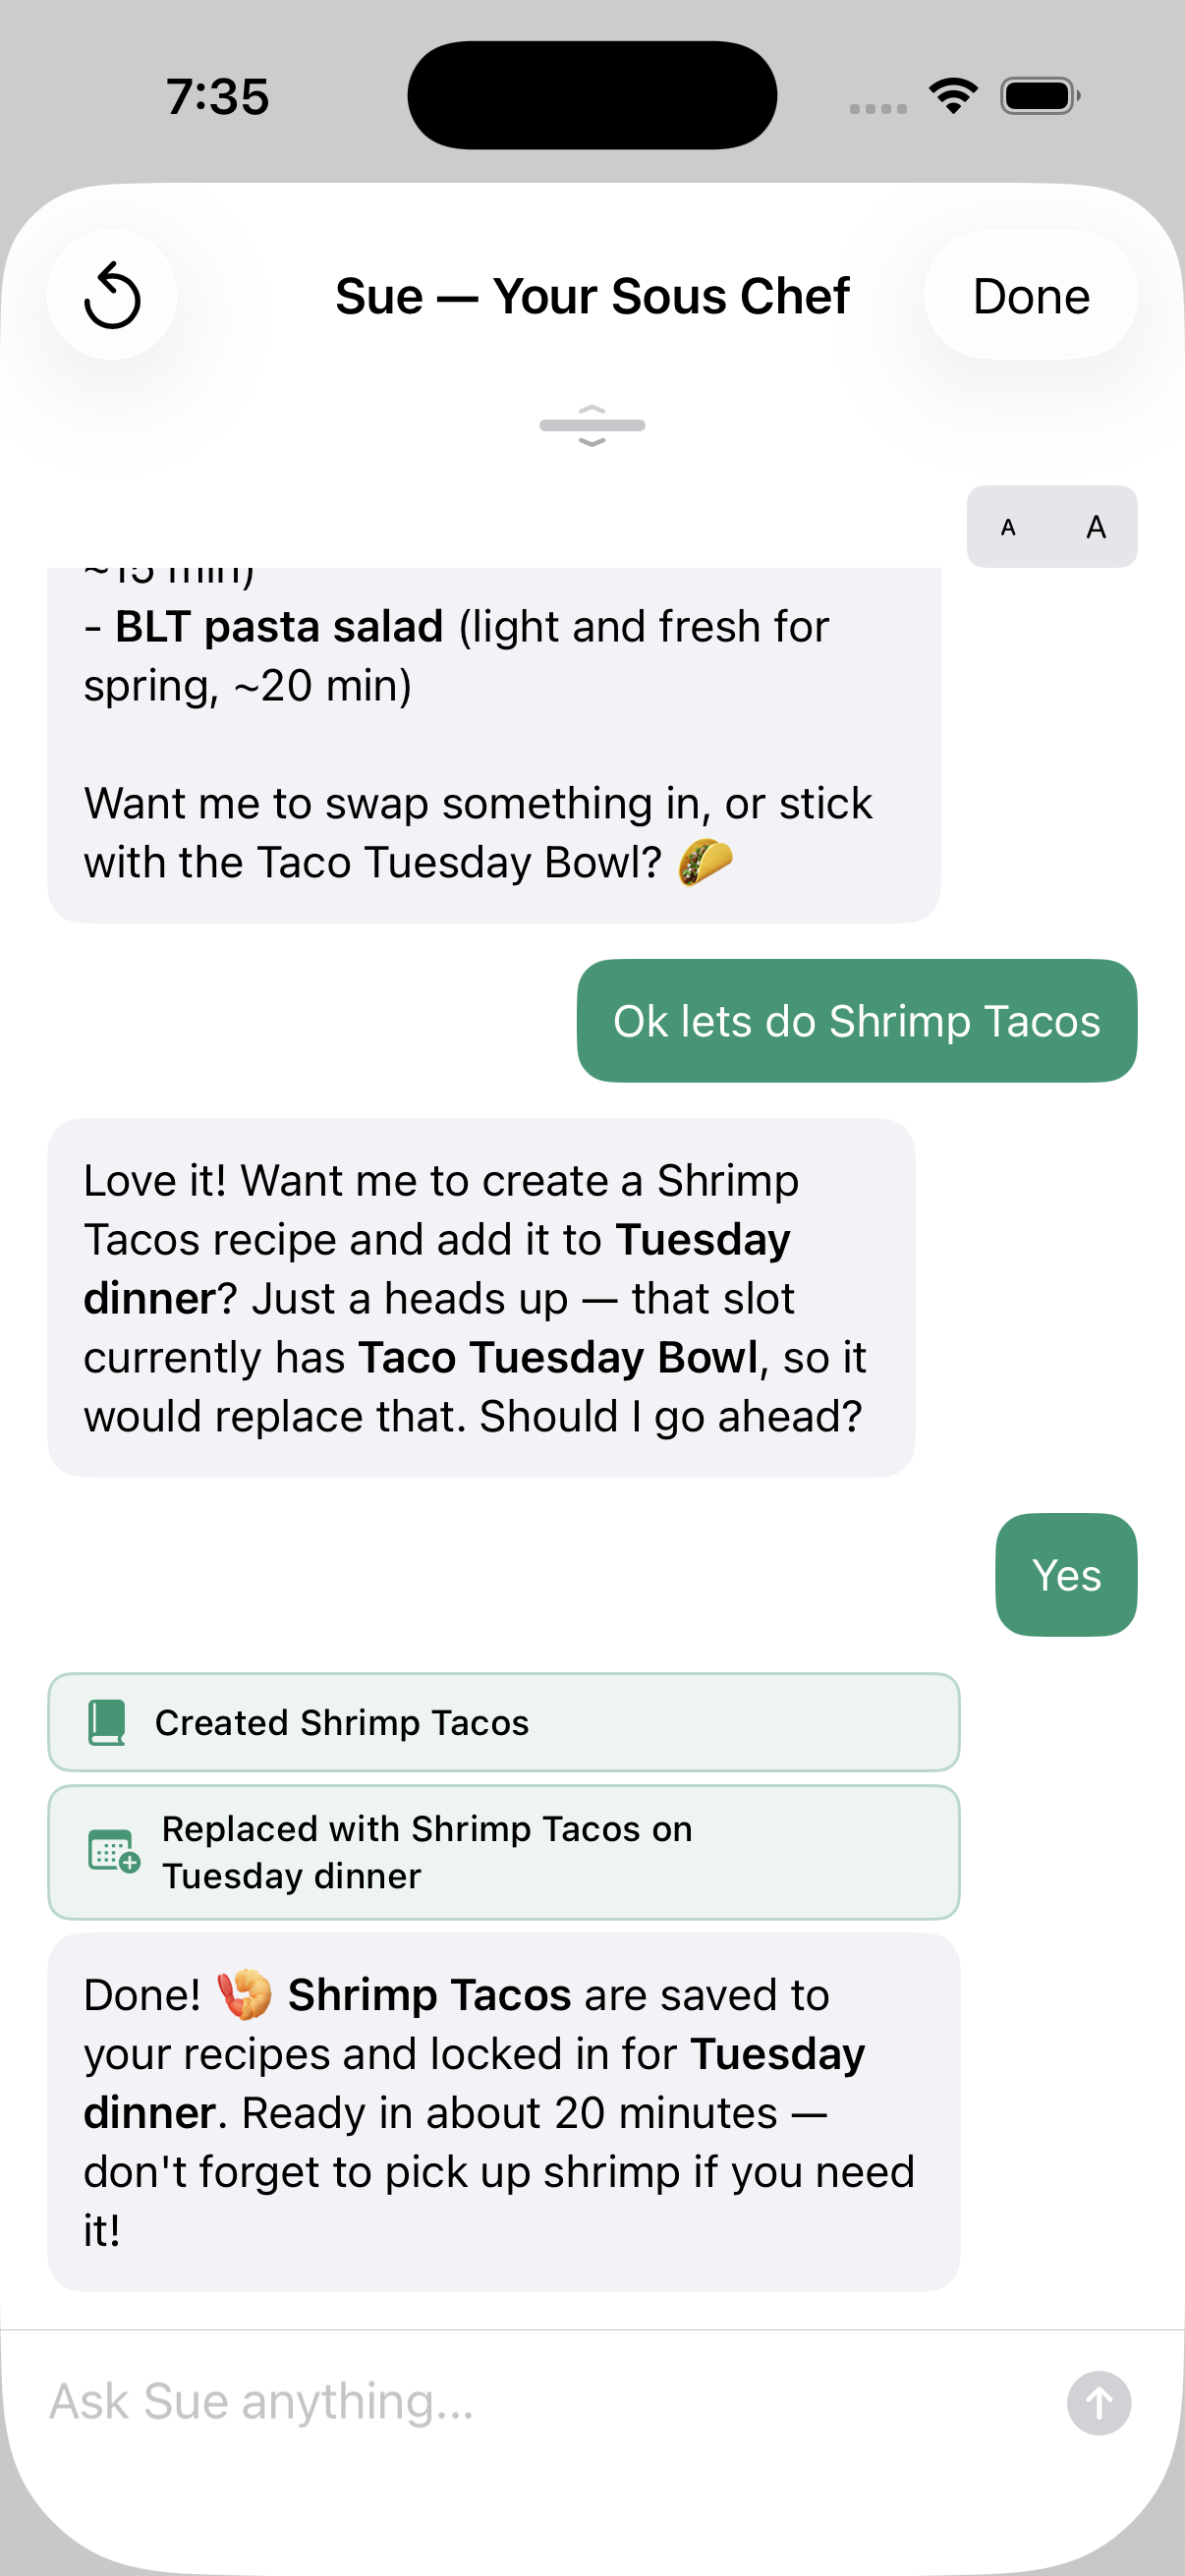
5. Meet Sue, Your Sous Chef
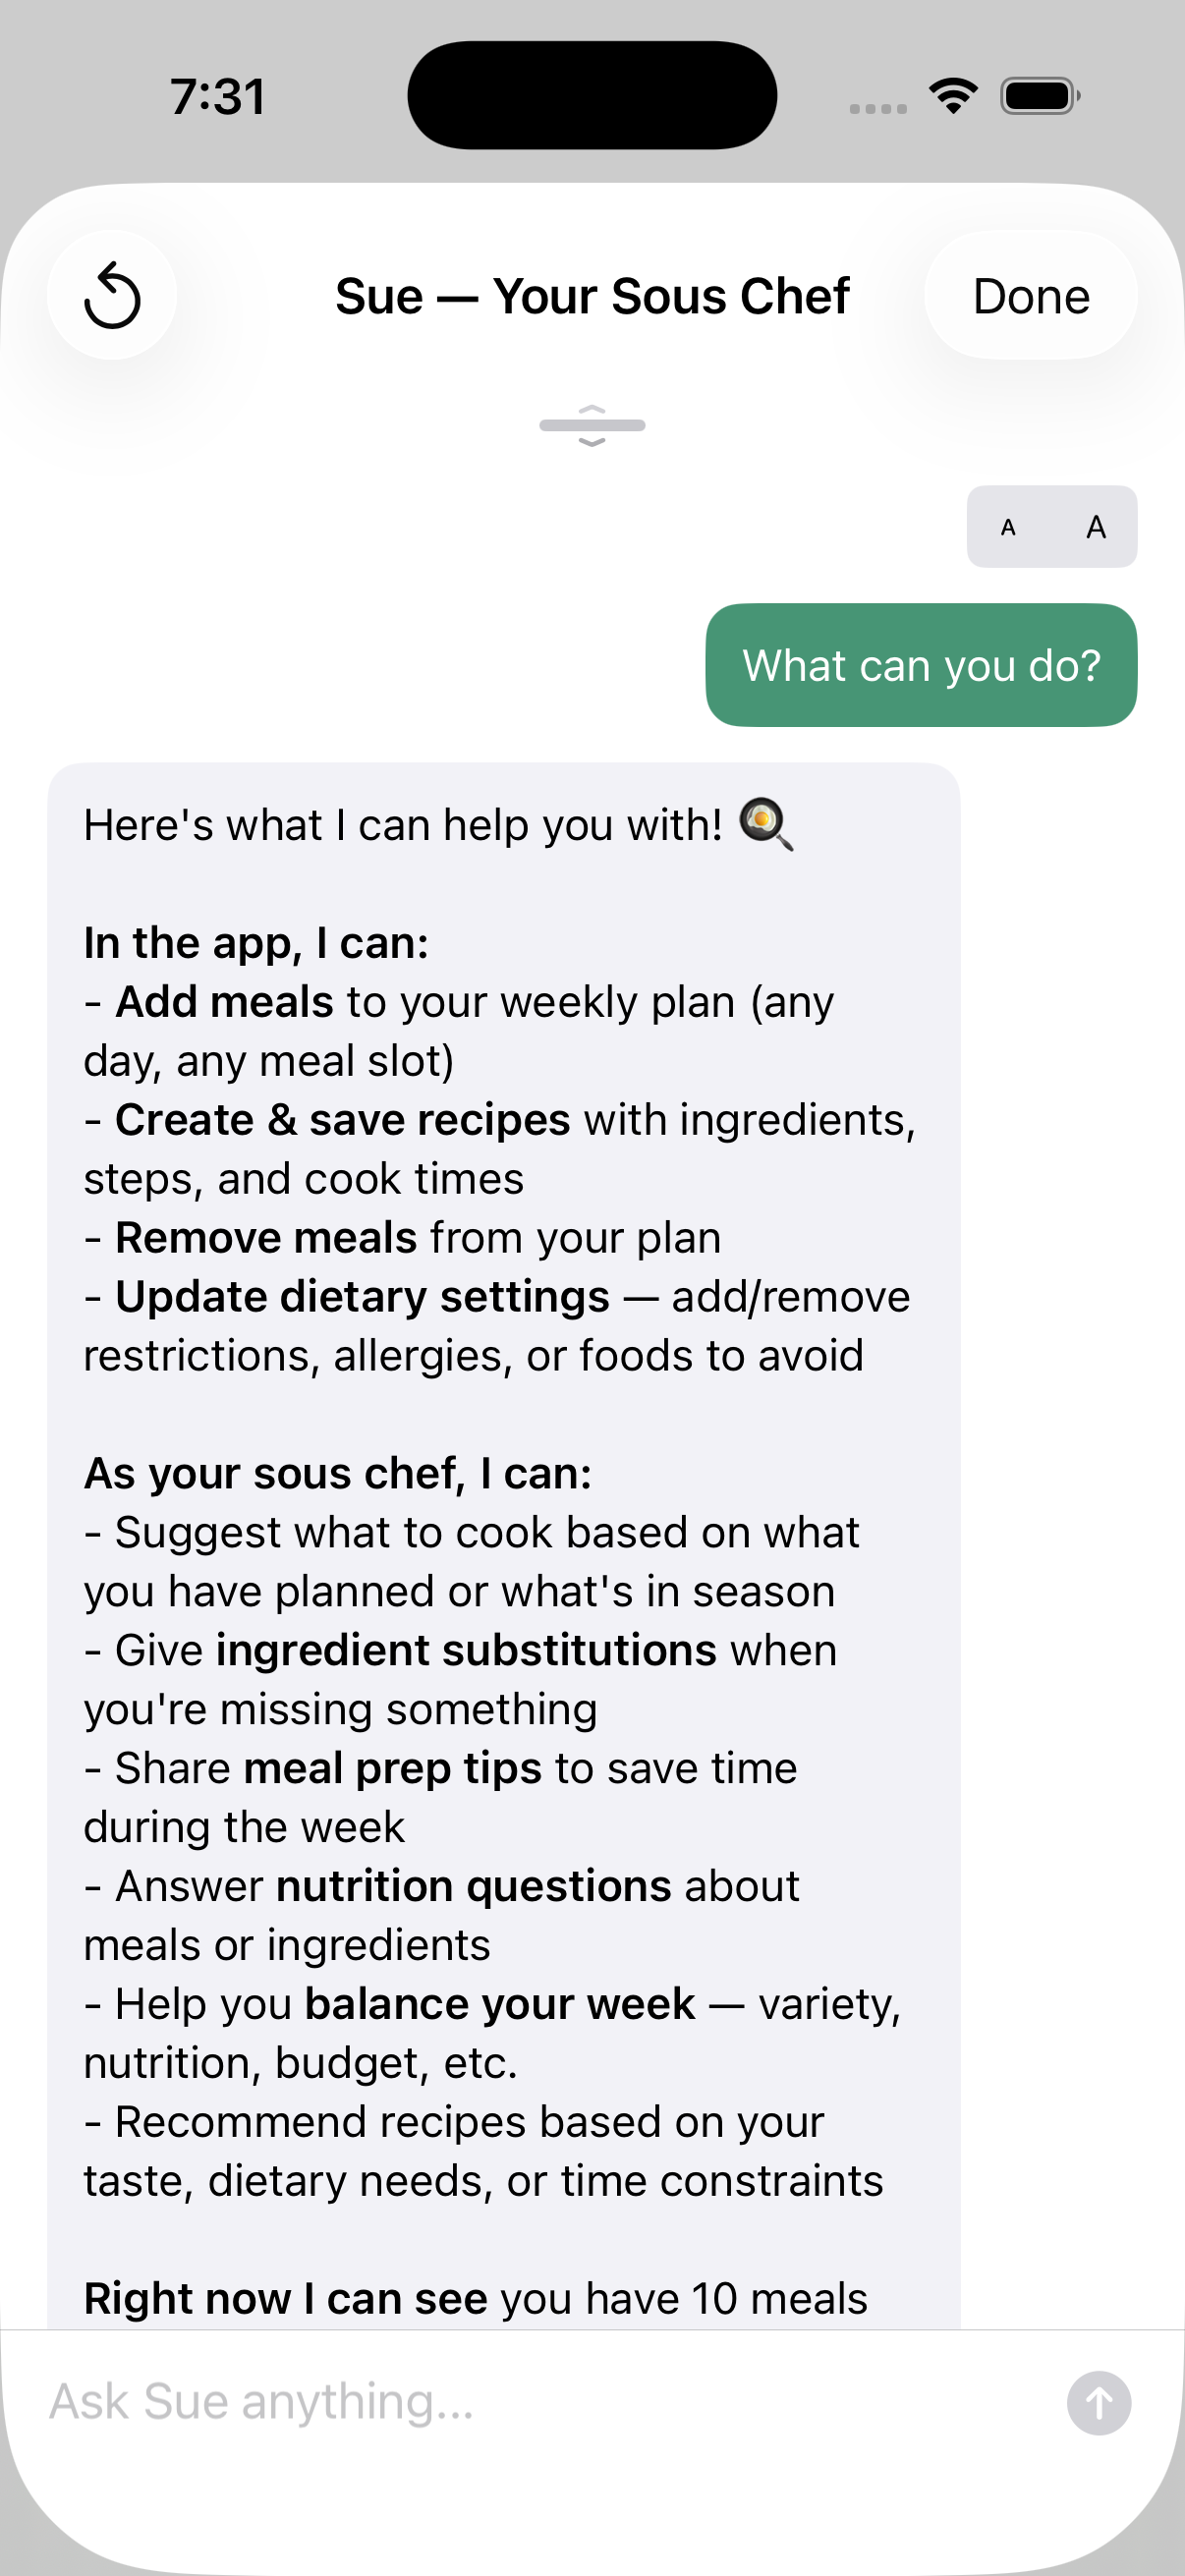
Sue is your AI sous chef — always ready with ideas, answers, and hands-on help. Tap the raised center button in the tab bar to chat with her anytime. She's not just a chatbot; she can actually take actions in the app on your behalf.

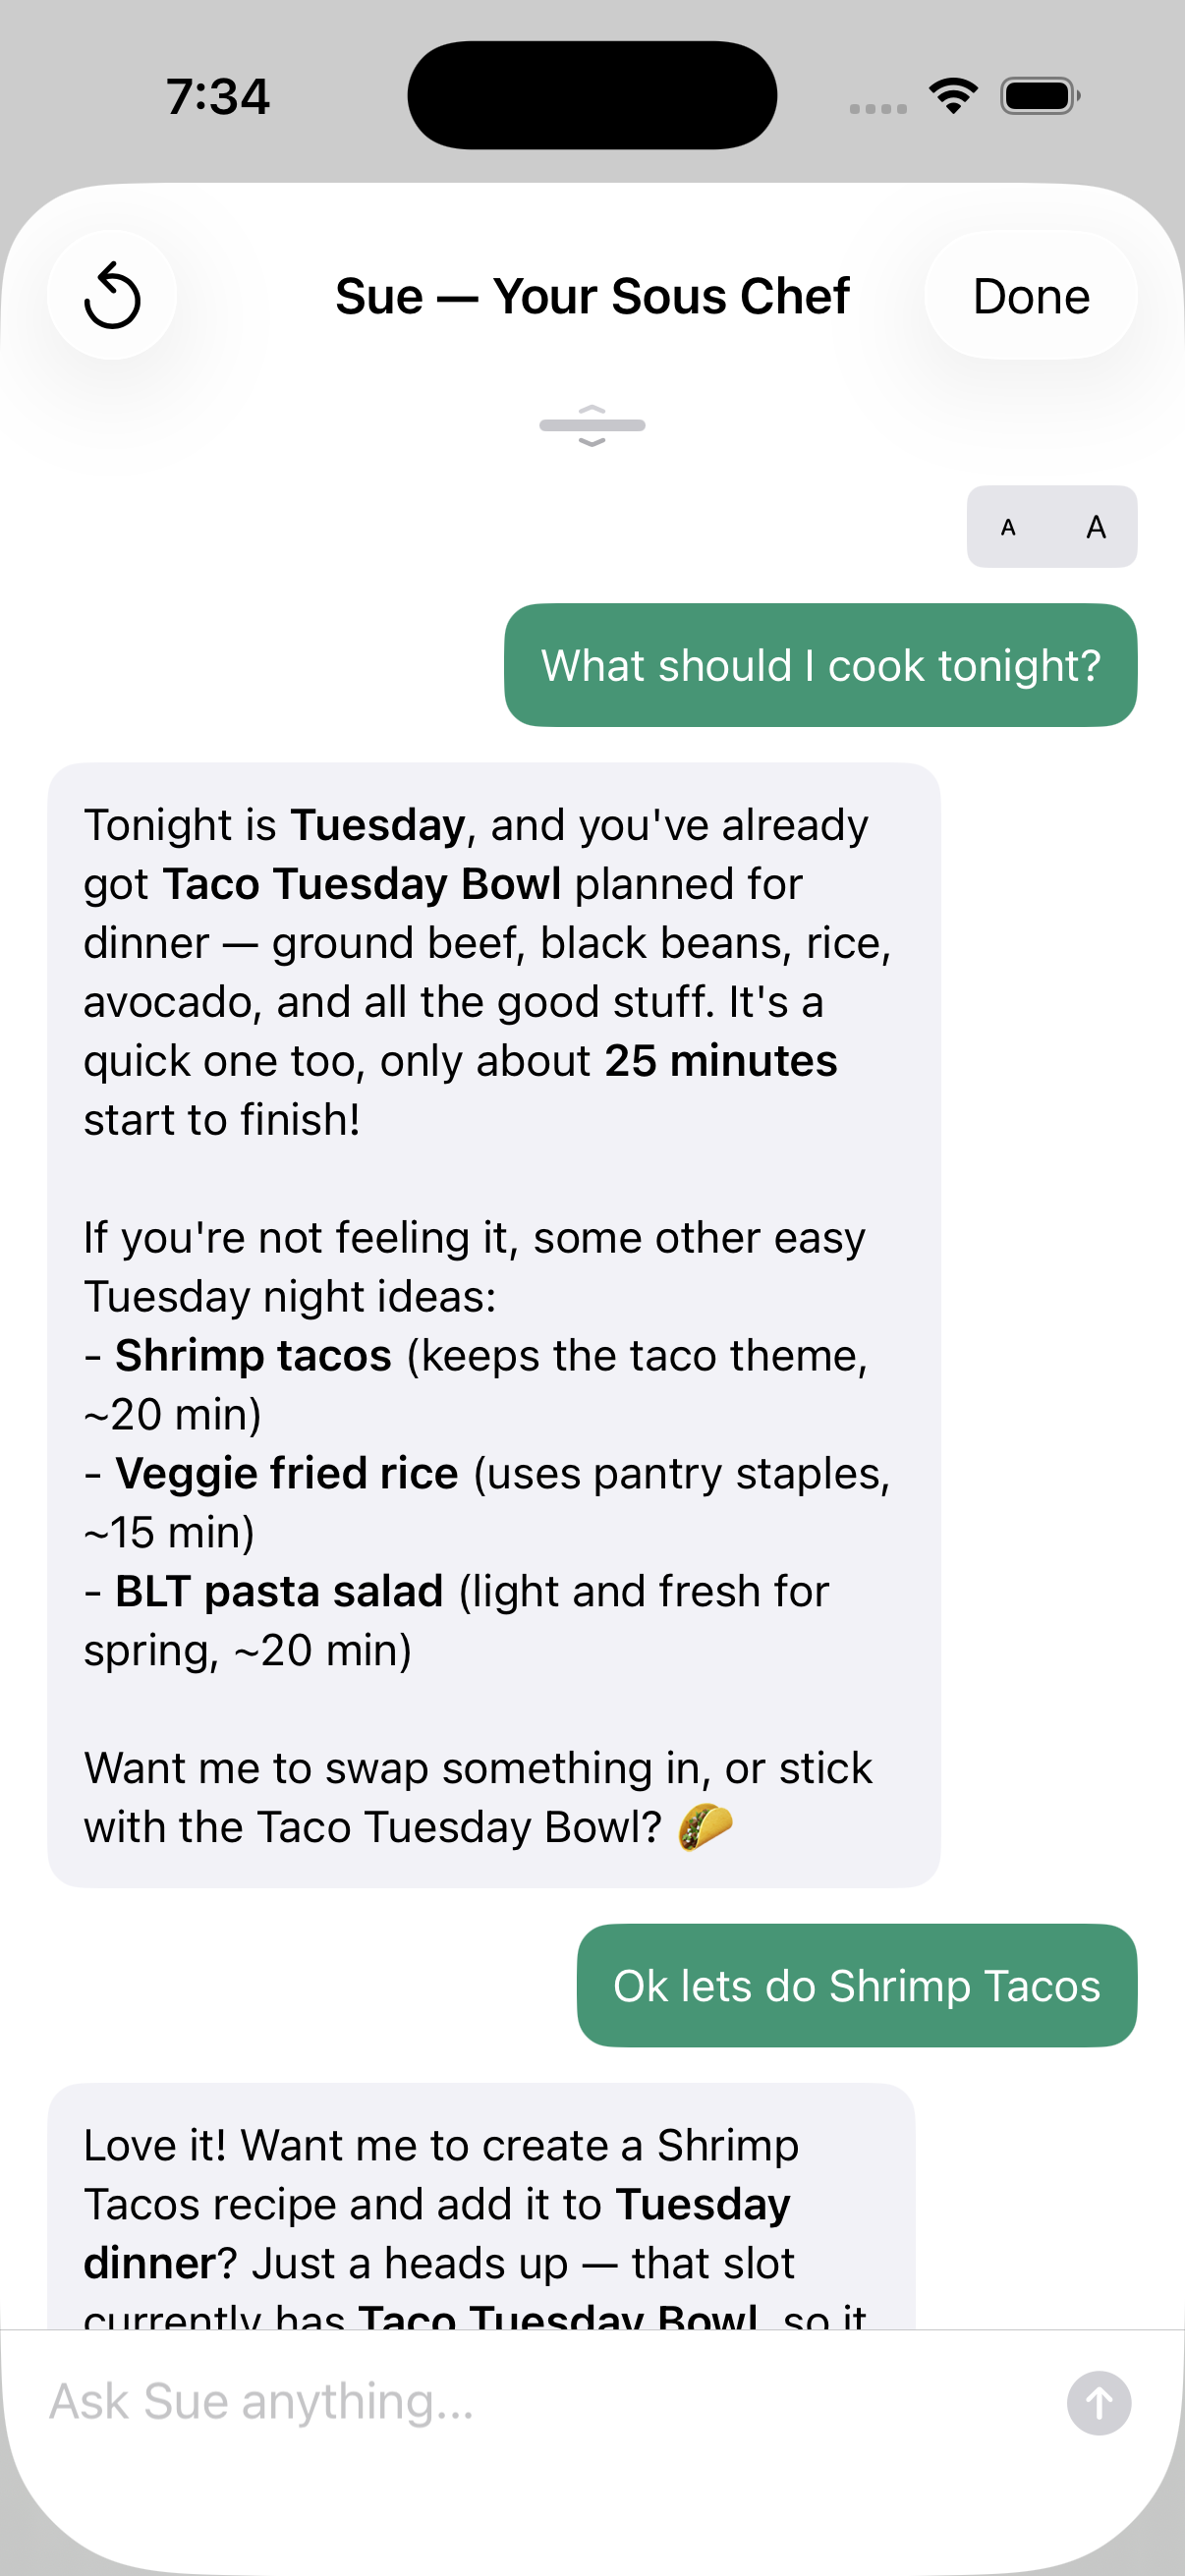
What Sue Can Do
- Create recipes — "Make me a quick weeknight pasta recipe"
- Add meals to your plan — "Add something healthy for dinner tonight"
- Answer cooking questions — "What pairs well with salmon?"
- Manage settings — "Add a nut allergy for Emma"
- Summarize your plan — "What's on the menu this week?"
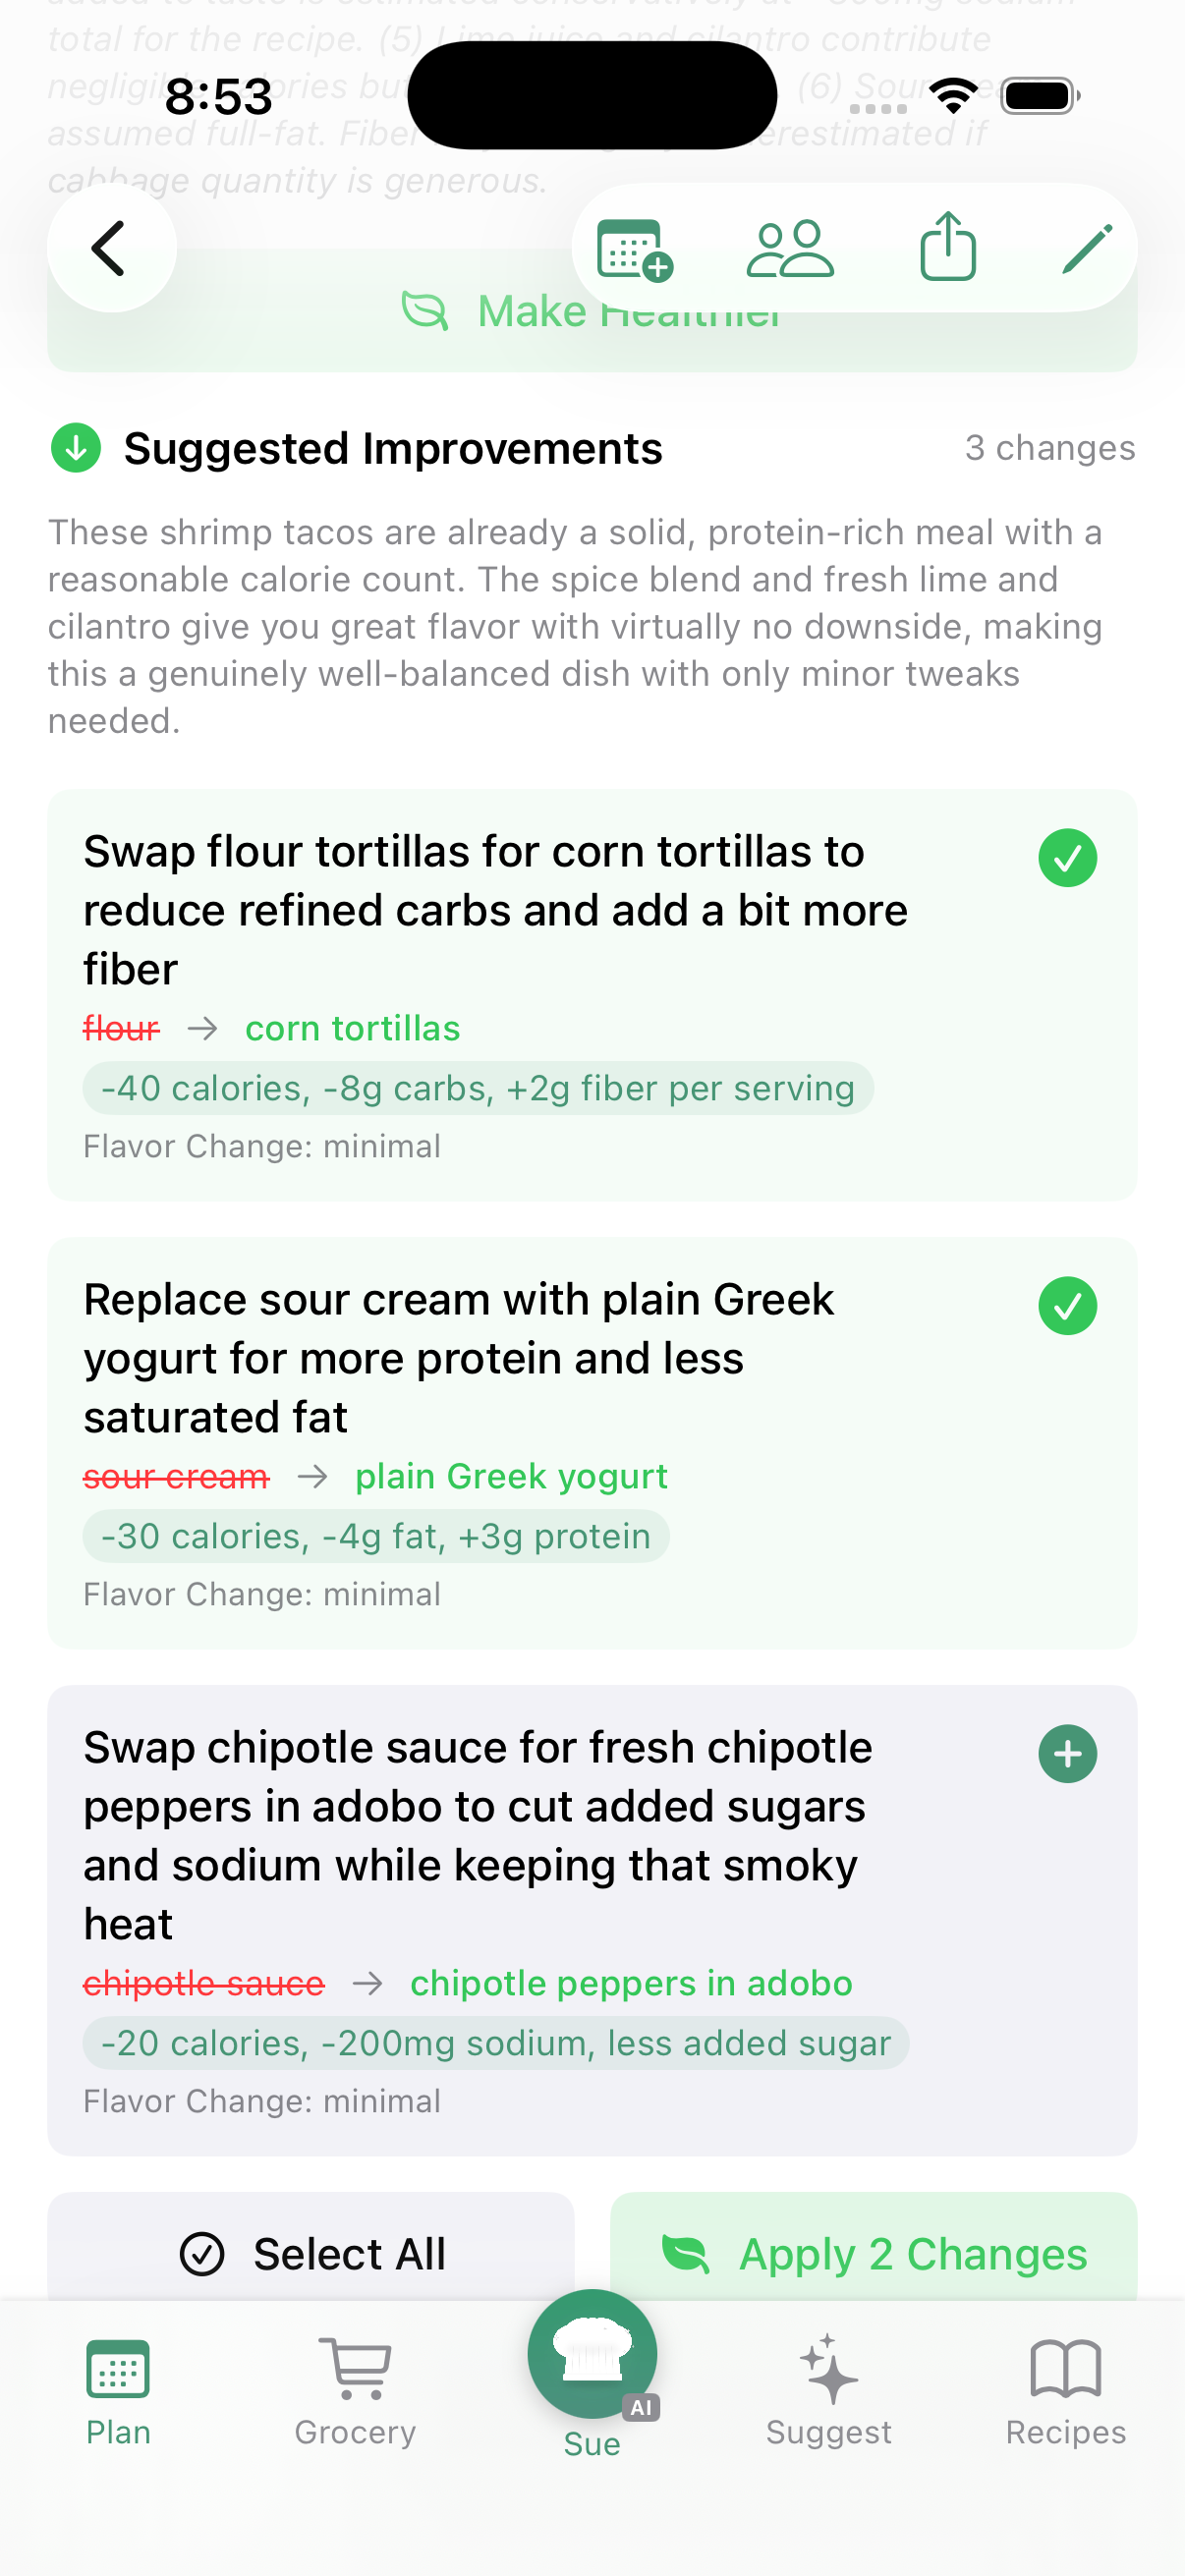
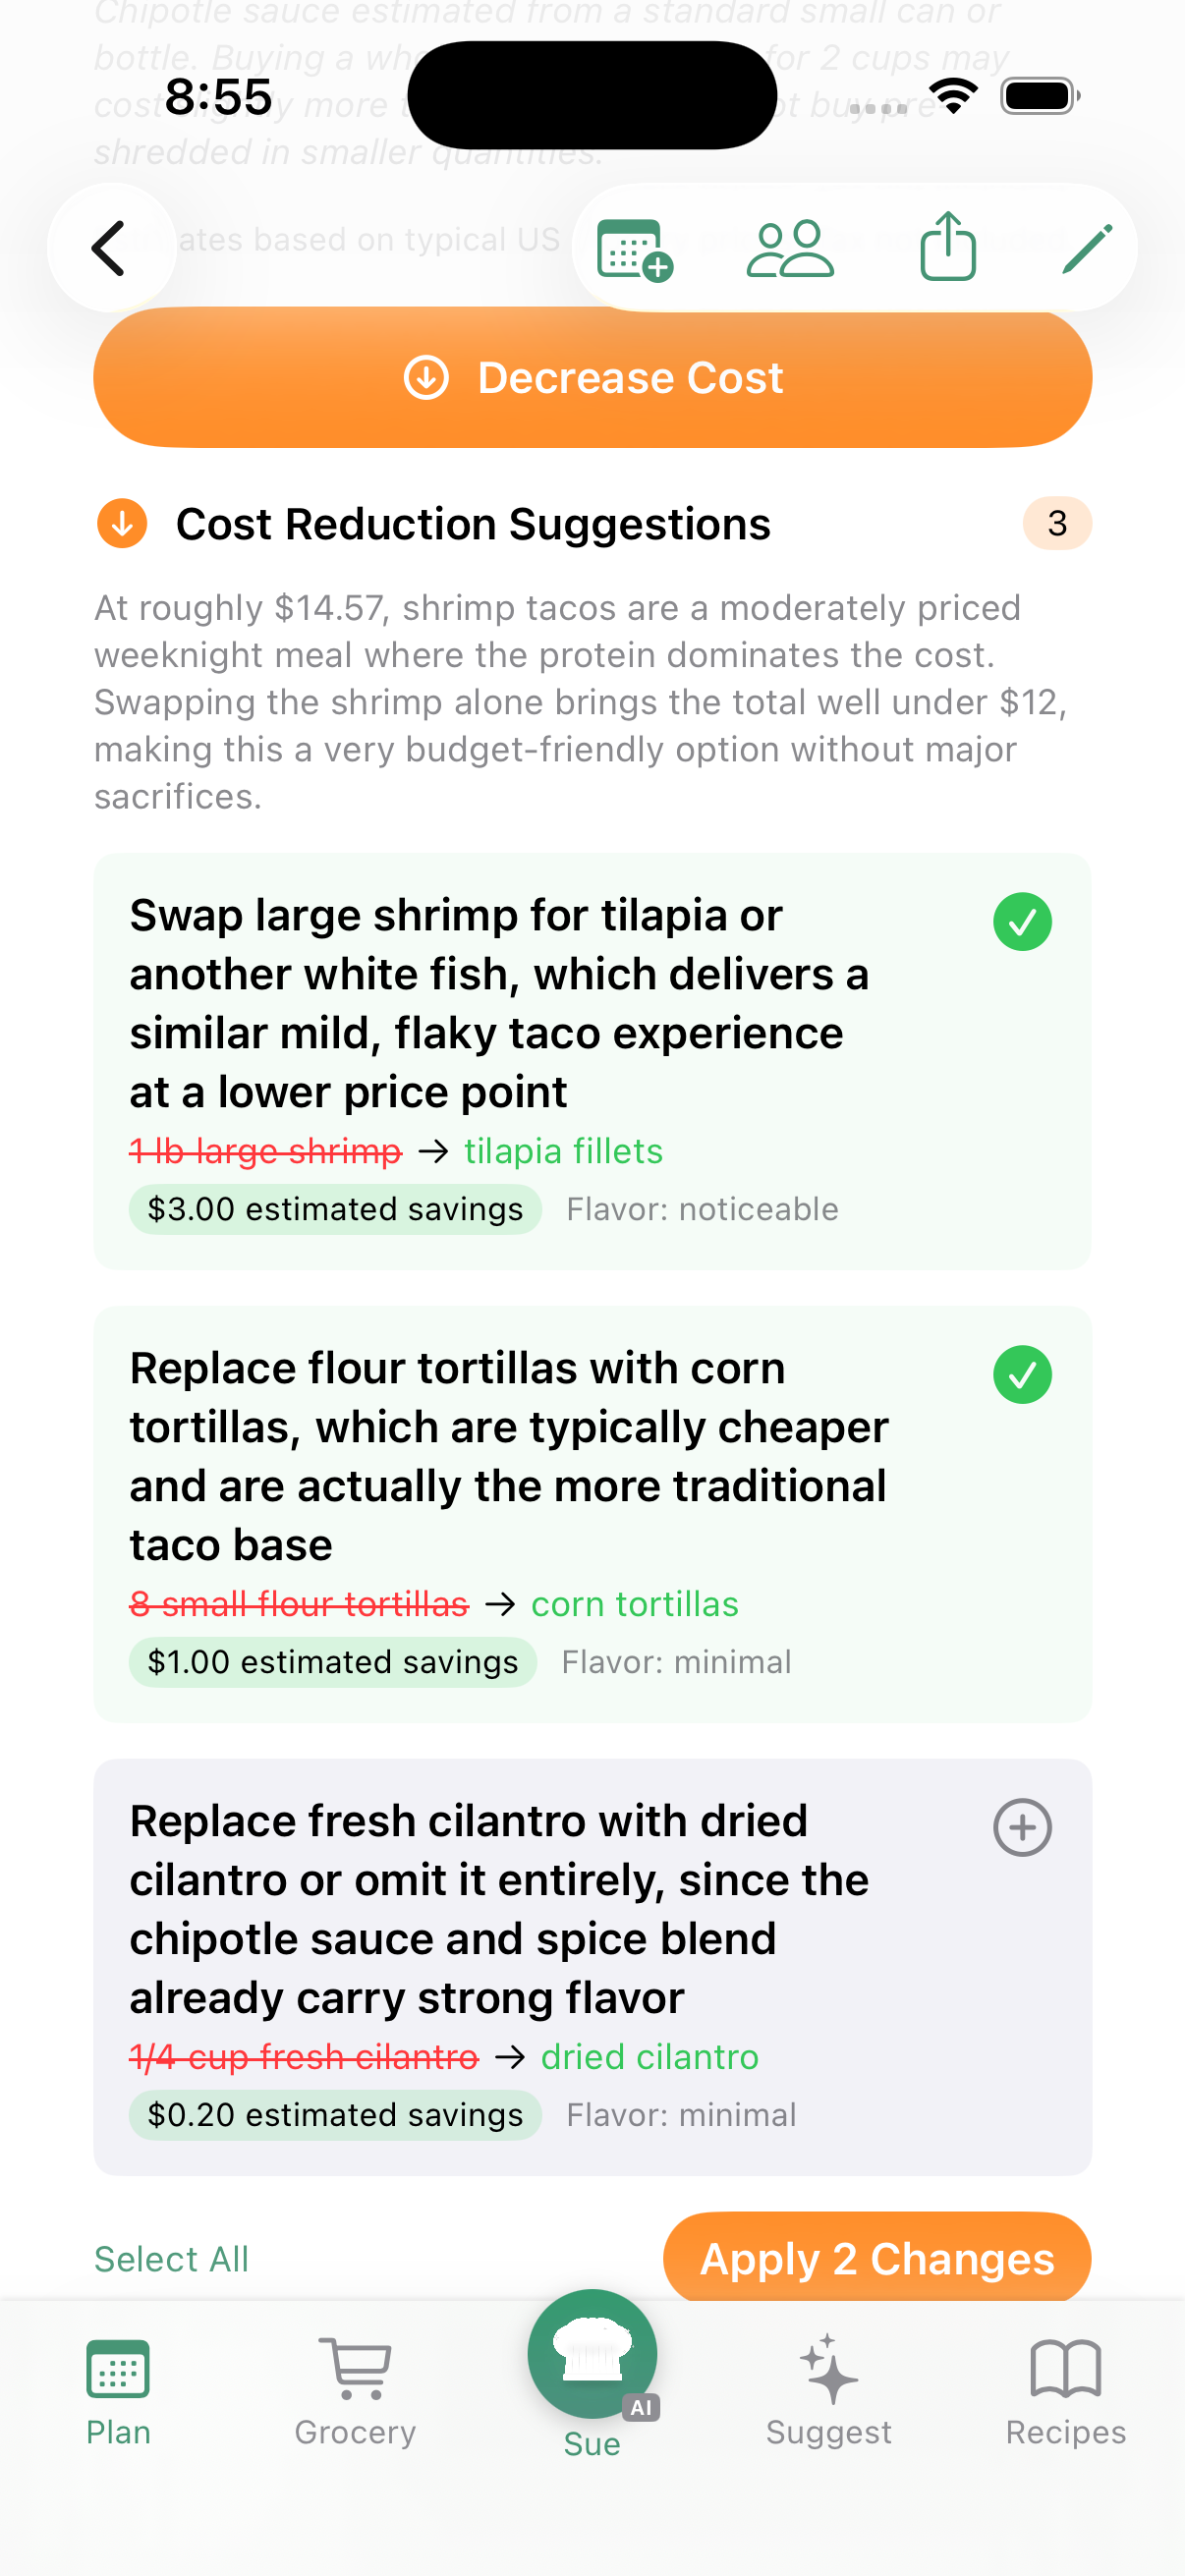
- Suggest improvements — "How can I make this recipe healthier?"
- Help plan hosting events — "What sides go with this?", "Help me plan the prep schedule", or "Explain this step"
Context Awareness
Sue knows what screen you're on. If you're looking at a recipe, she can answer questions about that specific dish. If you're on the Plan tab, she can help fill or rearrange your week. Inside a hosting event, she sees the full menu, contributors, and prep schedule. On a timeline step, she focuses on that specific task and its ingredients.
Learning Your Preferences
The more you use Tableset, the better Sue gets. She learns from your meal ratings, cooking history, and the cuisines you gravitate toward. Over time, her suggestions become more and more tailored to your household.
6. Planning Your Week
When you're ready to organize your meals for the week, the Plan tab brings it all together. You'll see seven day cards, each showing your planned meals.
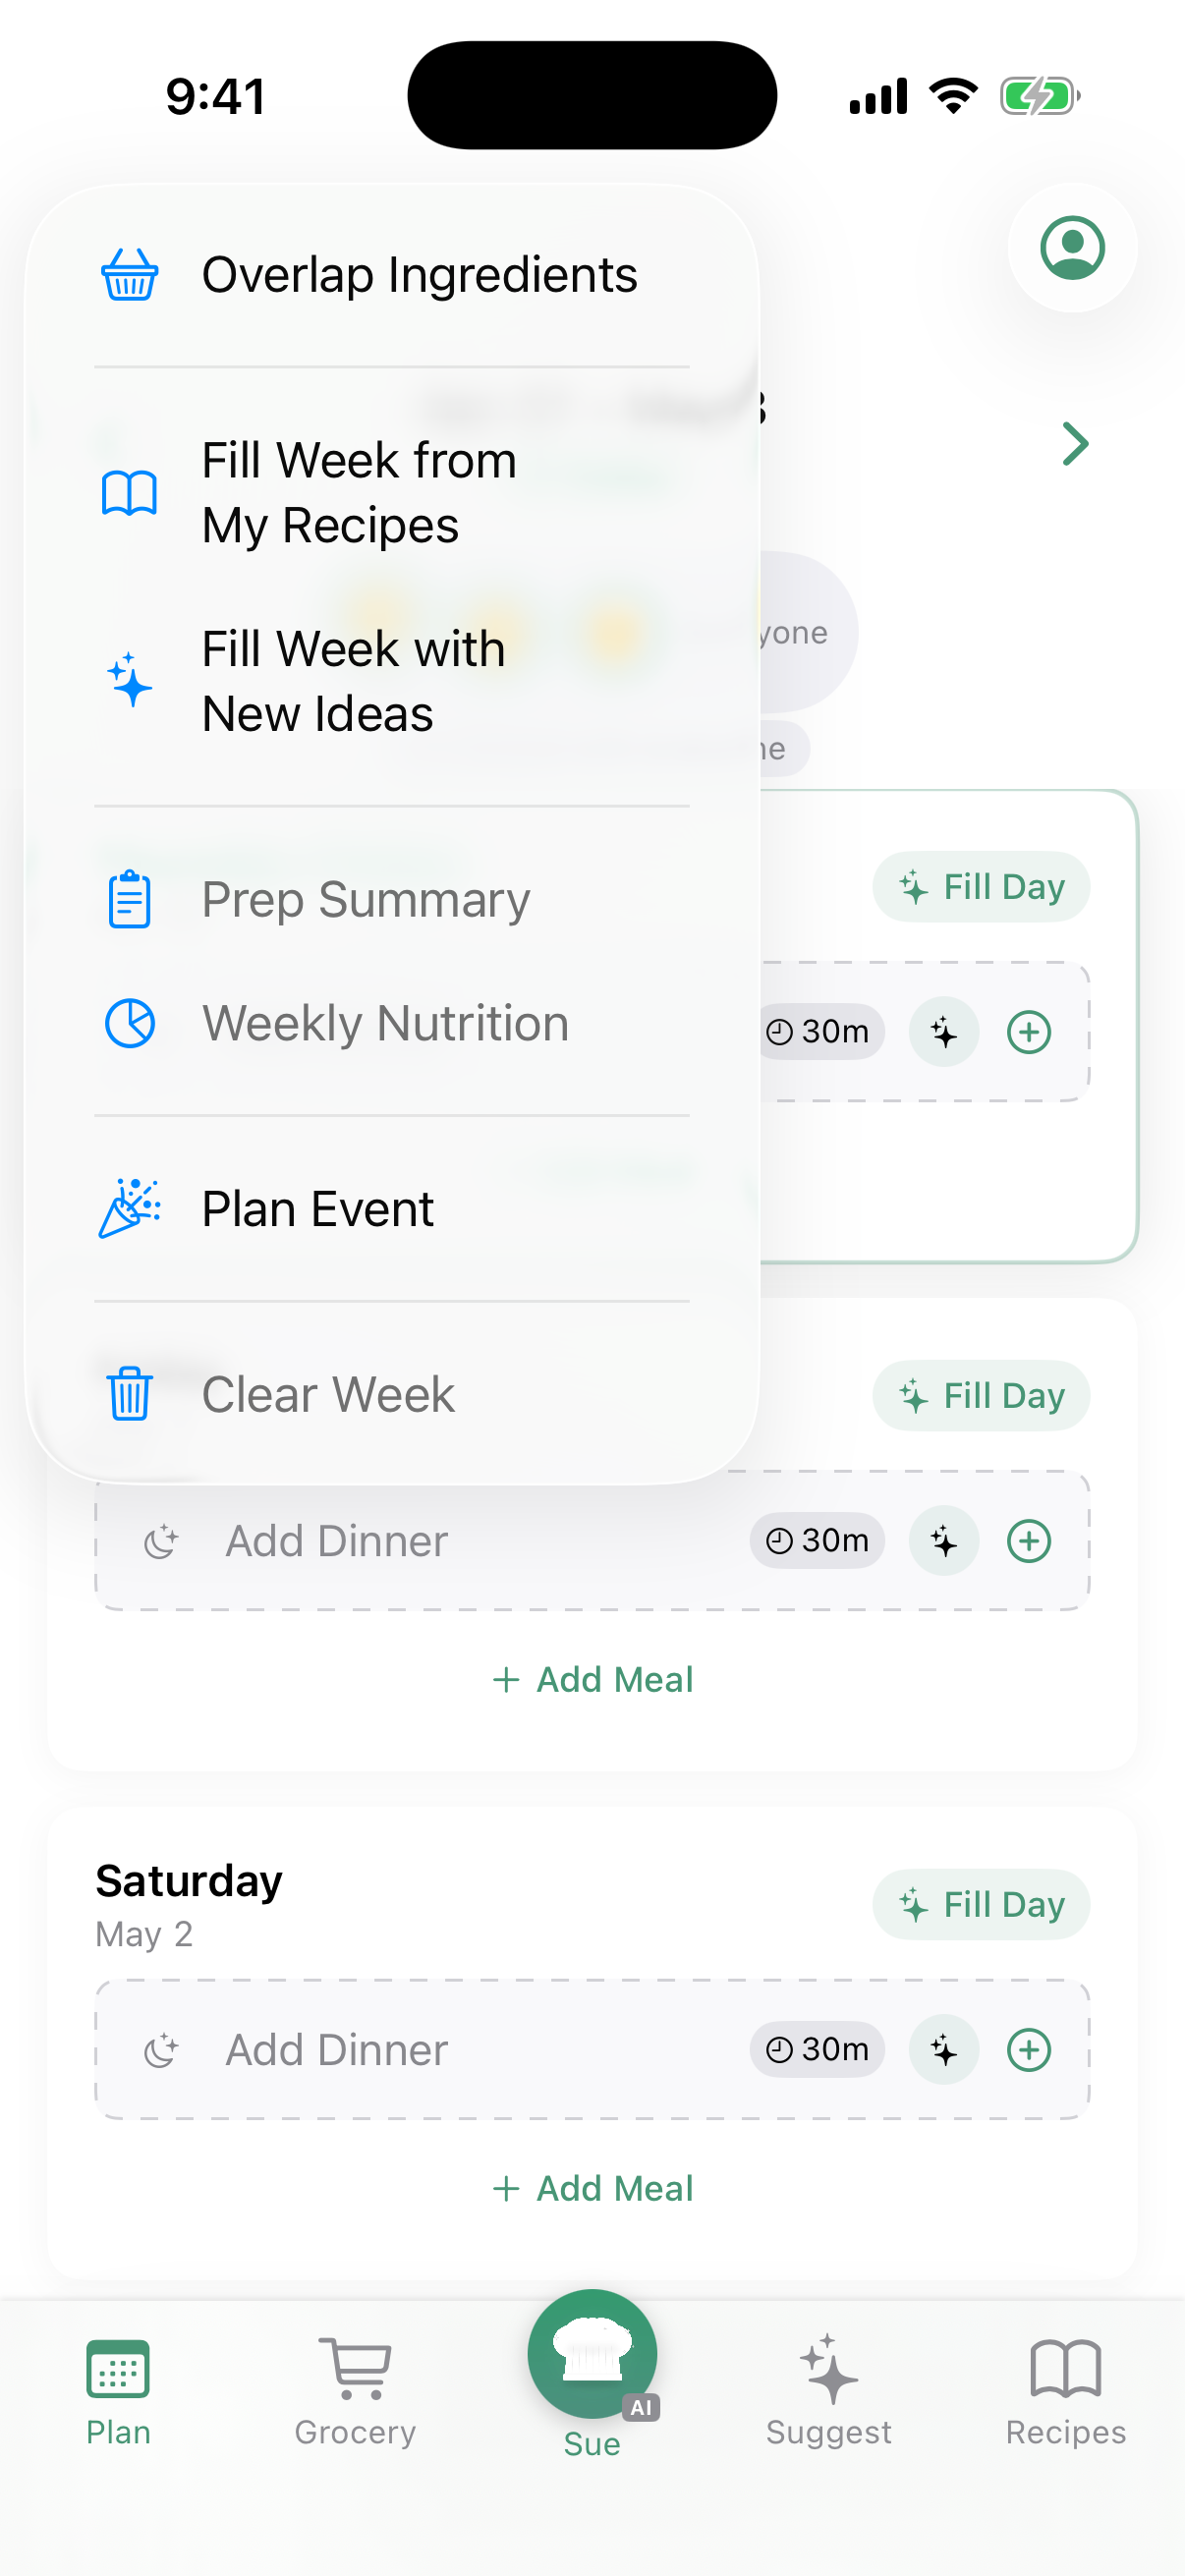
The Plan Toolbar
Tap the wand icon in the top right of the Plan tab to access powerful tools:
- Overlap Ingredients — Toggle smart ingredient overlap so recipes share common items, reducing waste and grocery cost.
- Fill from My Recipes — AI picks from your saved recipe collection to fill the week.
- Fill with New Ideas — AI generates a full week of brand new meals tailored to your household.
- Prep Summary — Get a prep overview for the week: what to chop, marinate, or thaw ahead of time.
- Weekly Nutrition — See estimated calories, protein, carbs, and fat across all planned meals.
- Clear Week — Remove all planned meals and start fresh.
Fill Your Week with AI
Instead of planning each meal one by one, let AI do the heavy lifting:
- Fill with New Ideas — AI generates a full week of meals tailored to your household's preferences, dietary restrictions, and time constraints.
- Fill from My Recipes — Same as above, but AI picks from recipes you've already saved.
- Fill Day — Tap the "Fill Day" button on any day card to fill just that day.
Adding Meals Manually
Prefer to choose your own meals? Tap Add Meal at the bottom of any day card. You can pick from your saved recipes or create a new one on the spot.
Who Are You Cooking For?
If you're in a household, you'll see member avatars at the top of the Plan tab. Tap to select who you're planning meals for:
- Just you selected — meals are personal (only on your device)
- You + others — meals are shared with your household
- Others only — you're planning for someone else (still shared)
A scope pill below the avatars shows the current mode: "Personal plan", "Shared with everyone", "Shared with Mike", etc. AI suggestions automatically account for the dietary needs of everyone you've selected.
Per-Slot AI Suggestions
Each empty meal slot has a sparkle button. Tap it to get an AI suggestion for just that slot — perfect for when you have most of the week planned but need inspiration for one meal.
Marking Meals as Cooked
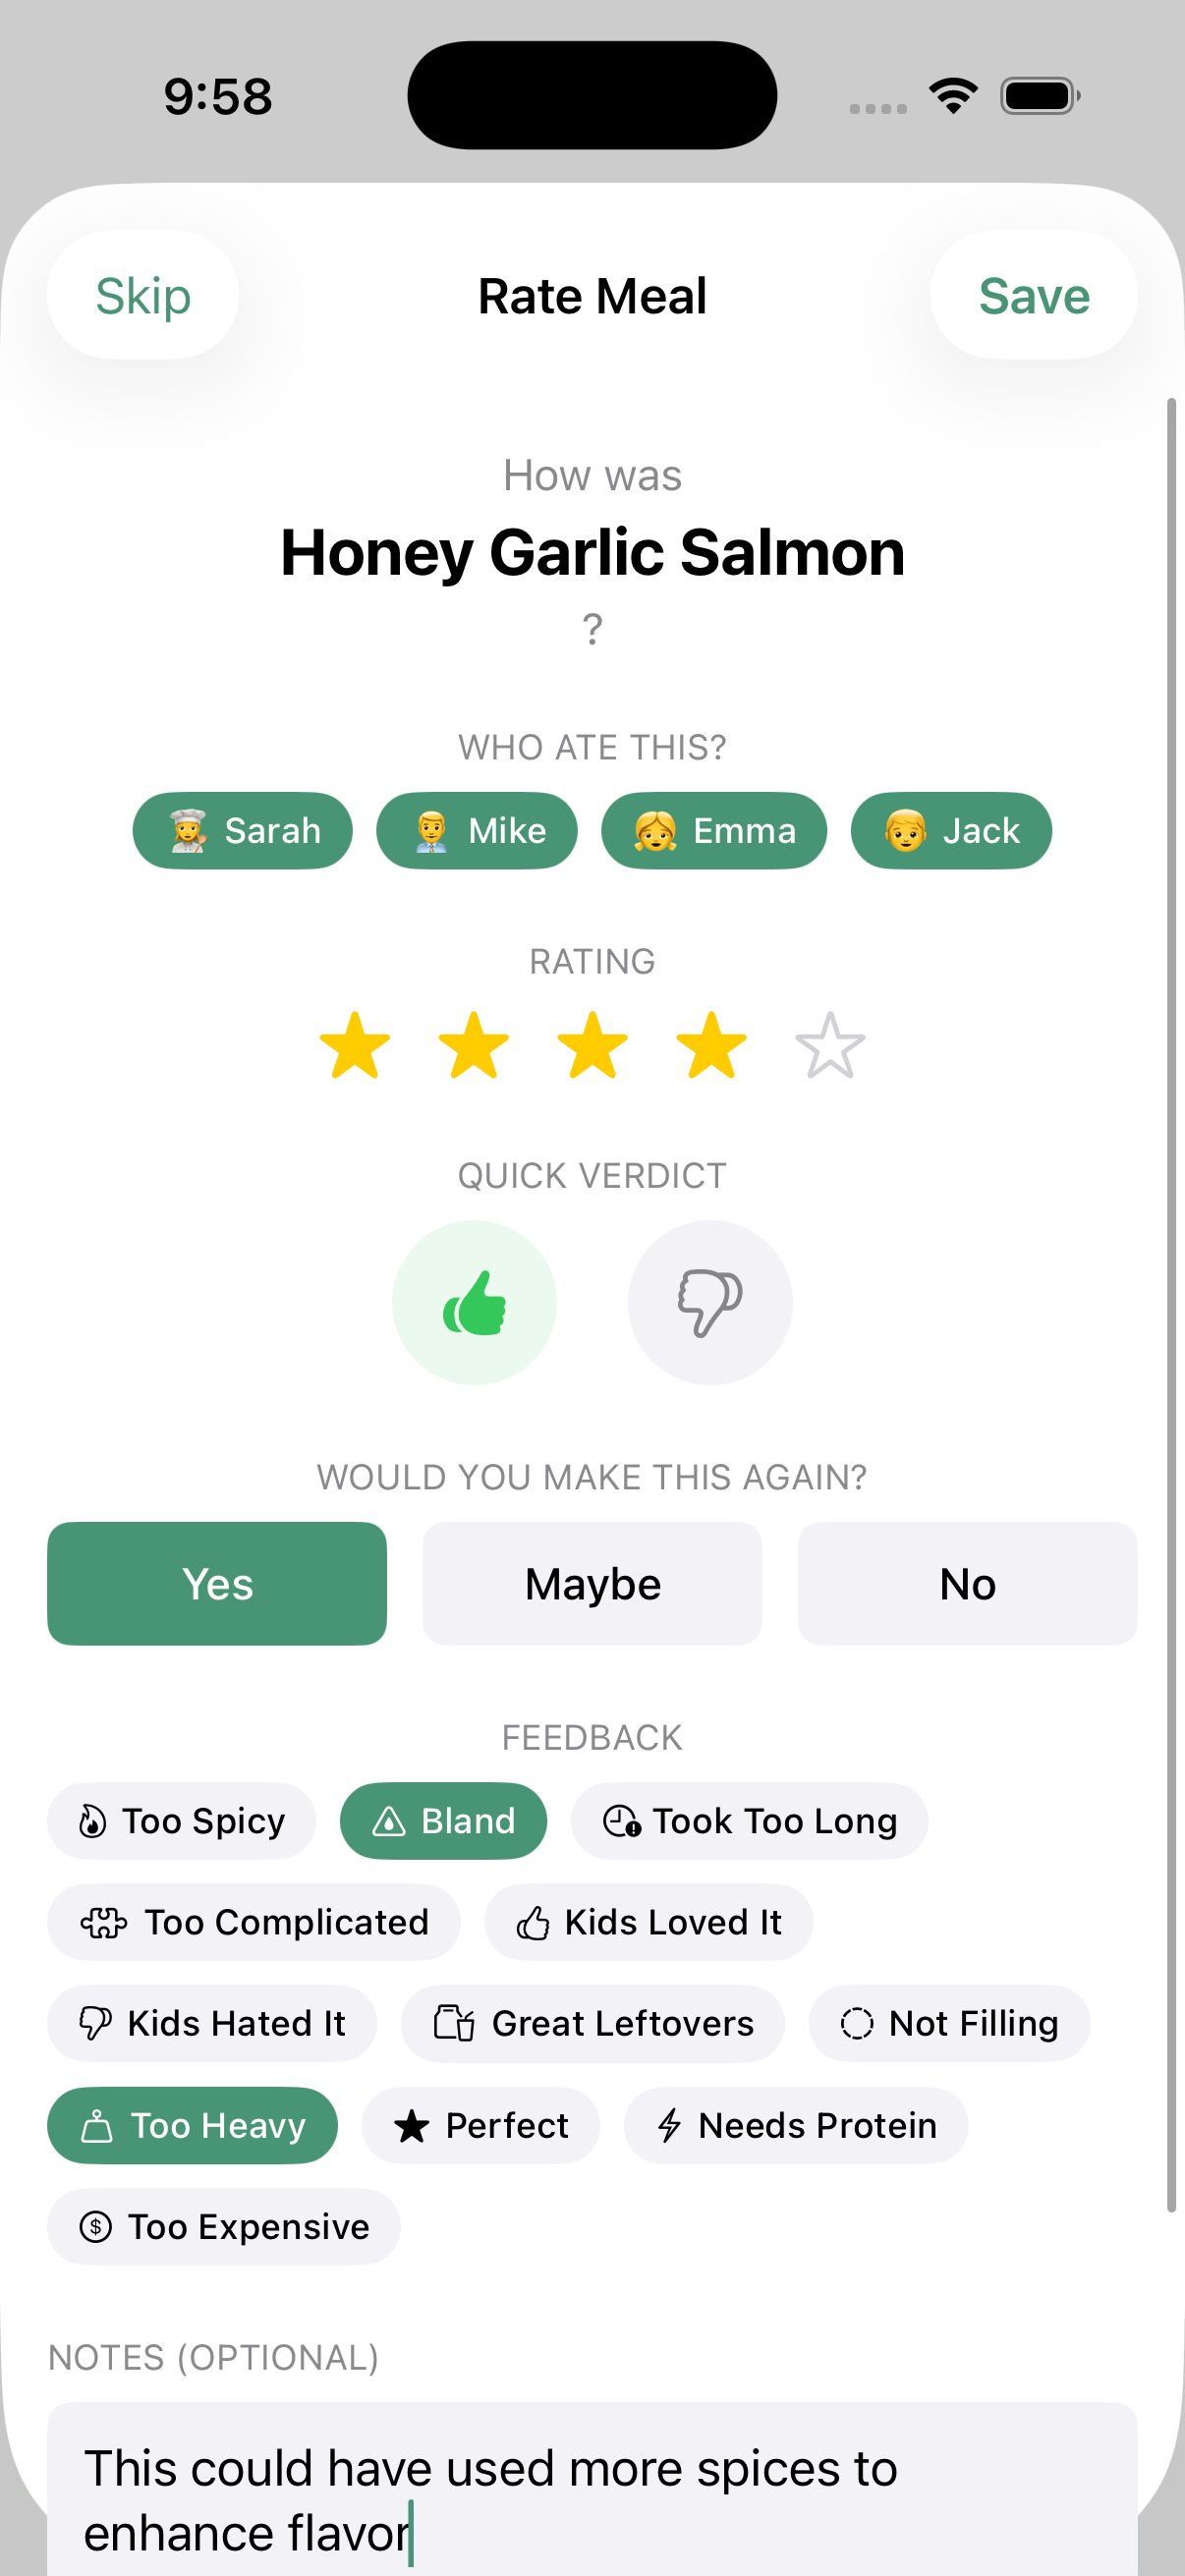
When you've made a meal, tap the checkmark to mark it as cooked. You'll be prompted to rate it — your feedback helps the AI learn what your household enjoys.
Rating Meals
After cooking, you can rate each meal with:
- Star rating (1–5) — How much did you enjoy it?
- Thumbs up or down — Quick sentiment
- "Would make again?" — Yes, Maybe, or No
- Feedback tags — Quick labels like "Kids Loved It", "Too Spicy", "Perfect", "Bland", etc.
- Notes — Free-text thoughts about the meal ("Could use more garlic", "Try with rice next time")
In a household, you can also select who ate the meal. This helps the AI understand individual preferences over time.
Prep Summary
Before a big cooking day, tap the wand icon and select Prep Summary. You'll get an overview of all the prep work needed for your planned meals — what to chop, marinate, or thaw ahead of time.
Weekly Nutrition
Want to see how your week stacks up nutritionally? Select Weekly Nutrition from the toolbar menu to see estimated calories, protein, carbs, and fat across all your planned meals.
7. Sharing with Family
Tableset is built for families. When you create a household, everyone can see the meal plan, coordinate cooking, and make sure every meal is safe for everyone.
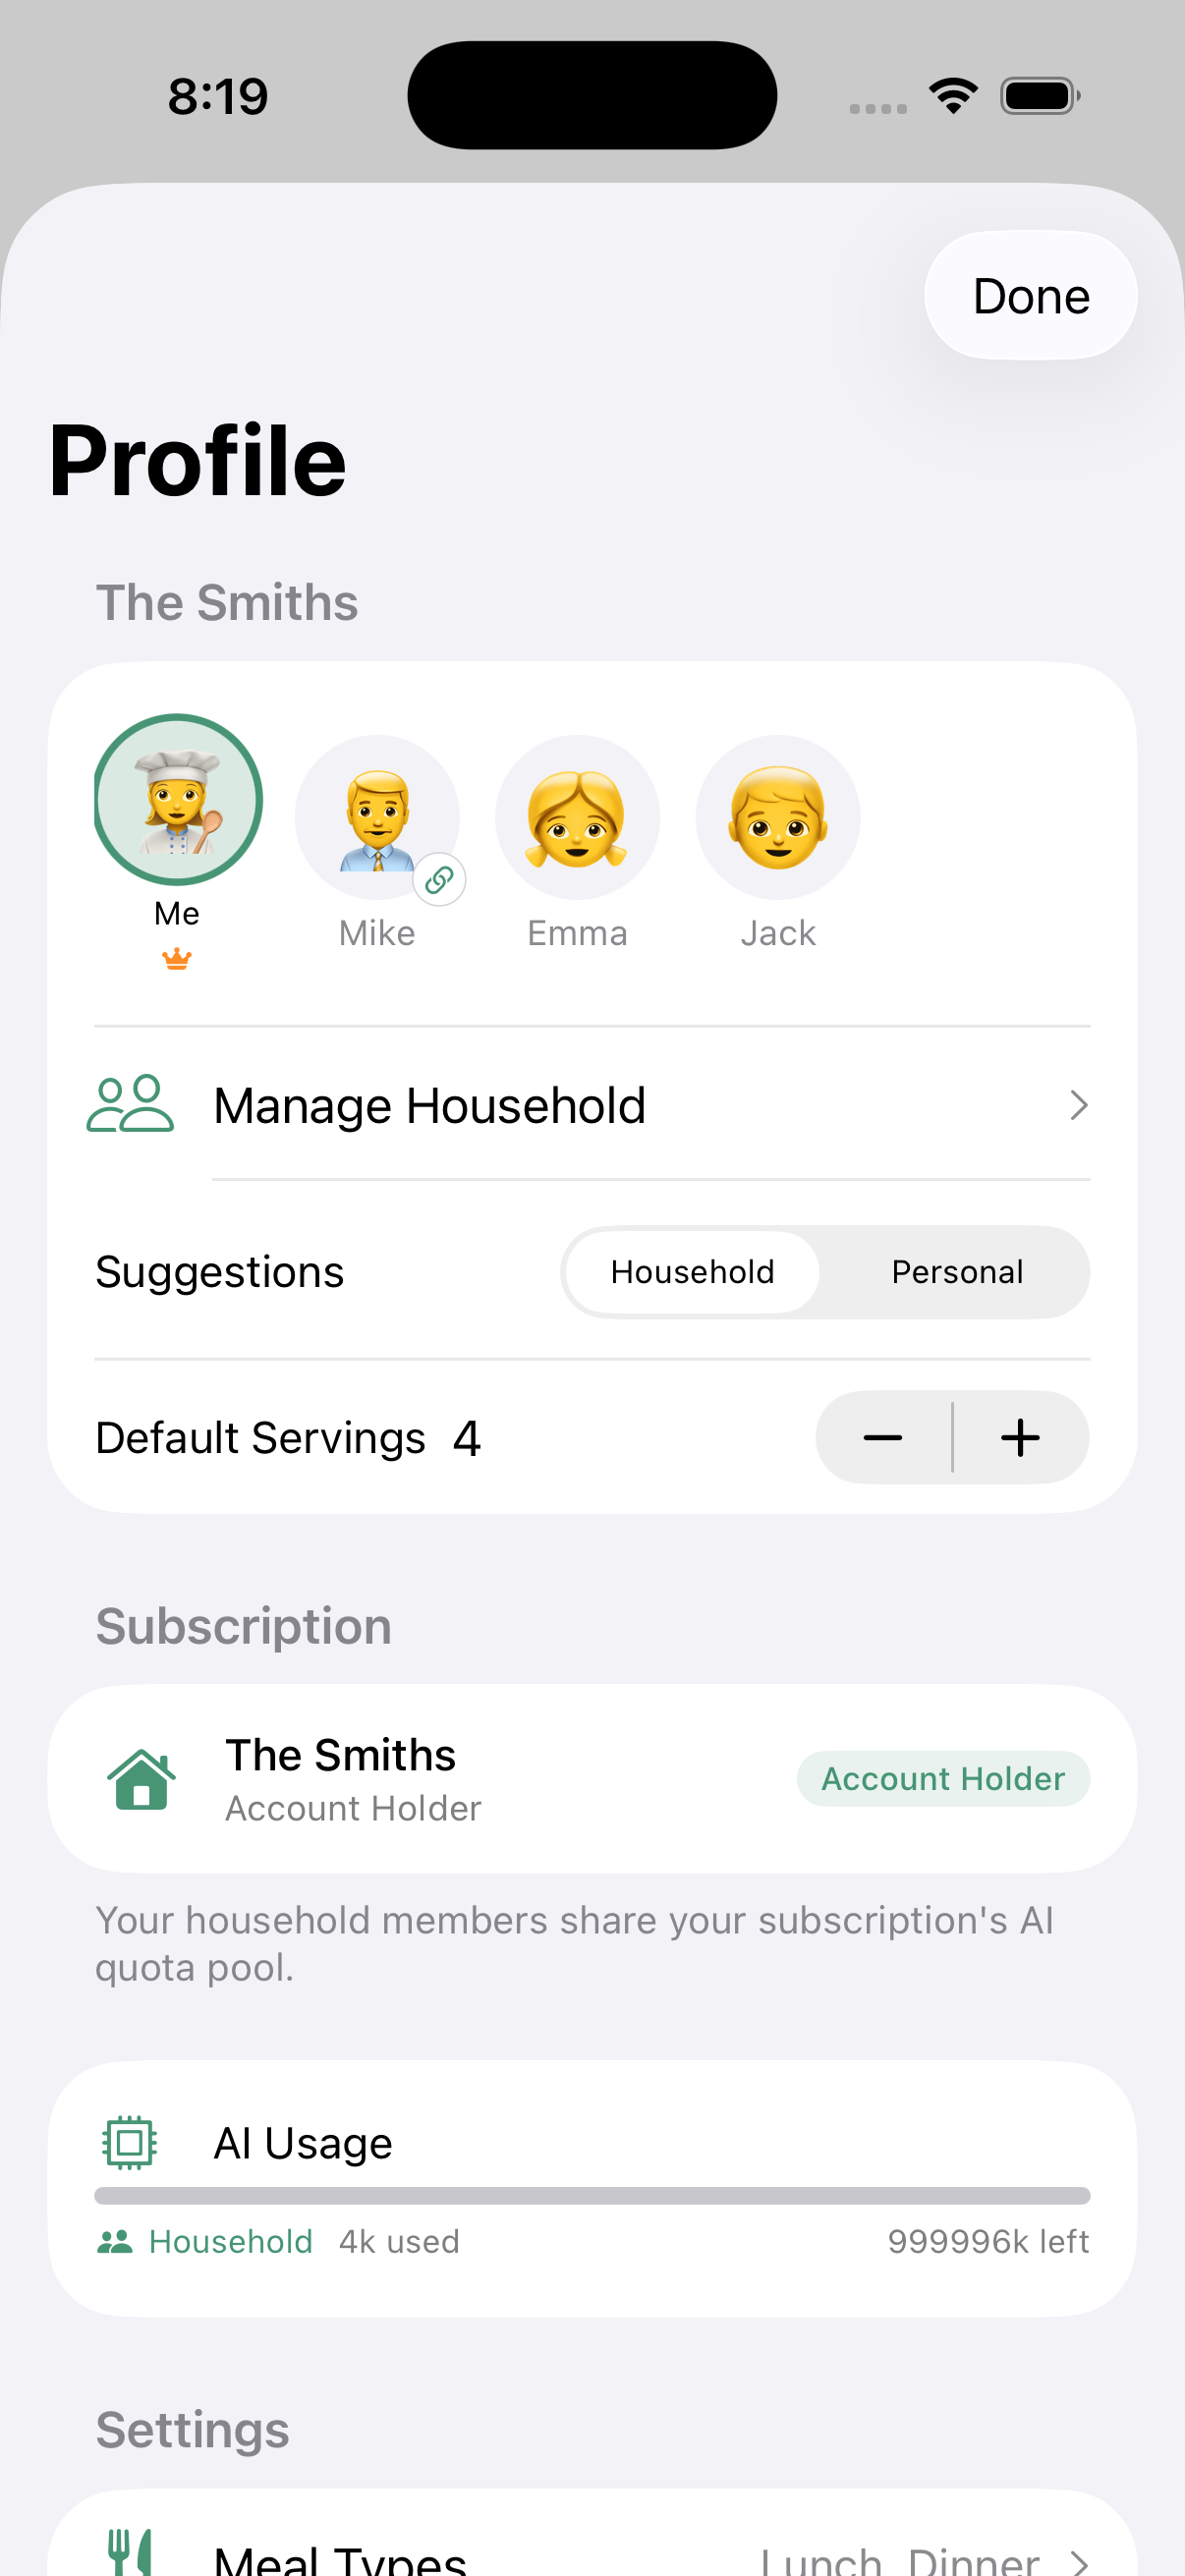
Creating a Household
Go to your Profile and tap Create Household. Give it a name (like "The Smiths") and you're the owner.
Inviting Members
Tap Invite Someone in Manage Household to generate a 6-character invite code. Share it with family members via text message — they'll get a link they can tap to join directly. Each tier includes shared user slots: Basic includes 2, Pro includes 4, Premium includes 4. If your household is at capacity for your tier, you'll be invited to upgrade your subscription before generating the code.
Adding People
Family members who don't have their own device (like young children) can be added as a Person profile. Tap Add Person in Manage Household to set their name, dietary preferences, and allergies. Their needs are automatically included when AI plans meals. Adding a Person doesn't use a shared user slot.
Dietary Safety
Each household member has their own dietary profile: allergies, restrictions (vegetarian, gluten-free, etc.), health goals, spice tolerance, and cuisine preferences. When the AI suggests meals, it considers everyone who's eating.
Shared Meal Plans
Your Plan tab shows both personal and shared meals side by side. Shared meals are labeled with a "Shared" badge so you can tell them apart. When you add a meal, it goes to personal or shared based on which family members you've selected in the avatar row at the top. Any household member can see shared meals and mark them as cooked.
Shared Recipes
Found a great recipe? Share it to the household so everyone can access it. Tap the share icon on any recipe detail page.
8. Grocery Lists
Your meal plan automatically generates a consolidated grocery list. No more forgetting ingredients or buying duplicates.
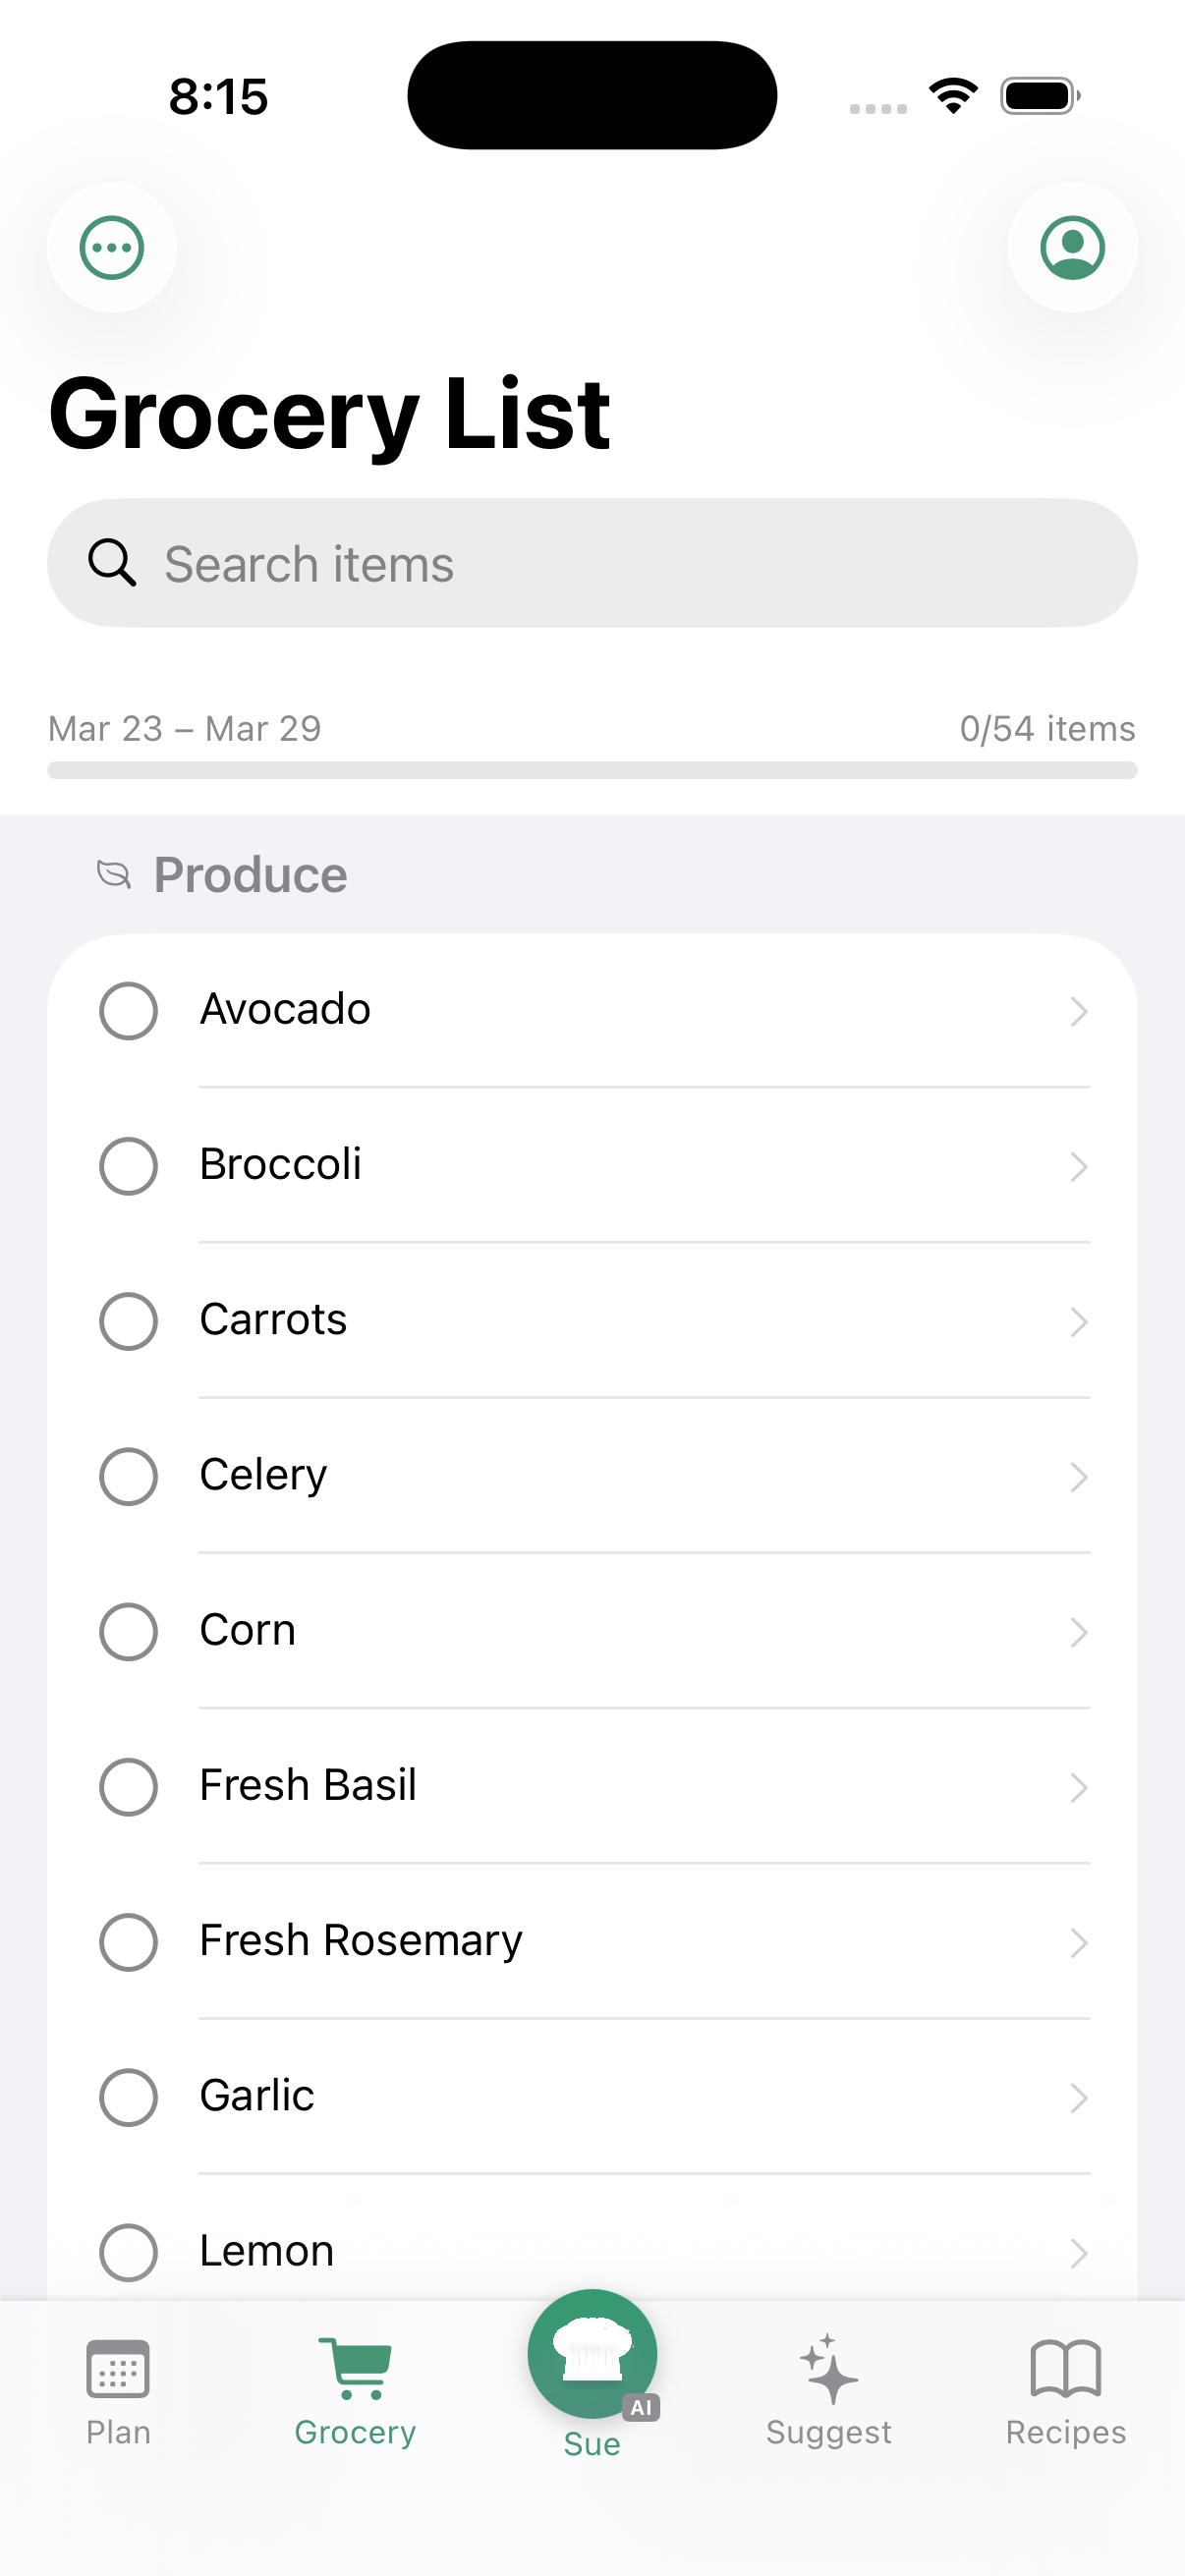
How It Works
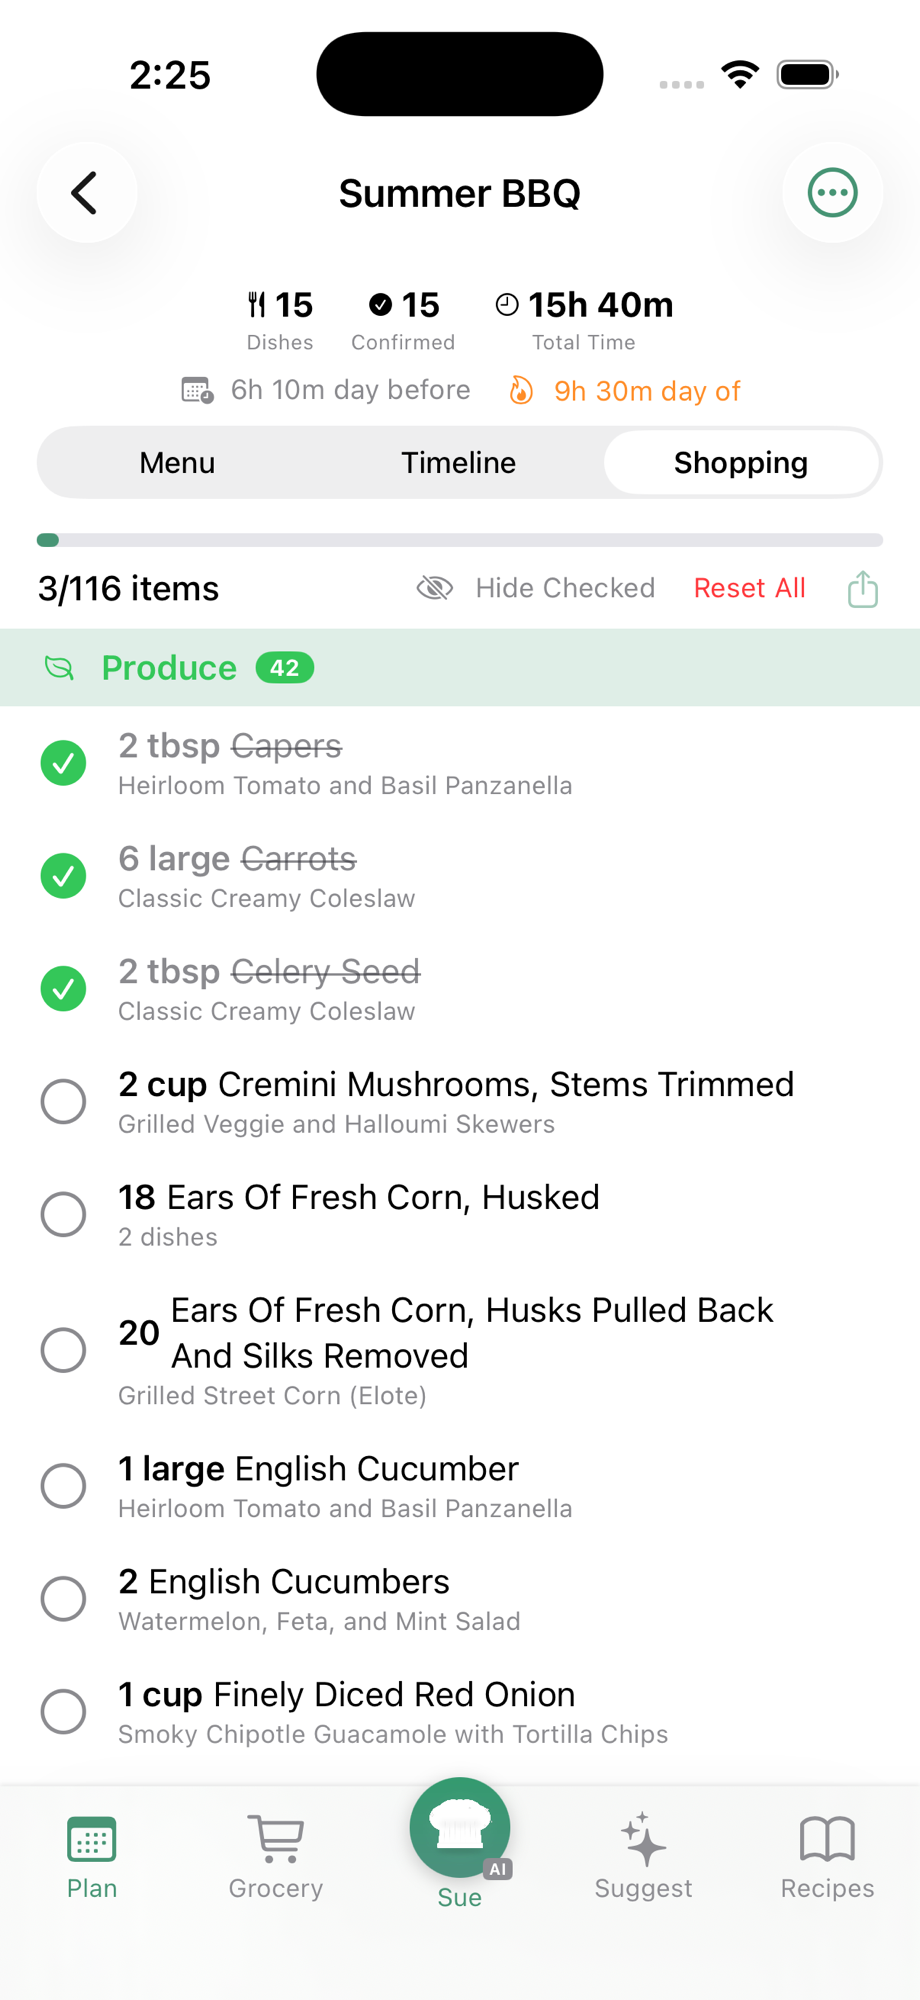
Tableset looks at every recipe in your weekly plan, combines the ingredients, and groups them by category: produce, proteins, dairy, pantry staples, and more. Duplicate ingredients are merged (two recipes that need onions? You'll see the combined amount).
At the Store
Check off items as you shop. In a household, checked items sync so both partners can shop from the same list without doubling up.
Adding Custom Items
Need something that isn't in a recipe? Add items manually to the list.
9. Settings & Account
Tap your profile icon (top right on most screens) to access settings.
Dietary Preferences
Set your allergies, dietary restrictions (vegetarian, vegan, gluten-free, etc.), health goals, foods to avoid, spice tolerance, and cuisine preferences. These apply to AI suggestions and are shared with your household.
Meal Types
Choose which meals to plan for: breakfast, lunch, dinner, and/or snacks. Each day in your plan will show slots for your enabled meal types.
Cooking Time
Set maximum cooking time per meal type. If Mike only has 20 minutes for lunch, AI won't suggest a 2-hour stew.
Appearance
Switch between light and dark mode.
Subscription
View your current plan, upgrade or downgrade, and manage your subscription through Apple's subscription settings.
Delete Account
Scroll to the bottom of your profile to find Delete Account. This permanently removes all your server-side data. Recipes and meal plans stored on your device are not affected.
Getting Help
The App Help chat is always available in your settings, regardless of your subscription status. Ask questions about how to use any feature and get instant guidance.
10. Hosting Events
Hosting a dinner party, holiday meal, or BBQ? Tableset's Hosting Events feature turns the Plan tab into an event-planning toolkit. Build a multi-course menu, assign dishes to guests, get an AI-generated cooking timeline that paces your prep across multiple days, and step through each task with a focused activity view.
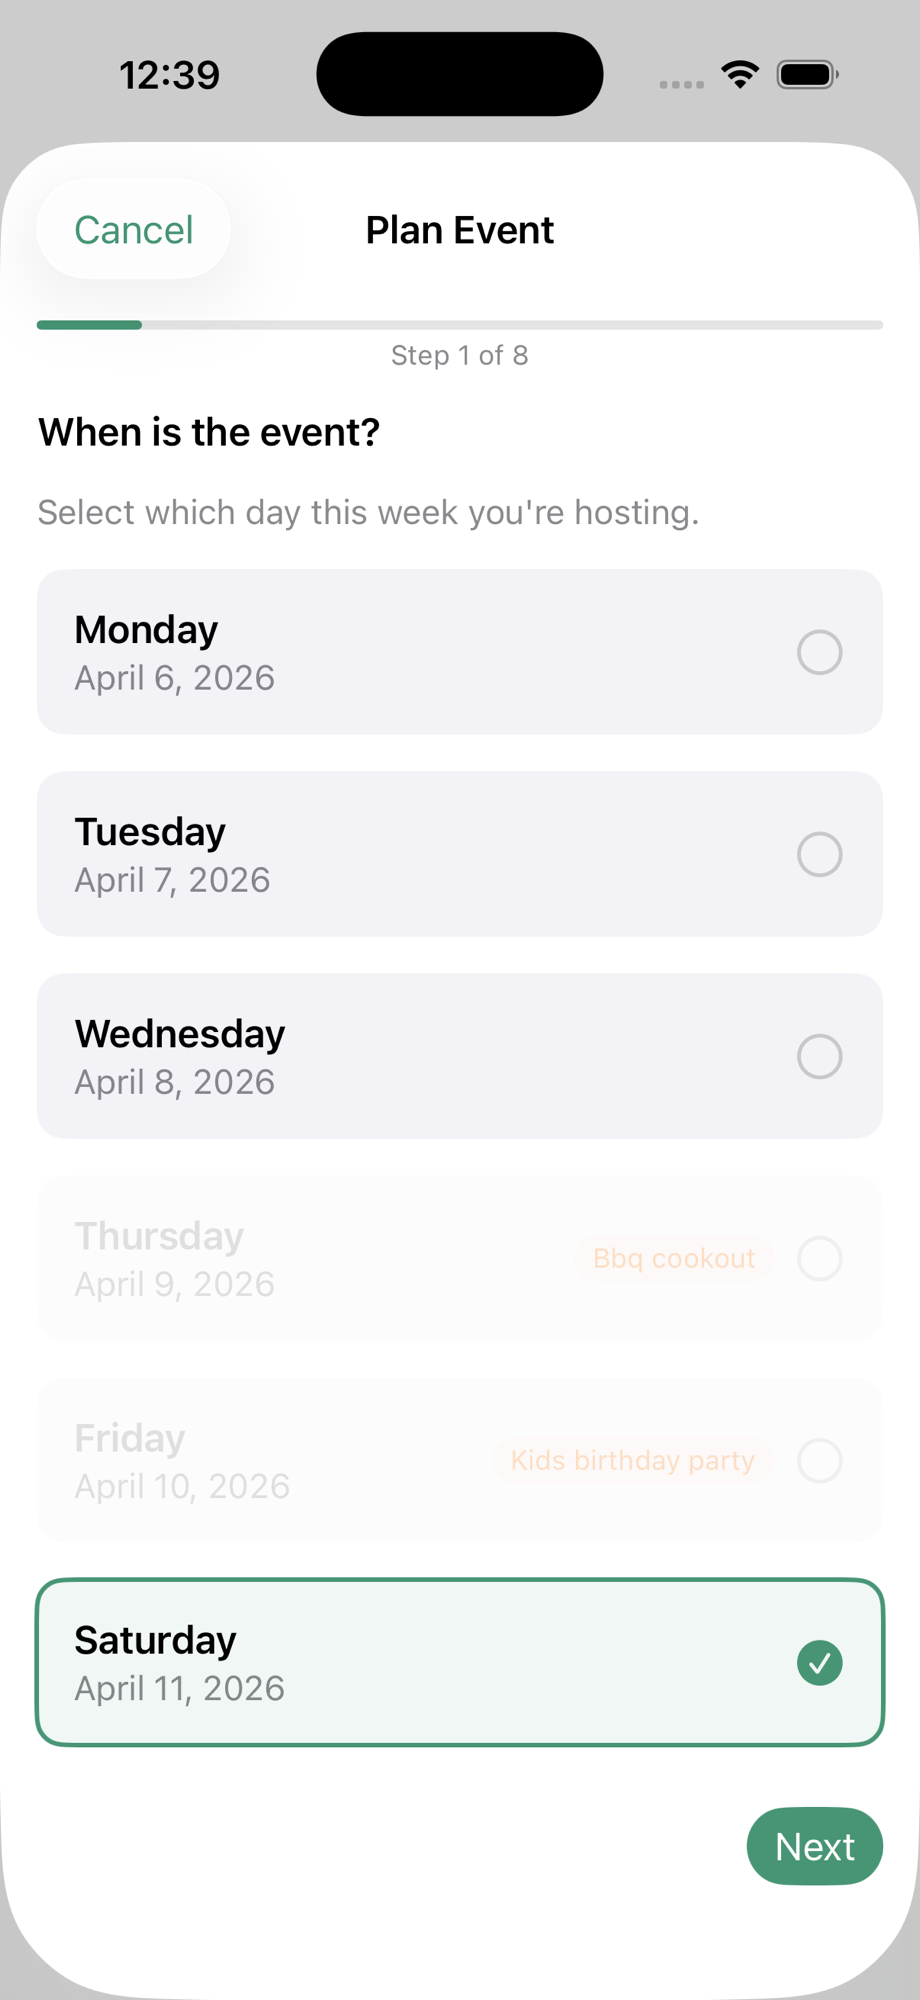
Creating an Event
From the Plan tab, tap the wand icon and choose Plan Event. Tableset walks you through an 8-step setup wizard:
- Pick a Day — Select which day of the week your event is on. Days that already have an event are disabled (one event per day).
- Event Basics — Name (e.g., "Easter Dinner"), guest count, and event start time.
- Menu Categories — Choose which courses you want (Mains, Appetizers, Sides, Salads, Desserts, Drinks).
- Dietary & Allergies — Set guest-specific dietary needs and allergies. These are event-only and separate from your personal profile, so you can accommodate guests without changing your household defaults.
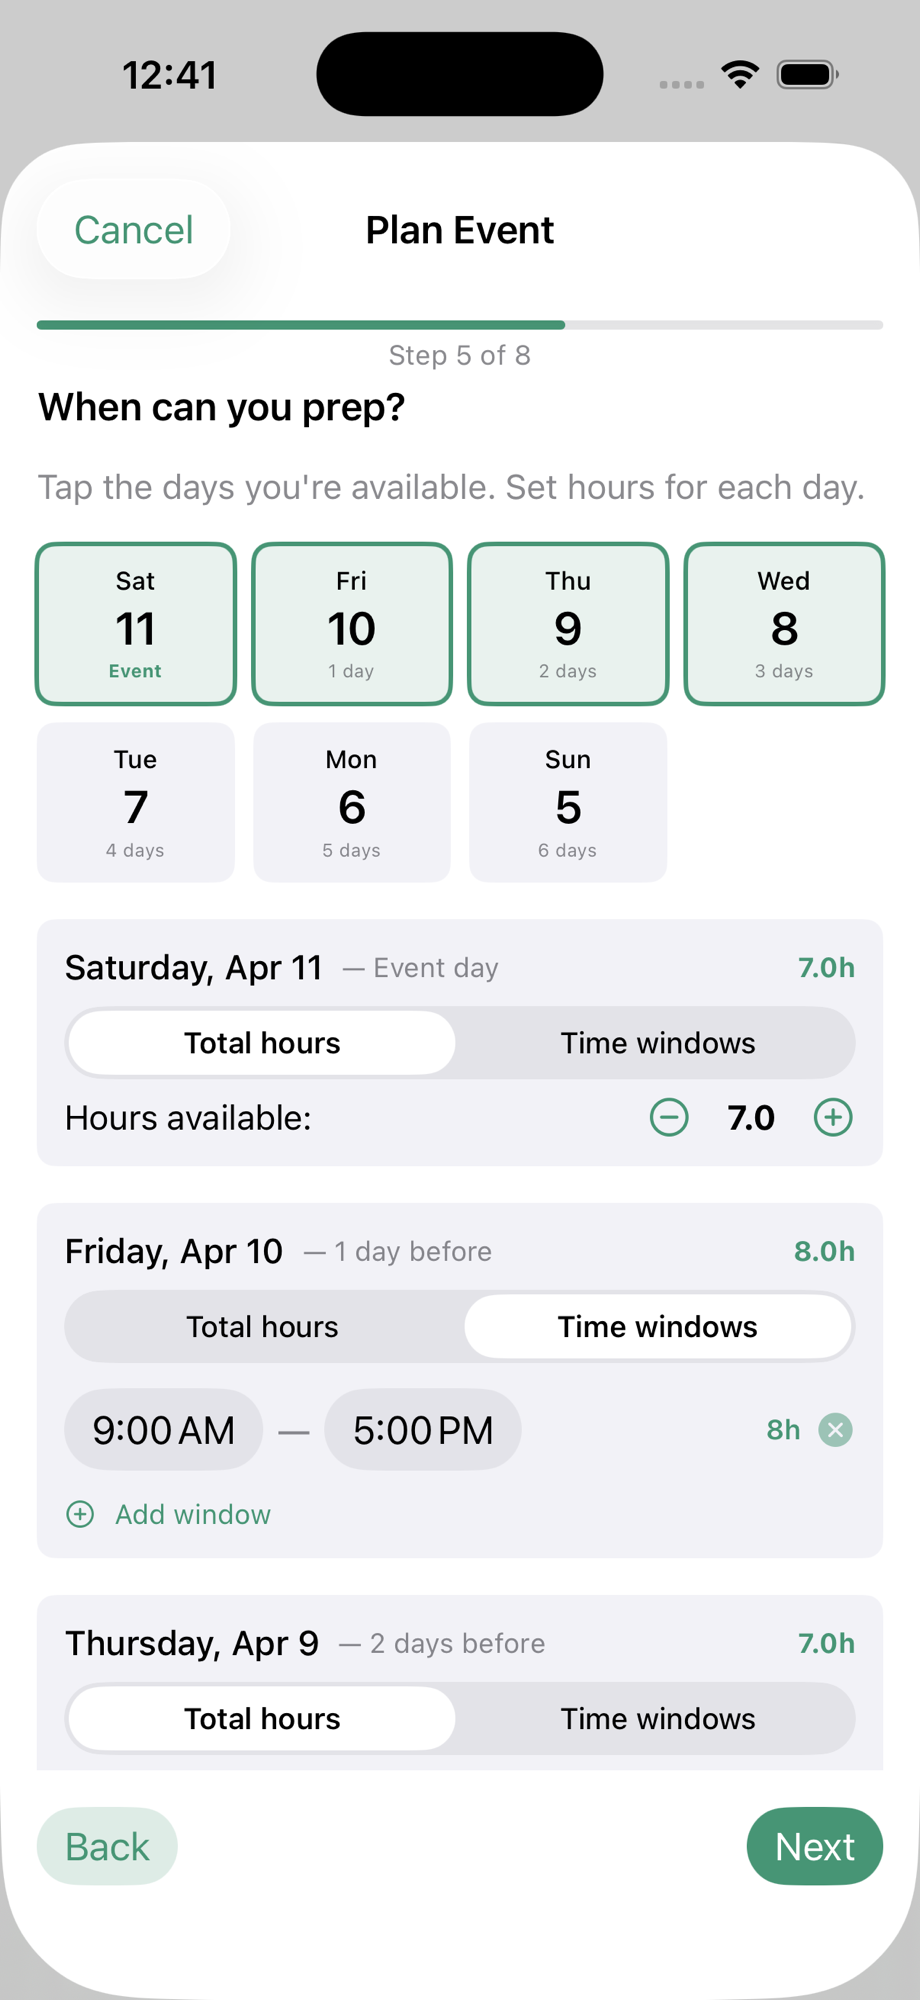
- Prep Availability — A calendar shows the days leading up to the event. Tap to mark which days you'll prep. For each selected day, choose total hours (with a stepper) or specific time windows (with start/end pickers that auto-sum to total hours). The event day is always selected.
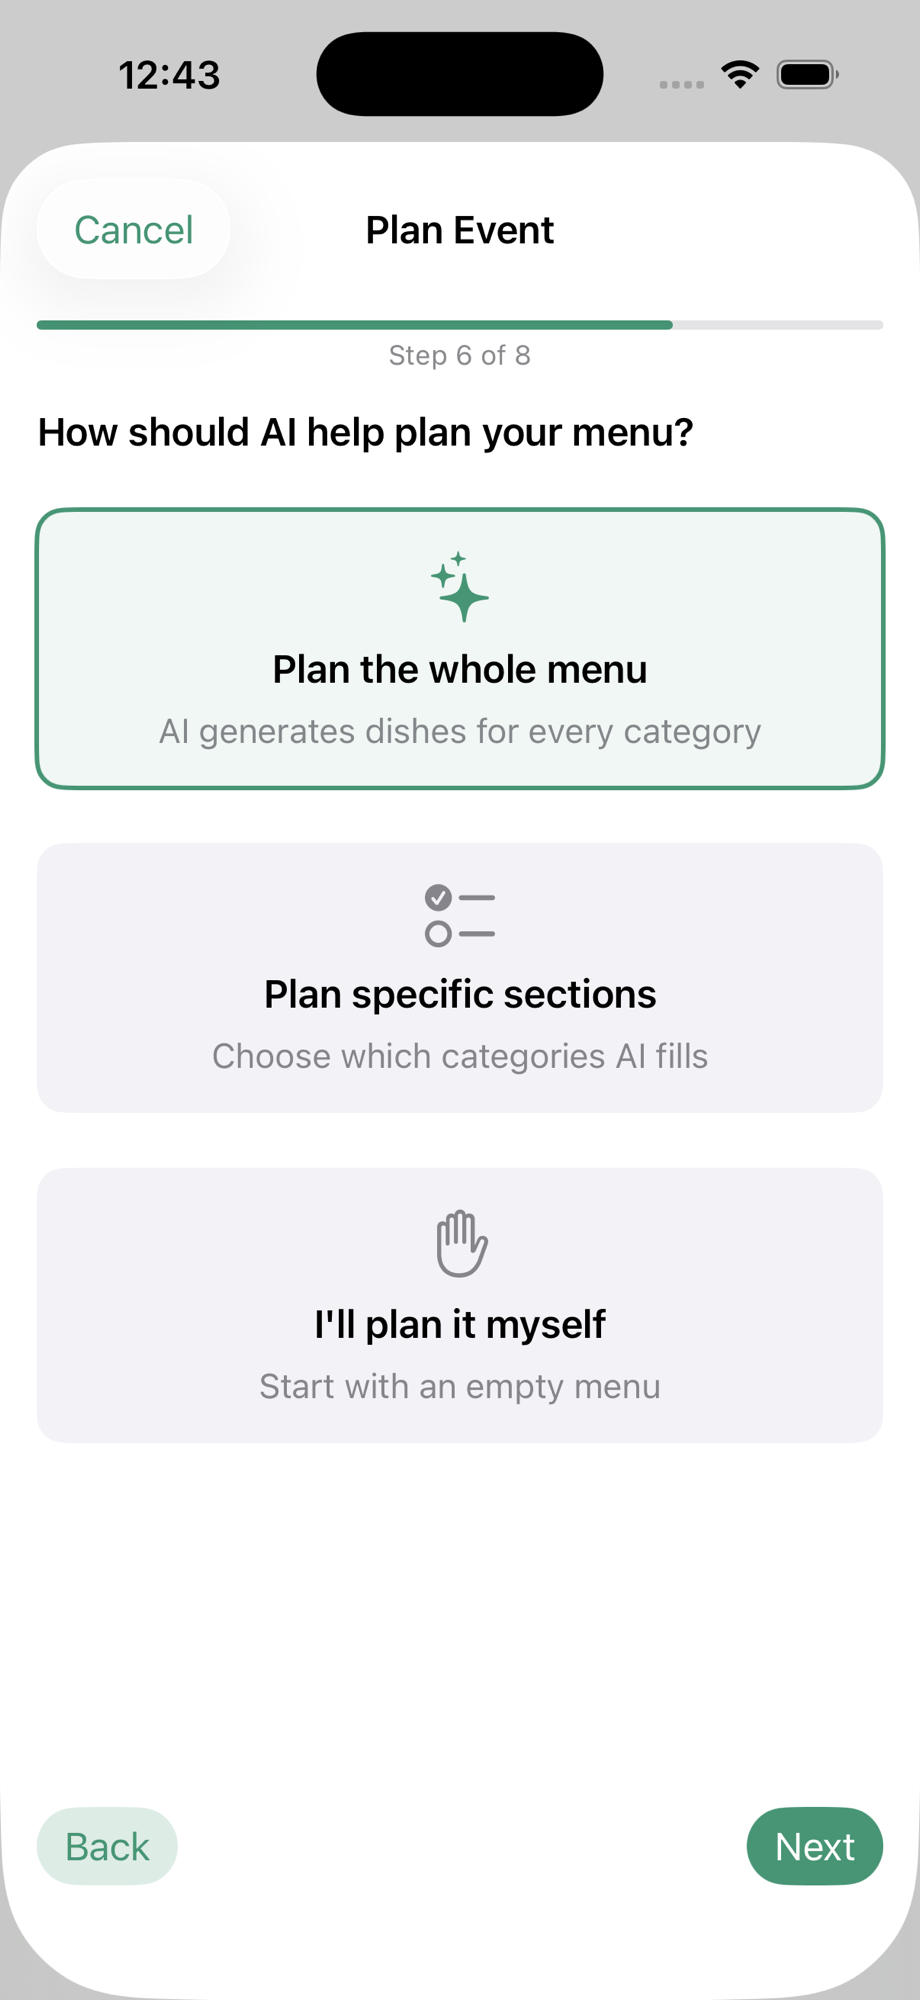
- AI Planning Scope — Pick "Plan whole menu" (AI fills every category), "Plan specific sections" (AI fills only the categories you check), or "I'll plan it myself" (manual only).
- Special Requests — Free-text field for any extra context for the AI, like "cold-serve only", "spring produce", or "make-ahead friendly".
- Contributors — Add household members and external guests who'll bring dishes. Each gets an emoji avatar.
The Event View
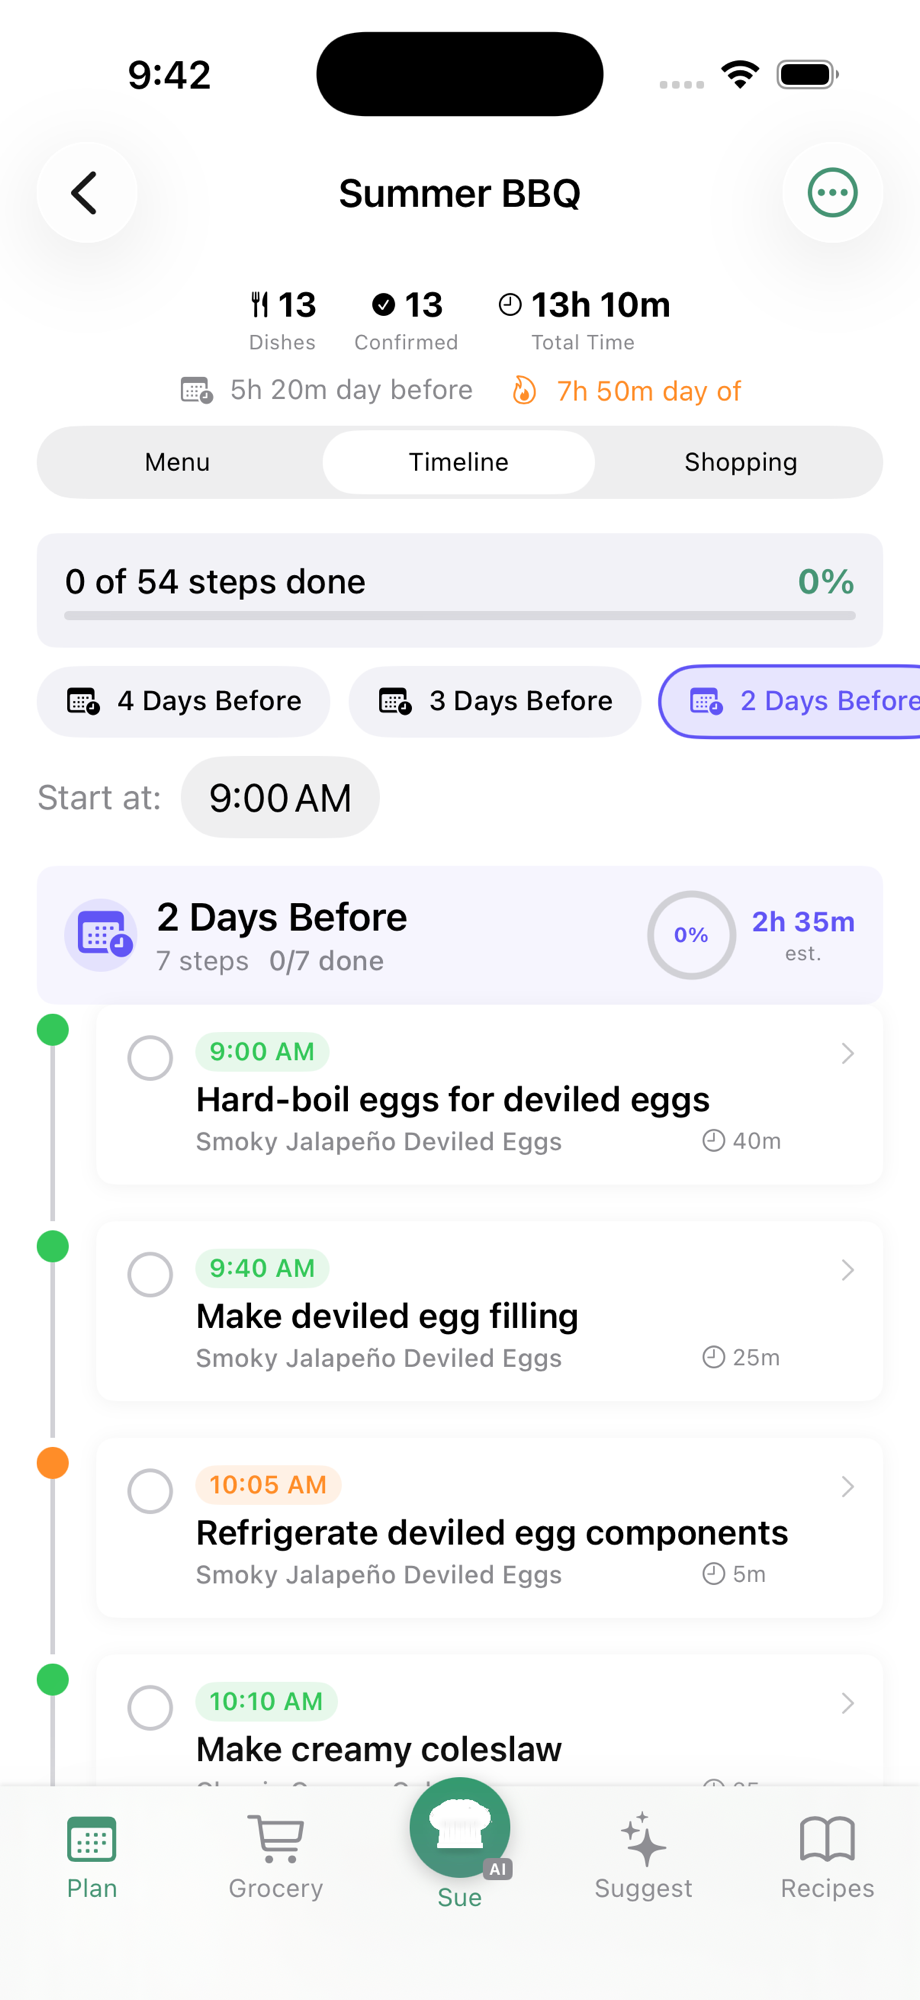
Once created, the event opens in a 3-tab view:
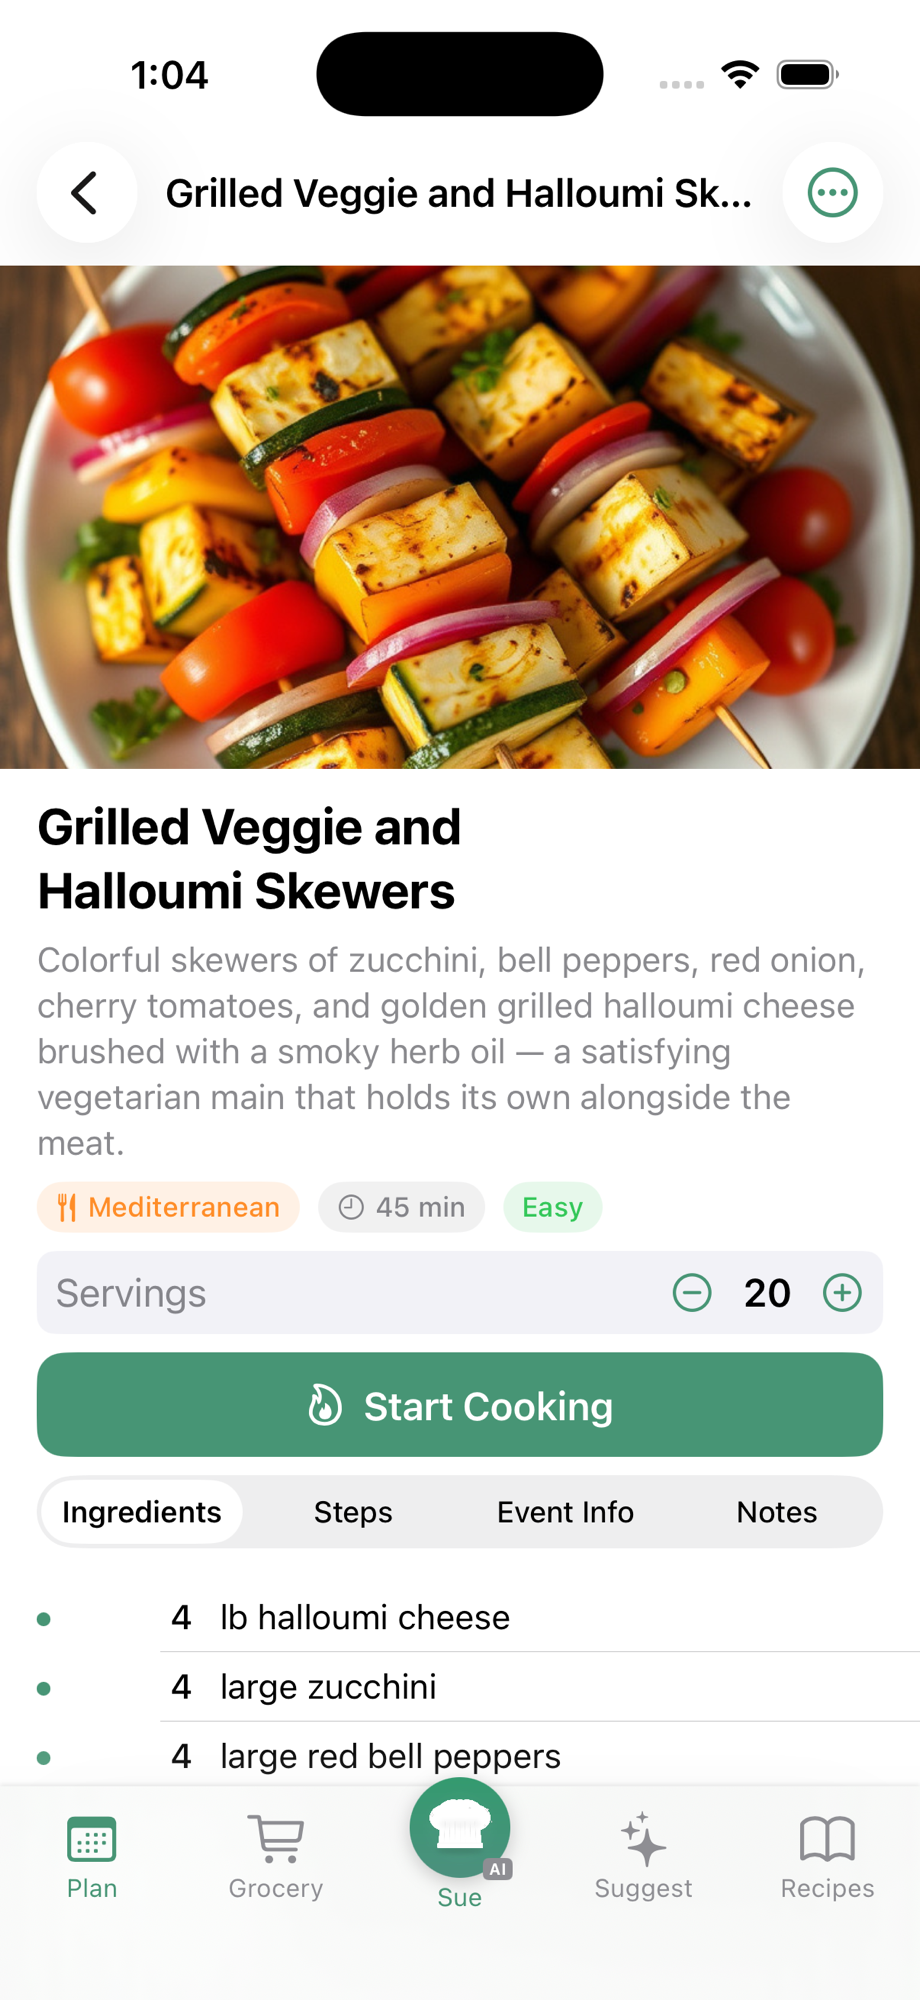
- Menu — Categories with their dishes. Each dish card shows a recipe image, name, cuisine/time/difficulty badges, and prep timing. Tap a dish for full details.
- Timeline — A multi-day cooking schedule (filled in by tapping Generate Timeline).
- Shopping — Auto-generated grocery list aggregated across all dishes.
The header stats show: total dishes, confirmed count, potential count, draft count, and total prep + day-of time.
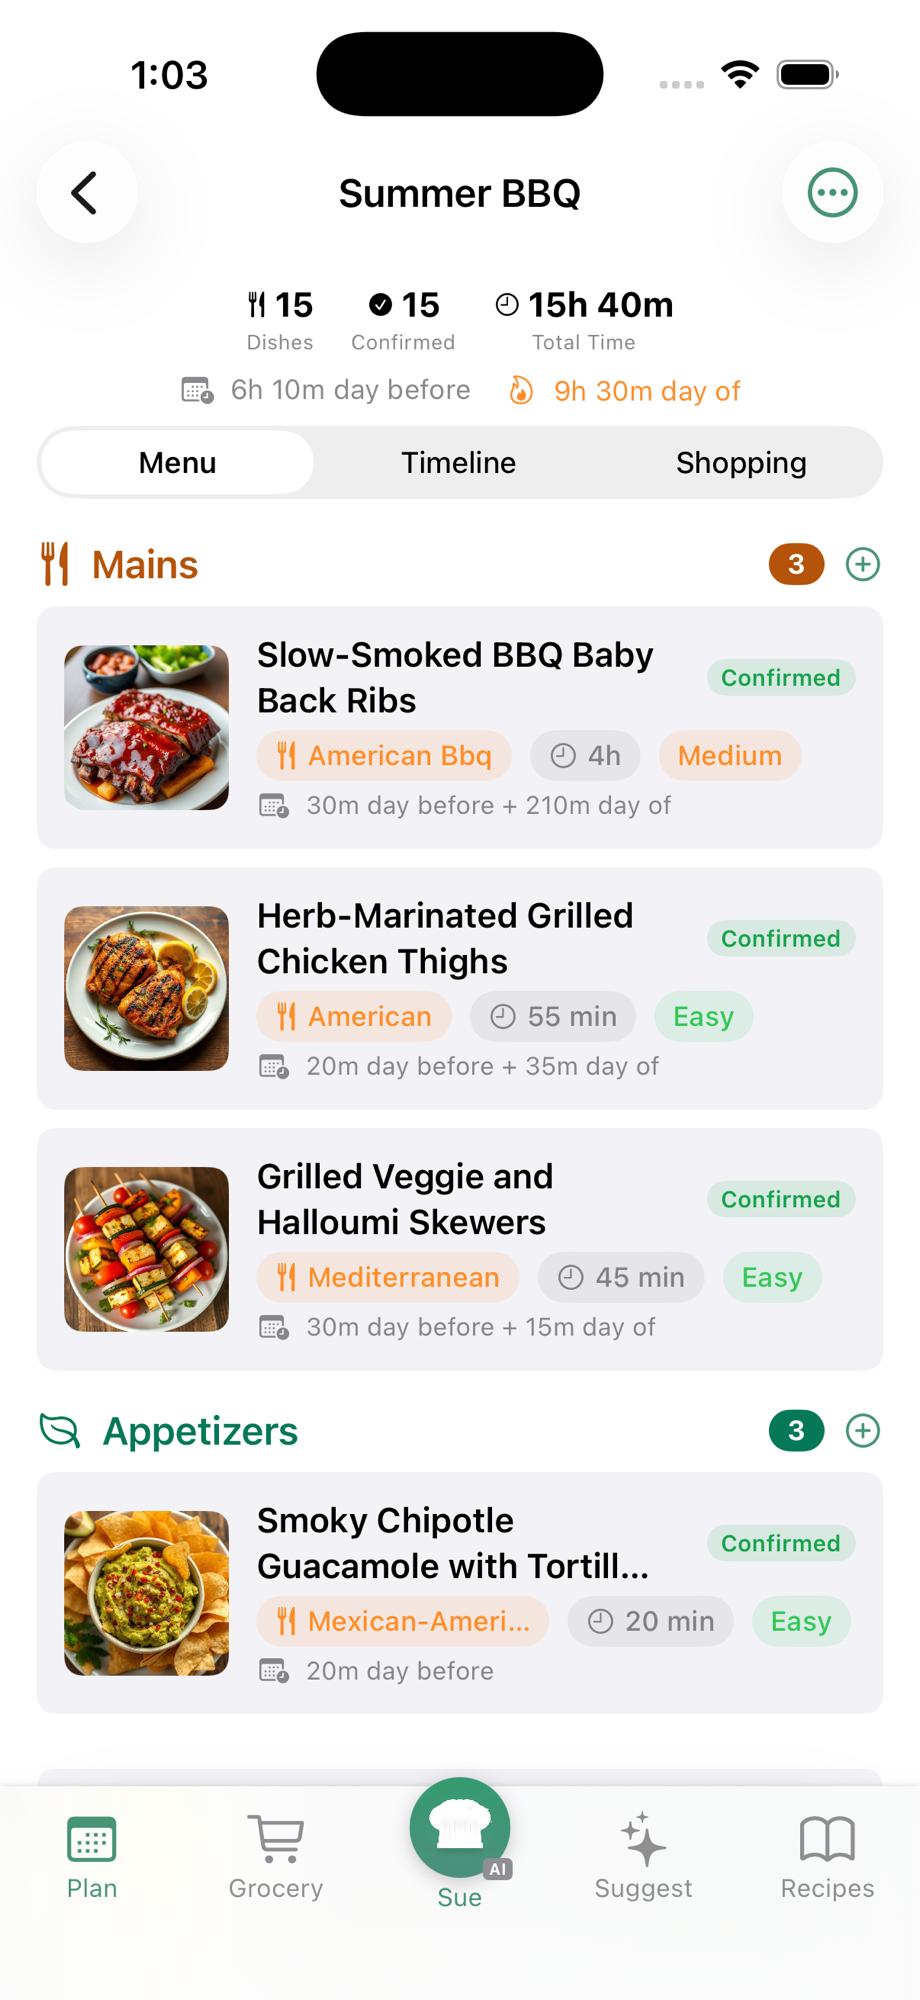
Dish Status
Every dish has one of three statuses to help you keep ideas separate from commitments:
- Confirmed (green) — "Making this for sure". Counted in timeline and shopping.
- Potential (amber) — "Likely making, still deciding". Counted in timeline and shopping.
- Draft (gray) — "Just an idea". Not counted in timeline or shopping until you upgrade it to Potential or Confirmed.
You can also mark a dish as Must-make — a star priority flag so showstopper dishes stand out at a glance.
Adding Dishes
Add dishes from the + Add Dish menu (or the + on each category):
- AI Suggest for [Category] — AI generates dish ideas for that category that fit your event's dietary needs.
- From My Recipes — Pick from your saved Tableset recipes.
- Custom Dish — Manual entry with title, notes, status, and contributor.
- Ask Sue — Open Sue chat with full event context to brainstorm.
Long-press any dish card to delete it.
Contributors
Who's bringing what? Add household members and external guests through the wizard or the event's ⋯ menu → Contributors. Assign each dish to a contributor — the avatar shows on the dish card.
Cooking Timeline
After your menu is set, tap Timeline → Generate Timeline (or use the ⋯ menu → Regenerate Timeline if you've added or removed dishes). A progress bar shows the generation status as the AI builds your schedule. The result is a multi-day schedule that:
- Spreads work across the prep days you selected
- Schedules things like marinades and overnight chilling for the right day
- Respects oven constraints (no two oven dishes at once)
- Includes resting and cooling time
- Shows active cooking time per phase — passive waits like refrigeration don't inflate the displayed hours
- Respects your daily time budget — active work stays within the hours you said you're available
- Ends each dish on event day with a serving step
Each phase (e.g., "2 Days Before", "1 Day Before", "Day Of") shows as a tappable pill at the top. Within a phase you'll see:
- A "Start at:" time picker — set when you'll begin prep that day, and every step's clock time updates automatically.
- A vertical timeline of steps with a colored dot, checkbox, computed clock time (e.g., "9:30 AM"), task title, dish name, and duration.
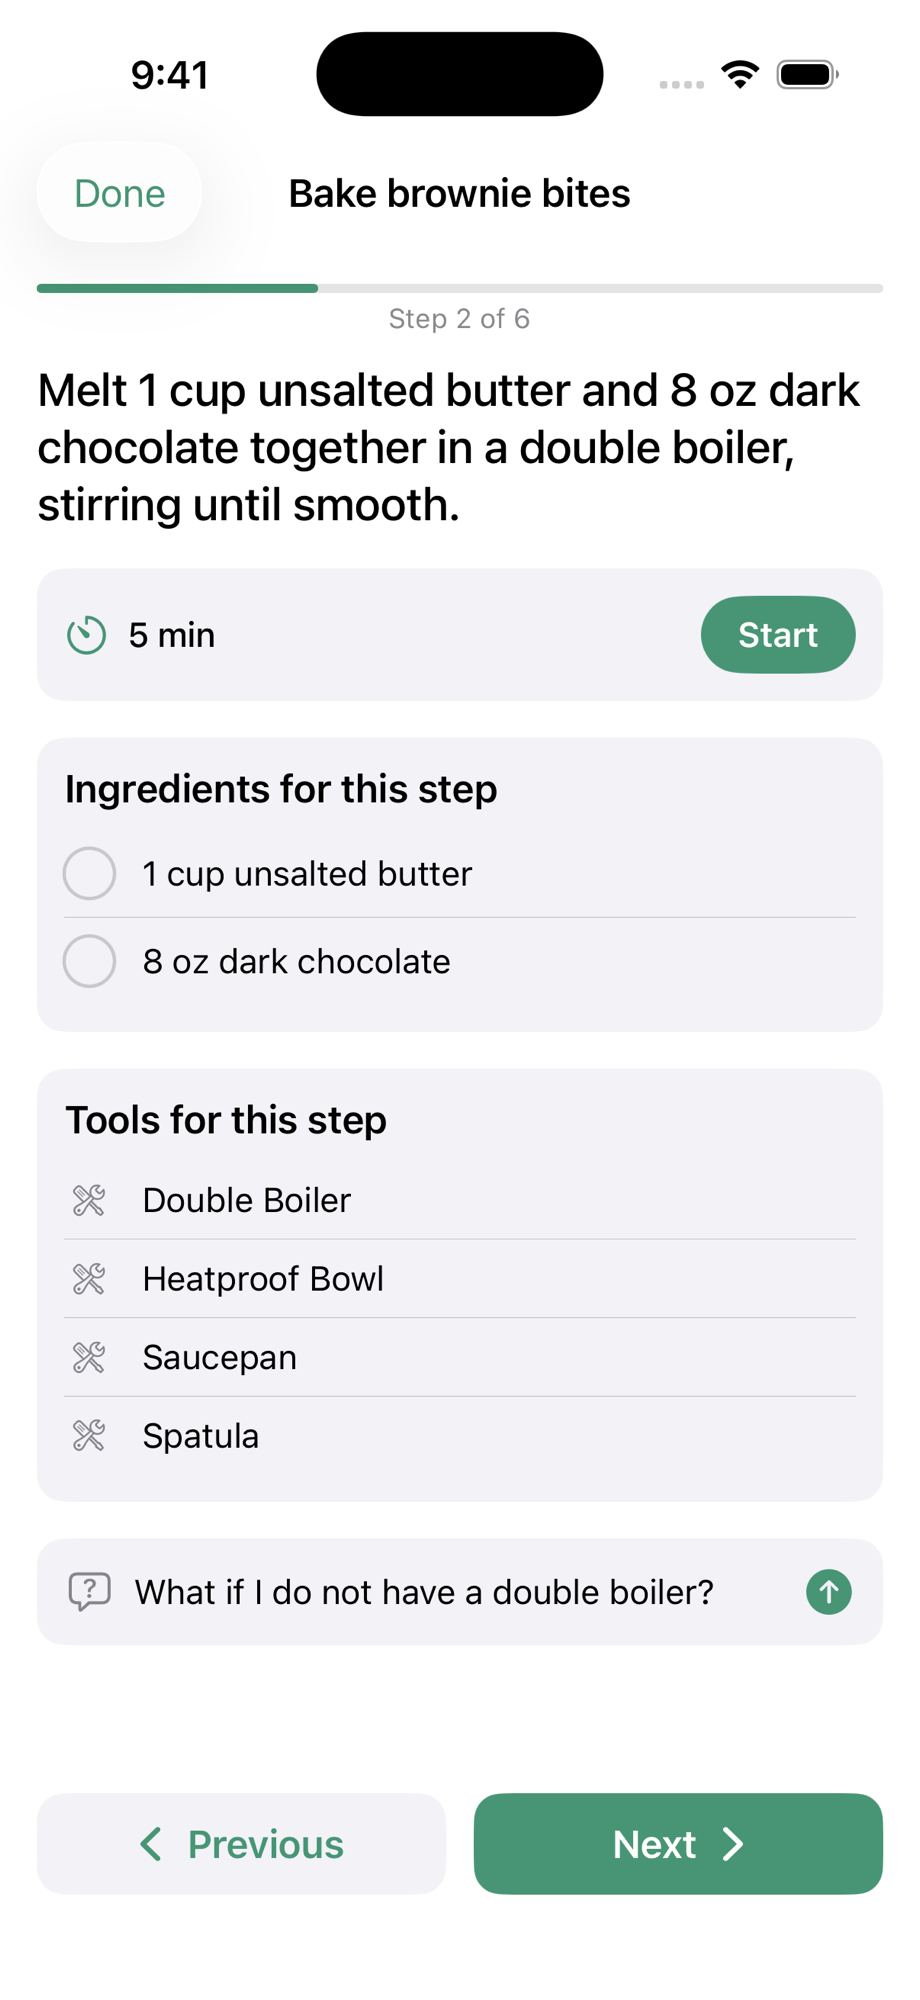
The Activity View
Tap any timeline step to see a summary, then tap Start Activity for a focused cooking experience just like our regular Cooking Mode — but for that one step. The activity view paginates through the step's micro-actions (e.g., "Preheat oven", "Whisk dry ingredients", "Combine and pour", "Bake until done"), showing only:
- The instruction for the current micro-step
- A timer for that micro-step (if needed)
- Only the ingredients used in that micro-step — no noise from the rest of the recipe
- Tools needed — what equipment to grab for this specific step
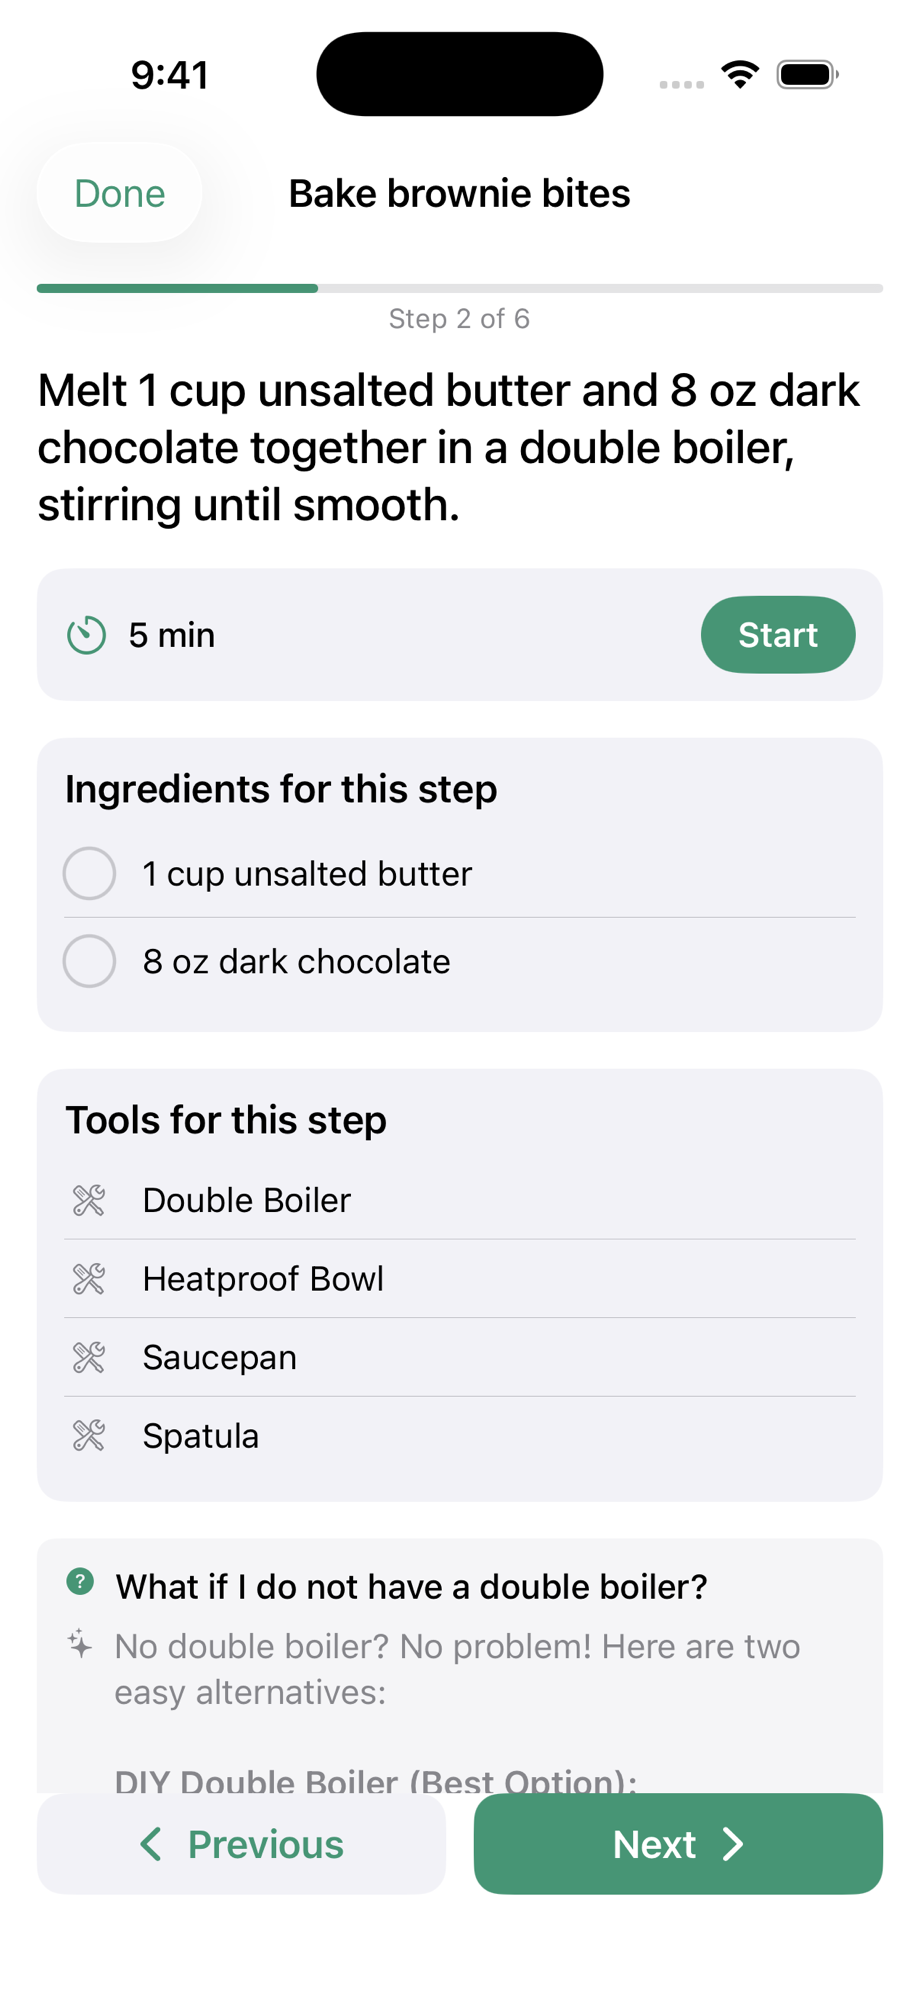
- Ask about this step — type a question and get an instant AI answer, just like in regular Cooking Mode
Swipe between micro-steps with Previous and Next. Each micro-step shows only its own ingredients and tools. The Finish button on the last micro-step marks the whole timeline step complete.
Shopping List
The Shopping tab aggregates ingredients from every Confirmed and Potential dish. Drafts are excluded until you upgrade them.
Sue Knows About Your Event
When you're inside an event or a timeline step, Sue automatically knows the event details — dishes, contributors, prep schedule, and the specific step you're looking at. Ask her things like "What sides go with this?", "Help me plan the prep schedule", or "Explain this step" and she'll answer with full context.
Works for any kind of gathering: dinner parties, holiday meals, birthday parties, brunches, cookouts, potlucks, baby showers, game day spreads, or anything else where you're feeding a group.
11. Support
We're a small team and we read every message. Got a question, a bug to report, or a feature idea? Email us at support@tableset.io.
What helps us help you:
- Your build number — tap the version row at the bottom of the Profile tab. Looks like "Version 1.0.1 (build 96)".
- What you were doing when the issue happened.
- A screenshot if something looked off — iPhone screenshots take ~1 second (press the side button + volume up at the same time).
Response time: We aim to reply within 24 hours, often sooner. Weekends may take a little longer.
That's everything! Thanks for cooking with Tableset.